
Operating instructions


ÊSetting Procedures
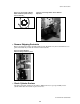
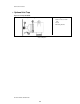
See FIGURE 1 during the following procedures:
1. With the machine near the final location, unbolt the shipping
skids. Observing all precautions, lift the machine off its
skids and lower the machine onto temporary blockings as
shown in FIGURE 1. Install anchor bolts, taking care to
align the bolts with the base plates to avoid bolt thread
damage.
2. Determine that the minimum clearance between each
base plate and floor surface is as specified (see dimen-
sional drawings). Shim the machine at temporary block-
ings to level the machine from left to right and front to
back. Use a carpenter’s level along the right and left side
of the base to determine if the machine is level from front
to back. Place a level laterally across the base plates to de-
termine if the machine is level from right to left.
NOTE: Do not pull on conduit when moving the machine.
Tampering with the conduit may require adjustment of the
door switch.
MACHINE DAMAGE AND MALFUNCTION HAZARDS—Tightening anchor bolt fasteners
onto spacers (without grout or with improperly applied grout) twists the machine frame and
causes cylinder misalignment.
☞ Never tighten anchor bolt fasteners before grouting.
☞ Grout must displace total clearance between base plate and existing foundation floor.
Voids must not exist!
3. After determining the final position of the machine, apply grout between the existing foundation floor and
base plates, while observing the following considerations:
• All machines are designed to be grouted under the full area of all base plates. Grout prevents the anchor
bolts from distorting the frame when the fasteners are tightened. Total area under each base plate must be
completely filled with grout (see dimensional drawings). Voids under base plates can magnify vibration,
causing unsatisfactory operation. Use only industrial strength non-shrinking grout.
• If the grout (after mixing) is of proper consistency, pack or trowel it by hand.
• If the grout (after mixing) is too thin (causing it to flow from under the base pads), install temporary
cardboard framing around the pads to retain the grout until it cures.
4. After the grout has completely cured, raise the machine sufficiently to remove all temporary blocking and
shims. Be careful to avoid disturbing or damaging grout.
5. Tighten all foundation fasteners until they contact the top of the base plate. Center bolt holes are located in-
side rear console. Install center hold down bolts properly to ensure successful operation.
6. Tighten all fasteners evenly, using only one-quarter turn on each fastener before moving to the next one.
While tightening, frequently skip from front to back and right to left to insure uniform tension. After tighten-
ing all fasteners, check each fastener at least twice.
ÎFIGURE 1
(MSIN0703BE)
ÎTemporary Blocking Points
for 30015 and 30022
Cxx, Sxx, Mxx, Txx and
Vxx Machines
28