
User Manual

Page 3 of 4
Made Better In The USA by:
Miltronics Manufacturing, Inc
95 Krif Road
Keene, NH 03431
www.miltronics.com
Home & Drive Alert
TM
Systems
Rev. 4-2-2019
Copyright © 2019 Miltronics Manufacturing, Inc.
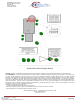
RECEIVER OPERATION AND INSTALLATION: Plug the transformer into a 110-volt, indoor outlet. Stand the
Receiver up or mount it to the wall with the included hook and loop fasteners. Extend the wire antenna straight upward
(For Extended Long Range Model; attach the rigid bayonet mount antenna to the connector on the Receiver). The
Receiver will sound the alert and the Event Diode will illuminate when the sensor is activated and the signal is
received. The alert sound resets itself after five seconds and the Event Diode remains on. Pressing the Reset Button
after an event will shut off the Event Diode. The Alert Tone will continue to alert you with every intrusion. The Alert
Tone Duration is factory pre-set for five seconds. By changing the on board Jumper settings, you can change the tone
duration to 10 seconds or constant on. When in the constant on mode, the Alert Tone and Event Diode can be reset
by pressing the Reset Button. The volume control (Deluxe LR and Deluxe ELR Receivers Only) is used to change the
sound level of the Alert Tone.
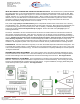
The Long Range and Extended Long Range Receiver Models come equipped with an accessory jack for the easy
addition of accessories (sold separately), adding to the versatility of the Deluxe systems. Carefully align and plug your
Accessory plug into the jack on the Receiver and ensure you feel two “clicks” indicating proper engagement. The
accessory output supports 12-volt DC accessories with a maximum current draw of 300-mAmp.
In unobstructed space, the reception range can reach up to 1,500 feet (up to 2,500 feet for Extended Long Range
models). Range may be reduced by certain obstructions such as; metal buildings, dense woods, brick walls, etc. For
maximum range, locate the receiver in an area in your home with some direct visibility to the sensor. In order to
minimize interference, it may be necessary to plug the Home & Drive Alert
TM
Receiver into an electrical circuit with no
other operating appliances. Hard-wired Sensor Transmitters and Receivers are available when transmission is not
possible or practical.
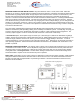
RECEIVER CODING ADJUSTMENT: The system coding is factory pre-set and should be adjusted only in the event
of interference from another source. Prior to adjustment, unplug the 110-volt transformer from the power outlet and
disconnect power cord from the Receiver. Remove the volume control knob and cover to access the Five Position
Coding DIP Switch. See diagram below. The DIP-Switch settings in the Receiver must match the settings in the
Sensor/Transmitter. Replace cover and volume knob prior to operation.
WALK TEST: After setting up your system, perform a "Walk Test” to ensure proper system operation. Walk and drive
through the detection area and have someone listen for the receiver to sound. The Sensor/Transmitter and/or the
Receiver can then easily be repositioned if not performing as desired. See the FCC Statement at the end of this
Manual for more information.