OPERATOR'S MANUAL MANUEL de L'UTILISATEUR MANUAL del OPERADOR Catalog No. No de Cat. Catálogo No. 0100-20 0101-20 0200-20 0201-20 0202-20 0299-20 0300-20 0301-20 0302-20 HEAVY-DUTY DRILLS EXTRA ROBUSTES PERCEUSES TALADROS PARA SERVICIO PESADO TO REDUCE THE RISK OF INJURY, USER MUST READ AND UNDERSTAND OPERATOR'S MANUAL. AFIN DE RÉDUIRE LE RISQUE DE BLESSURES, L'UTILISATEUR DOIT LIRE ET BIEN COMPRENDRE LE MANUEL DE L'UTILISATEUR.
GENERAL SAFETY RULES WARNING! READ AND UNDERSTAND ALL INSTRUCTIONS Failure to follow all instructions listed below, may result in electric shock, fire and/or serious personal injury. SAVE THESE INSTRUCTIONS the plug in any way. Double insulation eliminates the need for the three wire grounded power cord and grounded power supply system. WORK AREA 1. 2. 3. Keep your work area clean and well lit. Cluttered benches and dark areas invite accidents.
12. Avoid accidental starting. Be sure switch is off before plugging in. Carrying tools with your finger on the switch or plugging in tools with the switch on invites accidents. 13. Remove adjusting keys or wrenches before turning the tool on. A wrench or a key that is left attached to a rotating part of the tool may result in personal injury. 14. Do not overreach. Keep proper footing and balance at all times. Proper footing and balance enables better control of the tool in unexpected situations. 22.
GROUNDING EXTENSION CORDS The grounding prong in the plug is connected through the green wire inside the cord to the grounding system in the tool. The green wire in the cord must be the only wire connected to the tool's grounding system and must never be attached to an electrically “live” terminal. WARNING! Improperly connecting the grounding wire can result in the risk of electric shock. Check with a qualified electrician if you are in doubt as to whether the outlet is properly grounded.
FUNCTIONAL DESCRIPTION TOOL ASSEMBLY 2 WARNING! WARNING! To reduce the risk of injury, always unplug tool before attaching or removing accessories or making adjustments. Use only specifically recommended accessories. Others may be hazardous. 3 To reduce the risk of injury, always use a side handle when using this tool. Always brace and hold securely. Adjusting the Side Handle (Fig. 2) (Cat. No. 0200-20, 0202-20, 0299-20, 0300-20, 0301-20, 0302-20) ® 4 1 Removing and Replacing Quik-Lok Cords (Fig.
Be sure the bit shank and chuck jaws are clean. Dirt particles may prevent the bit from lining up properly. CHUCK IDENTIFICATION Chuck Type Drill Cat. No. 2. 0100-20 0101-20 0200-20 0299-20 0300-20 0301-20 Keyed Double sleeve Keyless 0201-20 Single sleeve Keyless 0202-20 0302-20 When using screwdriver bits, insert the bit far enough for the chuck jaws to grip the bit shank. Tighten the chuck jaws by hand to align the bit.
OPERATION Starting, Stopping and Controlling Speed To reduce the risk of injury, wear safety goggles or glasses with side shields. Unplug the tool before changing accessories or making adjustments. Using Forward/Reverse Switch (Fig. 10) Forward 2.
Typical Bracing Methods Driving Screws When driving screws, use the proper screwdriver bit for your job. After drilling pilot and shank holes, start the screw slowly and increase the speed as driving progresses. Set the screw by slowing to a stop. Do not run screws down at excessive speeds. To remove screws, reverse the motor. Fig. 12 MAINTENANCE Forward rotation WARNING! If the tool seems as if it is about to stall, maintain a firm grip and reduce pressure slightly to allow the bit to regain speed.
ACCESSORIES RÈGLES DE SÉCURITÉ GÉNÉRALES WARNING! AVERTISSEMENT! To reduce the risk of injury, always unplug the tool before attaching or removing accessories. Use only specifically recommended accessories. Others may be hazardous. VOUS DEVEZ LIRE ET COMPRENDRE TOUTES LES INSTRUCTIONS Le non-respect, même partiel, des instructions ci-après entraîne un risque de choc électrique, d'incendie et/ou de blessures graves.
18. N’utilisez pas un outil si son interrupteur est bloqué. Un outil que vous ne pouvez pas commander par son interrupteur est dangereux et doit être réparé. SÉCURITÉ DES PERSONNES 10. Restez alerte, concentrez-vous sur votre travail et faites preuve de jugement. N’utilisez pas un outil électrique si vous êtes fatigué ou sous l’influence de drogues, d’alcool ou de médicaments. Un instant d’inattention suffit pour entraîner des blessures graves. 19.
MISE A LA TERRE AVERTISSEMENT! CORDONS DE RALLONGE La dent de mise à la terre de la fiche est reliée au système de mise à la terre de l’outil via le fil vert du cordon. Le fil vert du cordon doit être le seul fil raccordé à un bout au système de mise à la terre de l’outil et son autre extrémité ne doit jamais être raccordée à une borne sous tension électrique. Si le fil de mise à la terre est incorrectement raccordé, il peut en résulter des risques de choc électrique.
DESCRIPTION FONCTIONNELLE MONTAGE DE L'OUTIL 2 AVERTISSEMENT! Pour minimiser les risques de blessures, débranchez toujours l’outil avant d’y faire des réglages, d’y attacher ou d’en enlever les accessoires. L’usage d’accessoires autres que ceux qui sont spécifiquement recommandés pour cet outil peut comporter des risques. 3 4 1 Mandrin 2. Poignée latérale* 3. Fiche signalétique 4. Bouton de verrouillage 5. Détente 6.
IDENTIFICATION DU MANDRIN Type de mandrin Perceuses No de Cat. 0100-20 0101-20 0200-20 0299-20 0300-20 0301-20 Mandrin à clé Ces outils sont pourvus d’un manchon sans clé à serrage manuel. Débranchez toujours l’outil avant d’installer ou de retirer une mèche. 0201-20 Mandrin à manchon unique sans clé 0202-20 0302-20 Mandrin à clé (Fig. 3) 1. 3.
2. Lorsque vous utilisez une mèche pour percer, insérez-la dans le mandrin. Centrez-la entre les mâchoires et retirez-la d’environ 1,6mm (1/16") du fond du mandrin. Serrez les mâchoires à la main pour aligner la mèche (Fig. 8). MANIEMENT AVERTISSEMENT! AVERTISSEMENT! Pour minimiser les risques de blessures, portez des lunettes à coques latérales. Débranchez l’outil avant de changer les accessoires ou d’effectuer des réglages. Fig.
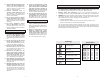
APPLICATIONS Bois No de Cat. T/Min. M è c h e s M è c h e s A m e s à vide d’alésage d’bois scies Boise/Acier Acier M è c h e s Mèches Path- M è c h e s LamesTirehéli.
Fig. 13 Fig. 14 ACCESSOIRES Reaction AVERTISSEMENT! Rotation avant Pour minimiser les risques de blessures, débranchez toujours l’outil avant d’y installer ou d’en enlever les accessoires. L’emploi d’accessoires autres que ceux qui sont expressément recommandés pour cet outil peut présenter des risques.
REGLAS GENERALES DE SEGURIDAD ¡ADVERTENCIA! LEA Y ENTIENDA TODAS LAS INSTRUCCIONES El no seguir las instrucciones a continuación puede ocasionar una descarga eléctrica, incendio y/o lesiones graves. GUARDE ESTAS INSTRUCCIONES más ancha que la otra). Hay una sola manera de introducir este enchufe en una toma polarizada. Si el enchufe no se ajusta completamente en la toma, dé vuelta el enchufe. Si el problema persiste, póngase en contacto con un electricista calificado para que instale una toma polarizada.
TIERRA REGLAS ESPECIFICAS DE SEGURIDAD 1. Sostenga la herramienta por las superficies aisladas cuando realice una operación donde la herramienta cortadora puede entrar en contacto con alambres que no estén visibles o su porpio cordón. Hacer contacto con un alambre con corriente hará que las partes metálicas expuestas de la herramienta también tengan corriente y produzcan una descarga sobre el operador. 2. Guarde las etiquetas y placas de especificaciones. Estas tienen información importante.
EXTENSIONES ELECTRICAS Las herramientas que deben conectarse a tierra cuentan con clavijas de tres patas y requieren que las extensiones que se utilicen con ellas sean también de tres cables. Las herramientas con doble aislamiento y clavijas de dos patas pueden utilizarse indistintamente con extensiones de dos a tres cables. El calibre de la extensión depende de la distancia que exista entre la toma de la corriente y el sitio donde se utilice la herramienta.
ENSAMBLAJE DE LA HERRAMIENTA ¡ADVERTENCIA! IDENTIFICACIÓN DE MANDRIL Tipo de mandril ¡ADVERTENCIA! Para reducir el riesgo de una lesión, desconecte siempre la herramienta antes de fijar o retirar accesorios, o antes de efectuar ajustes. Utilice sólo los accesorios específicamente recomendados. El uso de otros accesorios puede ser peligroso. Para reducir el riesgo de lesiones, use siempre un mango lateral al operar la herramienta. Siempre agarre o sujete la herramienta firmemente.
3. Mandril sin chaveta, de dos manguitos (Fig. 4, 5 y 6) Estas herramientas están equipadas con un mandril sin chaveta, de apriete manual. Desenchufe siempre la herramienta antes de instalar o extraer brocas. 1. Para cerrar las mordazas del mandril, sujete el collar mientras gira el manguito en el sentido de las manecillas del reloj (Fig. 6). Apriete bien. Fig.
OPERACION APPLICACIONES Madera ¡ADVERTENCIA! Cómo accionar, detener y controlar la velocidad Para reducir el riesgo de una lesión, use siempre lentes de seguridad o anteojos con protectores laterales. Desconecte la herramienta antes de cambiar algún accesorio o de hacerle algún ajuste. Cómo utilizar interruptor de avance/ retroceso (Fig. 10) Fig. 10 2. 2. Para detener la unidad, suelte el gatillo. 0100-20 0 - 2 500 38mm (1-1/2") NR NR NR NR 6,4mm (1/4") NR 3.
como bloques de hormigón de escorias, requiere muy poca presión. Materiales duros como el concreto, requieren más presión. Se sabe que se está taladrando a un ritmo adecuado cuando se produce un flujo parejo y suave de polvo. No permita que la broca gire en el orificio sin cortar. No utilice agua para asentar el polvo o enfriar la broca. Ambas acciones ocasionarán daños al carburo. Métodos de apoyo más comunes ¡ADVERTENCIA! Fuerza de rotación elevada.
MANTENIMIENTO ¡ADVERTENCIA! Limpie el polvo y suciedad de las ventilas. Mantenga las empuñaduras de la herramienta limpias, secas y libres de aceite y grasa. Use sólo jabón neutro y un trapo húmedo para limpiar su herramienta ya que algunas substancias y disolventes limpiadores pueden ocasionar daños a materiales plásticos y partes aislantes.
UNITED STATES MILWAUKEE Service To contact the factory SERVICE CENTER or authorized service station nearest you, call 1-800-414-6527 TOLL FREE • NATIONWIDE Monday-Friday • 8:00 AM - 4:30 PM • Local Time In addition, there is a worldwide network of distributors and authorized service stations ready to assist you. Check your “Yellow Pages” under “Tools-Electric” for the names of those nearest you.