
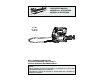
User guide


4
5
CAUTION To avoid damage to the grease
gun and pump, the loader fi tting MUST be
compatible with the coupler and rated for at
least 10,000 psi (690 bar).
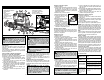
Pump Loading
1. Remove the battery pack.
2. Pull back the rod and turn the rod handle to lock
into the plunger. Release the rod/plunger. Do
NOT push the rod into the retaining slot.
3. Insert the loader fitting into the grease gun
loader coupler.
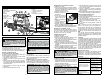
Counter Dial
The counter dial can be set to limit the amount of
grease dispensed. Set the dial to ON to dispense
grease as long as the trigger is pulled. Set the dial
to "1" through "50" to dispense grease for a specifi c
number of piston strokes. NOTE: The counter is
reset each time the trigger is pulled. If the counter is
set for 10, but the trigger is only pulled for 6 strokes,
the next time the trigger is pulled it will start over.
Speed Control
Push the speed control switch to display "1" for low
fl ow rate, high pressure. Push the speed control
switch to display "2" for high fl ow rate, low pressure.
Troubleshooting
Unable to pull
back rod
Press the bleeder to release
pressure
Unable to push
rod forward
Rotate rod 90° to disengage it
from plunger
No grease when
trigger is pulled
Barrel is empty, add grease
Air pockets in the barrel, prime
the grease gun
Contamination in grease barrel,
see "Clearing Contamination".
Grease gun
stops pumping
after one/several
pump strokes
Confi rm that Counter dial is set
to "ON" position
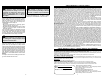
Clearing Contamination
If the motor runs when the trigger is pulled, but there
is no pumping sound and grease is not dispensed,
there may be contamination in the grease gun.
Always make sure the barrel (inside and outside)
and surfaces contacting the barrel are clean of dirt,
dust and debris. This debris can be pulled into the
grease gun and clog the valve.
To clear the contamination:
1. Check to be sure the tool is properly primed and
that there is suffi cient grease in the barrel.
If the problem persists...
2. Remove the hose assembly.
3. Pull and hold the trigger for up to 45 seconds. If
grease begins to pump out of the tool the debris
has been cleared. Reattach the hose assembly
and begin using the tool.
If the problem persists...
4. Remove the bolt from below the hose assembly.
5. Pull trigger for 15 seconds to clear the contami-
nation.
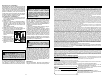
6. If a spring or ball are
expelled, wipe away
any contamination and
re-insert, as shown.
7. Reattach the bolt and
tighten securely.
8. Pull trigger for 30 sec-
onds.
9. Reattach the hose as-
sembly and begin us-
ing the tool.
Bulk Grease Loading
Bulk grease can be loaded 2 ways, using the barrel
for suction loading, or using a pump to load grease
through a coupler.
Suction Loading
1. Remove the battery pack.
2. Unscrew and remove the barrel.
3. Insert the open end of the barrel below the sur-
face of the bulk grease.
4. Pull back the rod, and push it sideways into the
retaining slot.
5. Remove the barrel from the bulk grease.
6. Wipe excess grease from the outside of the bar-
rel and screw it into the grease gun.
7. Release the rod from the retaining slot and press
it completely into the barrel.
8. Prime the grease gun according to "Priming the
Grease Gun"
ASSEMBLY
Inserting/Removing the Battery
To remove the battery, push in the release buttons
and pull the battery pack away from the tool.
To insert the battery, slide the pack into the body of
the tool. Make sure it latches securely into place.
Installing the Clear Barrel
(Accessory Cat. No. 49-16-2646)
A clear grease barrel is offered to replace the
provided steel barrel.
1. To install the clear barrel, unscrew and remove
the steel grease barrel from the tool.
2. Unscrew the cap with rod from the back of the
steel barrel.
3. Remove the spacer screw with a phillips screw-
driver, and remove the plastic spacer by squeez-
ing the two retention tabs and pulling away from
the tool.
4. Screw the back cap with rod onto the clear barrel.
5. Screw the clear barrel into tool.
Fuel Gauge
To determine the amount of charge left in the bat-
tery, pull the trigger. The Fuel Gauge will light up
for 2-3 seconds.
To signal the end of charge, 1 light on the fuel gauge
will fl ash for 2-3 seconds.
Installing a Fitting/Coupler
Screw the appropriate coupler to the end of the
hose assembly. Use only accessories rated for at
least 10,000 psi (690 bar).
OPERATION
WARNING To reduce the risk of injury,
wear safety goggles or glasses with side
shields.
WARNING Always remove battery
pack before changing or removing acces-
sories. Only use accessories specifically
recommended for this tool. Others may be
hazardous.
WARNING Recharge only with the
charger specifi ed for the battery. For specifi c
charging instructions, read the operator’s
manual supplied with your charger and battery.
WARNING To reduce the risk of injury,
use only low pressure loader fi ttings. Exces-
sive pressure can be caused by high pressure
loader fi ttings.
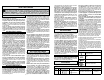
Cat. No. Volts DC
Max. Operating
Pressure Flow Rate Barrel Capacity Hose Rating
2646-20 18 1 - 10,000 PSI (690 bar)
2 - 5,000 PSI (345 bar)
1 - 3.5 oz./min
2 - 10 oz./min
16 oz Bulk
14.5 oz Cartridge
10,000 psi
(690 bar)
SPECIFICATIONS
4. Operate the loader pump until the rod has been
pushed out of the barrel approximately 8".
5. Rotate the rod handle to release the plunger.
Press the rod completely into the barrel.
6. Prime the grease gun according to "Priming the
Grease Gun"
Priming the Grease Gun
1. Insert the battery pack
2. Push the priming valve until all air has escaped.
3. Hold the hose assembly by the spring strain relief
and point away from your body.
4. Pull the trigger for 10-20 seconds.
5. If grease doesn't not appear, repeat from step 2.
NOTE: This tool has been tested to factory stan-
dards, which results in a small amount of grease be-
ing left in the pump body, hose and coupler assembly.
It is recommended that you purge this tool with the
brand of grease you will be using before actual use.
LED
To turn the LED on or off, press the LED button or
pull the trigger. The LED will go off automatically
10 minutes after last use.
CAUTION To avoid contamination in the
grease gun, Always make sure the barrel
(inside and outside) and surfaces contacting
the barrel are clean of dirt, dust and debris.
This debris can be pulled into the grease gun
and clog the valve.
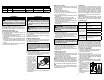
Grease Cartridge Loading
1. Remove the battery pack.
2. Pull back the rod, and push it sideways into the
retaining slot. Ensure the rod is securely seated
in the slot or it may spring back.
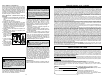
3. Unscrew and re-
move the barrel.
4. Remove the cap
from the cartridge.
5. Insert the cartridge,
open end fi rst, into
the barrel.
6. Remove the seal
from the cartridge.
7. Screw the barrel
into the grease gun.
8. Release the rod
from the retaining slot and press it completely
into the barrel.
9. Prime the grease gun according to "Priming the
Grease Gun"