
User guide


6
7
WARNING To reduce the risk of injury,
always use a side handle when using
this tool. Always brace or hold securely.
ASSEMBLY
WARNING To reduce the risk of injury,
always unplug tool before attaching
or removing accessories or making adjust-
ments. Use only specifi cally recommended
accessories. Others may be hazardous.
OPERATION
WARNING To reduce the risk of injury,
always unplug tool before attaching
or removing accessories or making adjust-
ments. Use only specifi cally recommended
accessories. Others may be hazardous.
WARNING To reduce the risk of injury,
keep hands and cord away from the bit
and all moving parts.
WARNING To reduce the risk of injury,
wear safety goggles or glasses with side
shields.
Drilling
Depth
Bit holder
release
collar
Adapter
Core
Bit
Center
Pin
Guide
Plate
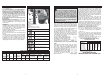
Clean
and
lubricate
threads
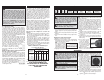
Adjusting the Side Handle Position
1. Loosen the side handle by unscrewing the side
handle grip until the side handle rotates freely.
2. Rotate the side handle to the desired position.
3. Tighten the side handle grip securely.
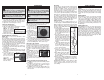
Setting the Depth Gauge
1. Press in the clamping lever.
2. Slide the depth gauge rod backward or forward
until it is set for the desired depth.
NOTE: The drilling
depth is the distance
between the tip of the
bit and the tip of the
depth gauge rod.
3. Release the clamping lever.
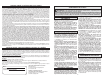
Installing Drill Bits and Chisels
NOTE: Only use accessories with SDS or SDS
Plus shanks.
Be sure that the shank of the bit is clean. Dirt par-
ticles may cause the bit to line up improperly. Do not
use bits larger than the maximum recommended
capacity of the drill because gear damage or mo-
tor overloading may result. For best performance,
be sure that the bit is properly sharpened and the
shank is lightly greased before use.
1. Insert the bit or chisel into the nose of the tool.
2. Rotate bit slowly until it aligns with the locking
mechanism.
3. Push bit into tool until it locks.
4. Check that the bit is locked properly; it should
be possible to pull the bit back and forth slightly
(about 1/4”).
5. To remove bits and
chisels, pull bit holder
release collar toward
the rear of tool and
remove bit.
NOTE: Use caution
when handling hot
bits and chisels.
Selecting Action
MILWAUKEE Rotary Hammers have three settings:
drill only, rotary hammer, and hammer only.
1. For drilling, turn the
selector lever so the
arrow on the lever
points to the twist
drill symbol.
2. For rotary hammer-
ing, turn the selector
lever so the arrow
points to the ham-
mer and twist drill
symbol.
3. For hammering only, turn the selector lever so
the arrow points to the hammer symbol.
4. To freely rotate the bit to the desired angle for
chiseling only, turn the selector lever so the arrow
points to the
O
symbol. Then, follow step 3.
Using the Control Switch
The control switch may be set to three positions:
forward, reverse and lock. Due to a lockout mecha-
nism, the control switch can only be adjusted when
the trigger is not pulled. Always allow the motor to
come to a complete stop before using the control
switch.
For forward (clockwise)
rotation, push the control
switch to the left side of the
tool. Check the direction of
rotation before use.
For reverse (counterclock-
wise) rotation, push the control switch to the right
side of the tool. Check direction of rotation before
use.
Starting, Stopping and Controlling Speed
1. To start the tool, grasp the handle fi rmly and pull
the trigger.
2. To vary the speed, increase or decrease the
pressure on the trigger. The further the trigger
is pulled, the greater the speed.
3. To stop the tool, release the trigger. Make sure
the tool comes to a complete stop before laying
the tool down.
Operating
Position the tool, grasp the handles fi rmly and pull
the trigger. Always hold the tool securely using both
handles to maintain control. This tool has been
designed to achieve top performance with only
moderate pressure. Let the tool do the work.
If the speed begins to drop off when drilling large
or deep holes, pull the bit partially out of the hole
while the tool is running to help clear dust. Do not
use water to settle the dust since it will clog the bit
fl utes and tend to make the bit bind in the hole. If
the bit should bind, a built-in, non-adjustable slip
clutch prevents the bit from turning. If this occurs,
stop the tool, free the bit and begin again.
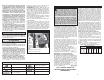
Using Core Bits
Core bits are useful for drilling large holes for
conduit and pipe. MILWAUKEE Heavy-Duty Thin
Wall Core Bits have heat treated steel bodies with
durable carbide tips. They are specially designed
for fast, accurate drilling with combined hammering
and rotary action.
1. Clean and lubricate the threads
on the adapter and core bit as
indicated to make later removal
easier. Screw the threaded end
of the adapter into the rear of
the core bit.
2. Push the guide plate onto the
pointed end of the center pin.
Insert the center pin with guide
plate a ssembly into to the core
bit. Be sure the small end of the
center pin is securely placed
into the hole in the center of the
adapter.
3. Insert the adapter into the bit
holder of the tool as described
in “Inserting Drill Bit or Chisel”.
Set the rotary hammer/drill
lever to rotary hammer.
4. Press the center pin firmly
against your center mark, hold
the tool fi rmly and pull the trig-
ger.
5. After drilling to about the depth
of the core bit teeth, remove
the center pin and guide plate from the core bit.
Resume drilling.
6. After you have fi nished drilling the hole, hold the
tool upwards, pointing it away from your body,
and run it briefl y in forward to loosen the core
bit from the adapter.
MILWAUKEE Heavy-Duty Thin Wall Core Bits
drill holes up to 3" deep. To make deeper holes,
remove the bit, break and remove the core. Re-
sume drilling.
Forward Reverse
APPLICATIONS
Drilling in Wood, Composition Materials and
Plastic
When drilling in wood, composition materials and
plastic, select the drill operating mode. Start the
drill slowly, gradually increasing speed as you drill.
Select low speeds for plastics with a low melting
point.
Drilling in Metal
When drilling in metal, select the drill operating
mode. Use high speed steel twist drills or hole
saws. Use a center punch to start the hole. Lubri-
cate drill bits with cutting oil when drilling in iron
or steel. Use a coolant when drilling in nonferrous
metals such as copper, brass or aluminum. Back
the material to prevent binding and distortion on
breakthrough.
Drilling in Masonry
When drilling in masonry, select the rotary hammer
operating mode. Use high speed carbide-tipped
bits. Drilling soft masonry materials such as cinder
block requires little pressure. Hard materials like
concrete require more pressure. A smooth, even
fl ow of dust indicates the proper drilling rate. Do
not let the bit spin in the hole without cutting. Do
not use water to settle dust or to cool bit. Do not
attempt to drill through steel reinforcing rods. Both
actions will damage the carbide.