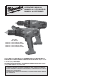
OPERATOR'S MANUAL MANUEL de L'UTILISATEUR MANUAL del OPERADOR Cat. No. No de Cat. 0615-20 0617-20 0625-20 0627-20 Lok-Tor II Driver Drill Lok-Tor II Hammer-Drill Lok-Tor II Driver Drill Lok-Tor II Hammer-Drill 14.4 V AND 18 V LOK-TOR II 1/2" HAMMER-DRILLS & DRIVER DRILLS PERCEUSE À PERCUSSION ET PERCEUSE-VISSEUSE DE 14,4 V ET 18 V 13 mm (1/2") LOK-TOR II TALADRO DE PERCUSIÓN Y TALADRO ATORNILLADOR DE 13 mm (1/2") LOK-TOR II Y 14,4 V Y 18 V TO REDUCE THE RISK OF INJURY, USER MUST READ OPERATOR'S MANUAL.
GENERAL SAFETY RULES-FOR ALL BATTERY OPERATED TOOLS WARNING READ ALL INSTRUCTIONS Failure to follow all instructions listed below may result in electric shock, fire and/or serious injury. The term "power tool" in all of the warnings listed below refers to your mains-operated (corded) power tool or battery-operated (cordless) power tool. SAVE THESE INSTRUCTIONS PERSONAL SAFETY WORK AREA SAFETY 1. Keep work area clean and well lit. Cluttered or dark areas invite accidents. 2.
SPECIFIC SAFETY RULES 1. 2. 3. 4. 5. 6. Maintain labels and nameplates. These carry important information. If unreadable or missing, contact a MILWAUKEE service facility for a free replacement. WARNING: Some dust created by power sanding, sawing, grinding, drilling, and other construction activities contains chemicals known to cause cancer, birth defects or other reproductive harm.
ASSEMBLY WARNING WARNING WARNING Always lock trigger or remove battery pack before changing or removing accessories. Only use accessories specifically recommended for this tool. Others may be hazardous. Recharge only with the charger specified for the battery pack. For specific charging instructions, read the operator’s manual supplied with your charger and battery pack. Inserting Battery Pack into Tool WARNING The battery pack may feel warm after the charging cycle.
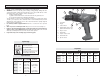
2. OPERATION WARNING Selecting Speed Fig. 4 To reduce the risk of injury, wear safety goggles or glasses with side shields. High The torque specifications shown here are approximate values. To use the drilling only mode (Fig. 6), rotate the hammer/drill selector collar until the drill symbol appears in line with the arrow. Then rotate the Torque selector collar until the drill symbol mmm appears in line with the arrow. Torque selector collar setting Fig.
Starting, Stopping and Controlling Speed 1. To start the tool, grasp the handle firmly and pull the trigger. 2. To vary the speed, increase or decrease the pressure on the trigger. The further the trigger is pulled, the greater the speed. Using Control Switch The control switch may be set to three positions: forward, reverse and lock. Due to a lockout mechanism, the control switch can only be adjusted when the ON/OFF switch is not depressed.
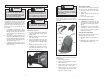
Typical Bracing Methods WARNING Fig. 11 MAINTENANCE Forward rotation WARNING High rotational force. To reduce the risk of injury, always hold or brace securely. Always use side handle on tools. Bit Binding A high rotational force occurs when a bit binds. If the bit binds, the tool will be forced in the opposite direction of the bit rotation. Bits may bind if they are misaligned or when they are breaking through a hole. Wood boring bits can also bind if they run into nails or knots.
RÈGLES GÉNÉRALES DE SÉCURITÉ POUR LES OUTILS ALIMENTÉS PAR BATTERIE FIVE YEAR TOOL LIMITED WARRANTY Every MILWAUKEE electric power tool (including battery charger) is warranted to the original purchaser only to be free from defects in material and workmanship.
12. Retirer toute clé de réglage avant de mettre l’outil sous tension. Une clé laissée attachée sur une pièce mobile de l’outil électrique peut entraîner des blessures. 13. Ne pas travailler à bout de bras. Bien garder un bon équilibre à tout instant. Ceci permet de mieux préserver la maîtrise de l’outil électrique dans des situations imprévues. 14. Porter des vêtements adéquats. Ne pas porter de vêtements amples ni de bijoux. Ne pas approcher les cheveux, vêtements et gants des pièces en mouvement.
MONTAGE DE L'OUTIL DESCRIPTION FONCTIONNELLE 6 7 8 9 AVERTISSEMENT 1 5 AVERTISSEMENT Verrouillez toujours la détente ou retirez la batterie avant de changer ou d’enlever les accessoires. Utilisez les accessoires spécifiquement recommandés pour cet outil, l’utilisation d’autres accessoires pourrait comporter des risques. Ne recharger la batterie qu’avec le chargeur spécifié par le fabricant.
Le système est expédié assemblé pour un utilisateur droitier. Pour modifier le montage pour un utilisateur gaucher: AVERTISSEMENT Verrouillez toujours la détente ou retirez la batterie avant de changer ou d’enlever les accessoires. Utilisez les accessoires spécifiquement recommandés pour cet outil, l’utilisation d’autres accessoires pourrait comporter des risques. 1. Retirer la batterie. 2. Retirer les vis retenant le porte-outils et le porte-mèches. 3.
Sélection de l’action de martelage ou de perforage Les marteaux perforateurs de MILWAUKEE sont conçus pour trois modes de fonctionnement: perforage avec action de martelage, perforage uniquement et entraînement de vis. Pour régler le mode de fonctionnement, faire tourner le collier de sélection marteau/perforateur jusqu’au symbole désiré. 1. Fig. 7 Utilisation du commutateur Marche, arrêt et contrôle de la vitesse 1. Pour mettre l’outil en marche, saisir fermement la poignée et tirer sur la détente. 2.
APPLICATIONS AVERTISSEMENT Perçage de la maçonnerie Lors du perçage dans la maçonnerie, sélectionnez le mode marteau perforateur (marteaux perforateurs seulement). Utilisez des forets à haute vitesse avec pointe au carbone. Les matériaux de maçonnerie moins durs, comme un bloc de cendre, exigent peu de pression. Les matériaux durs, comme le béton, exigent plus de pression. Un débit régulier de poussière indique une bonne vitesse de perçage. Ne laissez pas le foret tourner dans le trou sans percer.
MAINTENANCE GARANTIE LIMITÉE DE L’OUTIL DE CINQ ANS AVERTISSEMENT AVERTISSEMENT Pour minimiser les risques de blessures ou de dommages à l'outil, n'immergez jamais l'outil, la batterie ou le chargeur et ne laissez pas de liquide s'y infiltrer. Pour minimiser les risques de blessures corporelles, débranchez le chargeur et retirez la batterie du chargeur ou de l’outil avant d’y effectuer des travaux d’entretien. Ne démontez jamais l’outil, la batterie ou le chargeur.
REGLAS DE SEGURIDAD GENERALES PARA HERRAMIENTAS OPERADAS POR BATERÍA ADVERTENCIA LEA TODAS LAS INSTRUCCIONES Si no se siguen todas las siguientes instrucciones se puede provocar una descarga eléctrica, un incendio y/o lesiones graves. El término “herramienta eléctrica” en todas las advertencias incluidas más abajo se refiere a su herramienta operada por conexión (cable) a la red eléctrica o por medio de una batería (inalámbrica). GUARDE ESTAS INSTRUCCIONES SEGURIDAD EN EL ÁREA DE TRABAJO 1.
26. Cuando no se use la batería manténgala alejada de otros objetos de metal como clips para papel, monedas, llaves, clavos, tornillos u otros objetos de metal pequeños que puedan realizar una conexión entre los bornes. Realizar un cortacircuito en los terminales de la batería puede provocar quemaduras o un incendio. • • 27. Bajo condiciones abusivas, puede salir líquido expulsado de la batería; evitar el contacto. Si se produce un contacto accidental, lavar con agua.
ENSAMBLAJE DE LA HERRAMIENTA ADVERTENCIA ADVERTENCIA ADVERTENCIA Para reducir el riesgo de lesiones, extraiga siempre la batería o bloquee el gatillo antes de acoplar o desacoplar accesorios. Utilice únicamente accesorios específicamente recomendados para esta herramienta. El uso de accesorios no recomendados podría resultar peligroso. Recárguela solamente con el cargador especificado por el fabricante.
Utilización del portabrocas Fig. 4 Baja Antes de meter o sacar las brocas, siempre se debe extraer la batería o ponerle el seguro al gatillo. Fig. 3 1. 2. 3. 2. Selección de la velocidad Su herramienta inalámbrica está equipada con un bloqueo del vástago. El portabrocas puede apretarse con una mano, creando fuerzas de sujeción más altas en la broca. Alta Las especificaciones de torsión que se muestran enseguida son valores aproximados. Para usar el modo de taladro (Fig.
Para retroceder (el giro es en el sentido opuesto a las manecillas del reloj), se presiona el interruptor de control colocado al lado izquierdo del taladro (Fig. 9). Verificar la dirección del giro antes de usarlo. Encendido, parada y control de la velocidad 1. Para encender la herramienta, agarre el mango firmemente y apriete el gatillo. 2. Para cambiar la velocidad, aumente o disminuya la presión sobre el gatillo. Cuanto más se apriete el gatillo, mayor será la velocidad. Fig.
MANTENIMIENTO GARANTÍA LIMITADA DE CINCO AÑOS ADVERTENCIA ADVERTENCIA Para reducir el riesgo de una lesión, descarga eléctrica o daño a la herramienta, batería o cargador, nunca los sumerja en líquidos ni permita que estos fluyan dentro de los mismos. Para reducir el riesgo de una lesión, desconecte siempre la herramienta antes de darle cualquier mantenimiento. Nunca desarme la herramienta ni trate de hacer modificaciones en el sistema eléctrico de la misma.
UNITED STATES - MILWAUKEE Service MILWAUKEE prides itself in producing a premium quality product that is NOTHING BUT HEAVY DUTY®. Your satisfaction with our products is very important to us! If you encounter any problems with the operation of this tool, or you would like to locate the factory Service/Sales Support Branch or authorized service station nearest you, please call... 1-800-SAWDUST (1.800.729.3878) NATIONWIDE TOLL FREE Monday-Friday • 8:00 AM - 4:30 PM • Central Time or visit our website at www.