
Product Manual


6 7
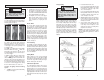
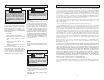
Adjusting the Pivot Shoe
The shoe can be adjusted forward or back-
ward to six positions to take advantage of the
unused portion of the blade or for special jobs
requiring low blade clearance.
Fig. 3
1/4 Turn
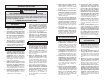
WARNING
To reduce the risk of injury, be sure
the blade always extends beyond the
shoe and workpiece throughout the
stroke. Blades may shatter if they im-
pact the workpiece or shoe (Fig. 4).
Quik-Lok
®
Blade Clamp Maintenance
• Periodically clean dust and debris from
the Quik-Lok
®
Blade Clamp with dry
compressed air.
• If the collar resists twisting, twist the
collar back and forth to shake debris
loose.
• Periodically lubricate Quik-Lok
®
Blade
Clamp with a dry lubricant such as
graphite.
Removing broken blades from the Quik-
Lok
®
Blade Clamp
Broken blades can be removed by the fol-
lowing methods.
• Remove battery pack before removing
blades.
• Point the tool downward, twist the collar,
and shake the tool up and down (DO
NOT turn the tool on while your fi ngers
are holding the blade clamp open). The
shank of the broken blade should drop
out of the clamp.
• If shaking the tool doesn't work...
In most cases, a corner of the broken
blade will extend beyond the blade
clamp. Twist the collar and pull the
broken blade out of the clamp by this
corner.
• If the broken stub doesn't extend far
enough to be grabbed by its corner, use
a thin blade with small teeth (such as a
metal cutting blade) to hook the blade
that is jammed in the clamp while twist-
ing the collar and pull it out.
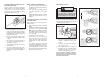
Installing and Removing Blades from the
Quik-Lok
®
Blade Clamp
Remove battery pack before changing
blades. Make sure the spindle and blade
clamp areas are clean. Metal chips and
sawdust may prevent the Quik-Lok
®
Blade
Clamp from clamping securely.
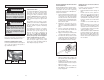
Fig. 2
1. Depending on the job, the blade may
be inserted with the teeth facing up or
down. To install a blade, twist collar in
the direction of the arrow while inserting
the blade into the clamp until the tang
butts against the collar.
2. Release collar and the spring loaded
mechanism will clamp the blade fi rmly
in place.
3. Twist collar in the opposite direction of
the arrow to ensure that the blade is
locked into the clamp.
4. Tug on blade to make sure it is securely
locked in place.
5. To remove a blade, twist collar in the
direction of the arrow while pulling on
the blade. Be careful when handling hot
blades.
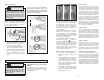
1. To adjust the shoe, pull the shoe release
lever down 1/4 turn and slide the shoe
forward or backward to the desired
position.
2. To lock the shoe in position, push the
shoe release lever up.
3. After adjusting the shoe, slowly pull
the trigger to be sure the blade always
extends beyond the shoe and your
workpiece throughout the stroke.
DO NOT OPERATE SAWZALL WITHOUT
SHOE. STRIKING THE SPINDLE AGAINST
WORKPIECE MAY DAMAGE THE RECIP-
ROCATING MECHANISM.
Fig. 4
Stroke