
Product Manual


8 9
Your MILWAUKEE Sawzall
®
is ideal for
plunge cutting directly into surfaces that can
not be cut from an edge, such as walls or
fl oors. Plunge cutting may be done two ways
depending on how the blade is inserted.
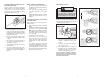
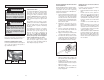
Column A shows how to plunge cut with the
teeth of the blade facing downward. (When
attempting to plunge cut in this manner, shoe
must be moved all the way out, as shown.)
Column B shows how to plunge cut with the
teeth of the blade facing upward. Do not
plunge cut into metal surfaces (see "Cutting
Metals").
1. Insert the blade into the tool.
If you inserted the blade with the teeth
facing downward, hold the tool as shown
in Column A, resting the edge of the
shoe on the workpiece.
If you inserted the blade with the teeth
facing upward, hold the tool as shown in
Column B, resting the edge of the shoe
on the workpiece as shown.
2. With the blade just above the workpiece,
pull the trigger. Using the edge of the
shoe as a pivot, lower the blade into the
workpiece as shown.
3. As the blade starts cutting, raise the
handle of the tool slowly until the shoe
rests firmly on the workpiece. Then
guide the tool along your cutting line to
acquire the desired cut.
NOTE: To make plunge cutting easier, use
a heavy gauge blade and install the blade
with the teeth facing upward as shown in
Column B.
Fig. 6
A B
WARNING
To reduce the risk of explosion,
electric shock and property dam-
age, always check the work area for
hidden gas pipes, electrical wires or
water pipes when making blind or
plunge cuts.
Plunge Cutting
2. To vary the speed, increase or decrease
the pressure on the trigger. The further
the trigger is pulled, the greater the
speed. The maximum RPM is determined
by the high/low/trigger lock switch.
3. To stop the tool, release the trigger.
Make sure the blade comes to a com-
plete stop before removing the blade
from a partial cut or laying the tool
down.
Electric Brake
The electric brake engages when the trig-
ger is released, causing the blade to stop
and allowing you to proceed with your work.
Generally, the saw blade stops within two
seconds. However, there may be a delay
between the time you release the trigger
and when the brake engages. Occasionally
the brake may miss completely. If the brake
misses frequently, the saw needs servic-
ing by an authorized MILWAUKEE service
facility. You must always wait for the blade
to stop completely before removing the saw
from the workpiece.
General Cutting
For straight or contour cutting from an edge,
line the blade up with your cutting line. Before
the blade contacts the workpiece, grasp the
handle fi rmly and pull the trigger. Then guide
the tool along your cutting line. Always hold
the shoe fl at against the workpiece to avoid
excessive vibration.
Cutting Metals
Begin cutting at a slow speed, gradually
increasing speed as you cut. When cutting
into metals or hard materials that can not be
cut from an edge, drill a starting hole larger
than the widest part of the blade.
Cold Weather Operation
The V28 Lithium-Ion battery pack can be
used in temperatures down to -4°F. When
the battery pack is very cold, it may pulse for
the fi rst minute of use to warm itself up. Put
the battery pack on a tool and use the tool in
a light application. After about a minute, the
pack will have warmed itself up and operate
normally.
For low speed (Maximum 2000 RPM): Move
the switch to the left." " will be displayed
above the switch. To vary the speed up to
2000 RPM, increase or decrease pressure
on the trigger. Low speed is generally used
for cutting metals.
For high speed (Maximum 3000 RPM):
Move the switch to the right. " " will be dis-
played above the switch. To vary the speed
up to 3000 RPM, increase or decrease pres-
sure on the trigger.
To lock the trigger: Move the switch to the
center. " " will be displayed above the
switch. The trigger will not work while the
switch is in the locked position. Always lock
the trigger and remove the battery pack be-
fore performing maintenance and changing
accessories. Lock the trigger when storing
the tool and when the tool is not in use.
Starting, Stopping and Controlling
Speed
1. To start the tool, grasp the handle fi rmly
and pull the trigger.
OPERATION
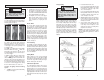
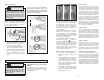
High/Low/Trigger Lock Switch
To set the maximum speed or lock the trigger,
move the high/low/trigger lock switch to the
following positions (Fig. 5):
Fig. 5
1
2
WARNING
To reduce the risk of injury, keep hands
away from the blade and all moving
parts. Always wear safety goggles or
glasses with side shields.