
Operator's Manual S/N G37A


3
•
WARNING
To reduce the risk of
injury, when working in
dusty situations, wear appropriate respiratory pro-
tection or use an OSHA compliant dust extraction
solution.
• Always use common sense and be cautious when
using tools. It is not possible to anticipate every situation
that could result in a dangerous outcome. Do not use this
tool if you do not understand these operating instructions
or you feel the work is beyond your capability; contact
Milwaukee Tool or a trained professional for additional
information or training.
•
WARNING
Some dust created by
power sanding, sawing,
grinding, drilling, and other construction activities contains
chemicals known to cause cancer, birth defects or other
reproductive harm. Some examples of these chemicals are:
• lead from lead-based paint
• crystalline silica from bricks and cement and other
masonry products, and
• arsenic and chromium from chemically-treated lumber.
Your risk from these exposures varies, depending on
how often you do this type of work. To reduce your
exposure to these chemicals: work in a well ventilated
area, and work with approved safety equipment, such
as those dust masks that are specially designed to lter
out microscopic particles.
READ AND SAVE
ALL INSTRUCTIONS
FOR FUTURE USE
FOR HOUSEHOLD USE.
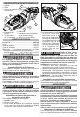
FUNCTIONAL DESCRIPTION
5. Lock-on switch
6. Trigger
1
1. Inlet
2. Filter
3. Dust canister latch
4. Fuel gauge
7. Lock/Unlock indicators
8. Dust canister
8
7
6
5
3
2
4
SYMBOLOGY
Volts
Direct Current
Read operator's manual
Wear eye protection
C
US
UL Listing for Canada and U.S.
SPECIFICATIONS
Cat. No. ..................................................... 0850-20
Volts.............................................................. 12 DC
Battery Type .................................................M12™
Charger Type................................................M12™
Air Flow .......................................................33 CFM
Recommended Ambient
Operating Temperature ......................0°F to 125°F
ASSEMBLY
WARNING
Recharge only with the
charger specified for
the battery. For specic charging instructions,
read the operator’s manual supplied with your
charger and battery.
Removing/Inserting the Battery
To remove the battery, push in the release buttons
and pull the battery pack away from the tool.
WARNING
Always remove battery
pack before changing
or removing accessories.
To insert the battery, slide the pack into the body
of the tool. Make sure it latches securely into place.
WARNING
To reduce the risk of
injury, always remove
the battery pack before removing the dust can-
ister. Do not use tool without dust canister and
lter in place.
Installing/Removing the Dust Canister
and Filter
To remove the dust canister:
1. Turn OFF the tool.
2. Remove the battery pack.
3. While holding over the trash, p
ress the dust canister
latch back and rotate the dust canister to the unlock
position. P
ull the dust canister away from the vacuum.
4. Empty dust from the dust canister.
5. To clean the lter, rotate
Black
Finger Tabs
the lter using the black
nger tabs only. Pull the
lter away from the vac-
uum and tap clean or
blow off with com-
pressed air. Do not
clean with water. Re-
place lter if damaged
or suction decreases
(Cat. No. 49-90-1950).