
Operator's Manual S/N J50A


5
OPERATION
WARNING
To reduce the risk of
injury, do not look directly into the light when
the light is on.
Using the Light
1. Insert battery pack or plug into AC power.
2. Use the switch to cycle through High, Medium,
Low, and OFF. Press and hold to turn OFF from
any setting.
MAINTENANCE
WARNING To reduce the risk of
injury, always unplug the charger and remove the
battery pack from the charger before performing
any maintenance. Never disassemble the tool,
battery pack or charger. Contact a MILWAUKEE
service facility for ALL repairs.
Maintaining Light
Keep your light, battery pack and charger in good
repair by adopting a regular maintenance program. If
the light does not work properly, return the light to a
MILWAUKEE service facility for repairs.
Tightening
If the head or extensions will not hold their position,
the screws may need to be tightened. Tighten the
bracket screws by holding the head. Tighten the ex-
tension latches by opening the latches and tightening
the screw inside.
WARNING To reduce the risk of
personal injury and damage, never immerse your
tool, battery pack or charger in liquid or allow a
liquid to ow inside them.
Cleaning
Clean dust and debris from vents. Keep handles
clean, dry and free of oil or grease. Use only mild
soap and a damp cloth to clean, since certain clean-
ing agents and solvents are harmful to plastics and
other insulated parts. Do not use sprays or solvents.
Some of these include gasoline, turpentine, lacquer
thinner, paint thinner, chlorinated cleaning solvents,
ammonia and household detergents containing am-
monia. Never use ammable or combustible solvents
around tools.
ACCESSORIES
WARNING
Use only recom-
mended accessories. Others may be hazardous.
For a complete listing of accessories, go online to
www.milwaukeetool.com or contact a distributor.
SERVICE - UNITED STATES
1-800-SAWDUST (1.800.729.3878)
Monday-Friday, 7:00 AM - 6:30 PM CST
or visit www.milwaukeetool.com
Contact Corporate After Sales Service Technical
Support with technical, service/repair, or warranty
questions.
Email: metproductsupport@milwaukeetool.com
Become a Heavy Duty Club Member at
www.milwaukeetool.com to receive important
notications regarding your tool purchases.
ASSEMBLY
WARNING Recharge only with
the charger specied for the battery. For specic
charging instructions, read the operator’s manual
supplied with your charger and battery.
Inserting/Removing Battery Pack
Insert the battery pack by sliding battery pack into the
battery bay. Insert the battery pack until the battery
latches lock.
To remove the battery pack, press in both battery
latches and slide the battery pack out of the battery bay.
Inserting/Removing Extension Cord
To operate the light on AC power, extend and lock
legs. Plug a suitable extension cord into the AC
inlet . To disconnect the extension cord, press the
switch button to turn o the light, then remove the
cord from the inlet.
NOTE: When an extension cord is plugged into the
light, the light will automatically run on AC power.
WARNING To reduce the risk of
injury, do not look directly into the light when the
light is on.
To reduce the risk of injury, always fully extend and
lock legs into position before raising the poles.
Light may tip and cause injury.
To reduce the risk of injury, keep hands clear of
the housing area when collapsing the extension
poles. Head may descend rapidly, pinching hands
and ngers.
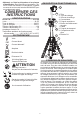
Extending/Collapsing the Legs
Always extend and lock legs before raising the poles.
1. Stand light upright.
2. Press the Leg Release Button and slide the legs
down using the Carrying Handle.
3. Lift up on the Upper Handle while sliding down the
Carrying Handle.
4. Lift until the Battery Bay lifts o the oor and the
legs lock into place.
5. To collapse, press the Leg Release Button and slide
in the legs using the Carrying Handle. Keep hands
clear of the legs as they collapse.
Extending/Collapsing the Extension Poles
Extend or collapse the two poles to set the light at the
desired height.
1. Extend and lock the legs.
2. Open the top extension latch and raise the head out
of the housing. Extend the pole to the desired height.
3. Fully close top extension latch.
4. If more height is needed, fully extend rst pole and
close latch before opening bottom latch.
5. Continue to raise the head to the desired height.
6. Fully close bottom extension latch.
7. Rotate the heads to the desired angle. The three
heads can be adjusted individually.
NOTE: Before collapsing the poles, the heads must
be returned to their upright angle.