
Use and Care Manual


3
SYMBOLOGY
Volts
Direct Current
To reduce the risk of inury, user must
read operator's manual
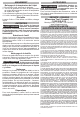
FUNCTIONAL DESCRIPTION
1. Display
2. Aperture
3. Nameplate
6
3
1
4
5
4. Trigger
5. Battery door lock
6. Battery door
2
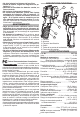
ASSEMBLY
Loading/Changing the Battery
1. Using a at screwdriver,
rotate the battery door
lock to the unlocked posi-
tion and open the battery
door.
2. Connect one (1) 9V bat-
tery to the connector
block. Fit the battery into
the compartment.
3. Close the battery door.
Turn the battery door lock to the locked position.
Selecting Celsius or Fahrenheit
1. Using a at screwdriver, rotate the battery door
lock to the unlocked position and open the battery
door.
2. Remove the battery to expose the °F/°C switch.
3. Toggle switch to the right position for °F or to the
left position for °C.
4. Fit the battery into the compartment.
5. Close the battery door. Turn the battery door lock
to the locked position.
56:1 Distance to Spot
NOTE: A quick change in ambient, operating, or
environment temperature (>10°F) affects the me-
ter’s readings. Allow the meter to reach ambient
temperature before use (5 to 30 minutes, depending
on temperature change).
Center of Spot
Spot size at distance indicated
At 25' away,
spot is ~Ø 5"
At 3' away,
spot is ~Ø 5/8"
At 56' away,
spot is ~Ø 1'
OPERATION
Scanning Object Temperature
1. Pull the trigger to wake up the tool.
2. Pull and hold the trigger for at least 2 seconds and
scan the surface temperature of an object.
3. Release the trigger to freeze the image on screen.
4. After 15 seconds of inactivity, the tool will turn off.
Low Battery
When the Low Battery icon is displayed, change
the battery.
MAINTENANCE
WARNING
To reduce the risk of injury, always
remove the batteries from the tool
before performing any maintenance. Never disas-
semble the tool. Contact a MILWAUKEE service
facility for ALL repairs.
Maintaining Tool
Keep your tool in good repair by adopting a regular
maintenance program. After six months to one year,
depending on use, return the tool to a MILWAUKEE
service facility for repairs.
If the tool does not start or operate at full power with
new batteries, clean the contacts on the battery door.
If the tool still does not work properly, return the tool
to a MILWAUKEE service facility for repairs.
Cleaning the Lens
Blow off loose particles with clean compressed
air. Carefully wipe the suface with a cotton swab
moistened with water. Using a second cotton swab,
dry completely.
WARNING
To reduce the risk of personal in-
jury and damage, never immerse
your tool in liquid or allow a liquid to ow inside
it.
Cleaning
Clean dust and debris from tool. Keep tool handles
clean, dry and free of oil or grease. Use only mild
soap and a damp cloth to clean the tool since cer-
tain cleaning agents and solvents are harmful to
plastics and other insulated parts. Some of these
include gasoline, turpentine, lacquer thinner, paint
thinner, chlorinated cleaning solvents, ammonia and
household detergents containing ammonia. Never
use ammable or combustible solvents around tools.