
Use and Care Manual

3
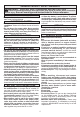
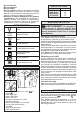
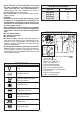
FUNCTIONAL DESCRIPTION
1. Jacket and Pocket Power Buttons
High: Red LED
Medium: White LED
Low: Blue LED
2. USB Battery Controller
3. Fuel Gauge
4. USB Power Button
5. Power Cable Port
6. USB Port
7. Battery Controller Pocket
8. Power Cable
2
3
7
8
1
4
6
5
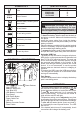
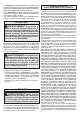
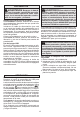
SPECIFICATIONS
SYMBOLOGY
Cat. No. Volts DC
2390 Series
2392 Series
2394 Series
43-72-1025
12
12
12
12
Volts
Direct Current
Machine wash, Gentle Cycle in
warm water
Do not bleach
Do not wring or twist
Tumble dry, low heat
Do not iron
Do not dry-clean
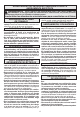
ASSEMBLY
WARNING Rechargeonly with the
chargerspecified for the battery. Forspe-
ciccharginginstructions,readtheoperator’s
manualsuppliedwithyourchargerandbattery.
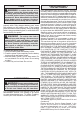
Inserting/RemovingtheBattery
To insert the battery, slide the pack into the body of
the battery controller. Make sure it latches securely
into place.
Insert the power cable (from inside the battery
controller pocket) into the power cable port on the
battery controller.
Place the battery controller into the pocket and zip
closed. If necessary, unzip the expansion zipper to
accommodate larger battery packs.
To removethe battery, push in the release buttons
and pull the battery pack away from the controller.
UsingtheUSBPort
The USB port can be used to charge a cell phone,
MP3 player, or other personal device that uses less
than 5V, 1A of DC electrical current. The cord can
be run from the battery controller pocket, through
the grommet and channel on the interior of the
jacket, and through another grommet into a side
pocket. It is not recommend to use the pocket
warmer when an electronic device is charging in
a pocket.
To turn on the USB, press the USB power button.
The USB port will remain on for two hours before
turning off automatically.
FuelGauge
Press the USB power button to display the battery
pack’s remaining power.
OPERATION
The zone power buttons are located on the up-
per left side of the jacket. Use the jacket and
pocket power buttons to control the two zones.
To turn on, press and hold (1 to 2 seconds) the
zone’s power button. The zone will be turned to
High and the red LED will light.
Temperature setting can be adjusted at any time
by pressing the zone’s power button. Each press
will cycle through the zone’s temperature settings.
To turn off the heated jacket, press and hold (1
to 2 seconds) the zone’s power button. The LED
will turn off.
If the heated jacket turns off unexpectedly, check
connections and charge the battery pack.