
Use and Care Manual


5
This tool provides a quick, convenient means of drill-
ing small holes and installing and removing screws.
Because of the many screw sizes, types, thread en-
gagements and materials available, it is difcult to
limit the application of this tool by screw size. How-
ever, for applications in wood, a #6 wood screw with
a full pilot hole is recommended as a practical limit.
Drilling in Wood, Composition Materials and
Plastic
Always use sharp bits. When using twist drill bits,
pull the bit out of the hole frequently to clear chips
from the bit utes. To reduce the chance of splinter-
ing, back work with a piece of scrap wood. Select
low speeds for plastics with a low melting point.
Driving Screws
Drill a pilot hole when driving screws into thick or
hard materials. Set the clutch adjusting ring to the
proper position and set the speed to low. Use the
proper style and size screwdriver bit for the type
of screw you are using.
With the screwdriver bit in the screw, place the tip
of the screw on the workpiece and apply rm pres-
sure before pressing the foward/reverse switch up.
Screws can be removed by pressing the foward/
reverse switch down.
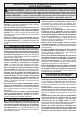
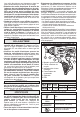
Locking the Screwdriver Bit
When the tool is off, the screwdriver bit auto-
matically locks in place allowing you to use the
screwdriver manually. Do this to tighten screws
that require more torque than the driver is capable
of delivering, when conrming the tightness of a
screw or when loosening an extremely tight screw.
Forward -
Push from
RIGHT
Lock -
Push to
CENTER
Reverse -
Push from
LEFT
Fig. 4
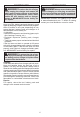
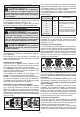
Clutch
Setting
in.
lbs.
Applications
2
4
6
8
10
12
14
Drill
4
7
10
13
16
19
41
120
Small screws in softwood.
Medium screws in softwood or
small screws in hardwood.
Large screws in softwoods. Me-
dium screws in hardwood or large
screws in hardwood with pilot hole.
Battery Pack Protection
To protect the battery from damage and extend
its life, the tool’s intelligent circuit monitors current
draw, temperature, and voltage drops.
In extremely high torque, binding, stalling, and short
circuit situations that cause high current draw, the
tool will vibrate for about 5 seconds, the fuel gauge
will ash, and then the tool will turn OFF. To reset,
release the trigger.
Under extreme circumstances, the internal tem-
perature of the battery could become too high.
If this happens, the fuel gauge will ash and the
battery pack will shut off. Let the battery pack cool
and then continue work.
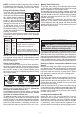
Using the Adjustable Clutch
This tool has an adjustable
clutch for driving different types
of screws into different materi-
als. When properly adjusted,
the clutch will slip at a preset
torque to prevent driving the
screw too deep and to prevent
damage to the screw or tool.
To adjust the clutch, turn the
clutch adjusting ring so that
the desired setting (1-15) lines
up with the arrow on the motor
housing, as shown.
The torque specifications shown here are ap-
proximate values obtained with a fully charged
battery pack.
APPLICATIONS
WARNING To reduce the risk of electric
shock, check work area for hidden pipes and
wires before drilling or driving screws.
For forward (clockwise) rotation, push in the control
switch from the right side of the tool. Check the
direction of rotation before use.
For reverse (counterclockwise) rotation, push in the
control switch from the left side of the tool. Check
direction of rotation before use.
To lock the trigger, push the control switch to the
center position. The trigger will not work while the
control switch is in the center locked position. Always
lock the trigger or remove the battery pack before
performing maintenance, changing accessories,
storing the tool and any time the tool is not in use.
Fig. 2
Driving
Fig. 3
Drilling
NOTE: Because the settings shown in the table are
only a guide, use a piece of scrap material to test
the different clutch settings before driving screws
into the workpiece.
Using Control Switch
The control switch may be set to three positions:
forward, reverse and lock. Due to a lockout mecha-
nism, the control switch can only be adjusted when
the ON/OFF switch is not pressed. Always allow
the motor to come to a complete stop before using
the control switch.
NOTE: It is not necessary to hold the collar out when
installing and removing bits. The rst time the tool
is used, it may be necessary to pull out the collar.