
Operator’s Manual


5
OPERATION
WARNING
Always remove battery pack before
changing or removing accesso-
ries. Only use accessories specically recom-
mended for this tool. Others may be hazardous.
To reduce the risk of injury, always wear proper
eye protection marked to comply with ANSI Z87.1.
Turning ON/OFF
Hold tool motionless when turning the tool ON.
Movement during the initial two second sensor
check may aect torque value. Press the power
button
to turn the LCD ON. Press and hold the
power button
to turn the LCD OFF. The tool will
go into standby mode within 2 minutes of nonuse
and sleep mode after 10 minutes. NOTE: In standby
mode, pressing the paddle switch or power button
will turn the tool back on. In sleep mode, pressing
the power button will turn the tool back on.
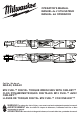
Progress Light Bar
The progress light bar will display the progress to
achieving the target torque.
White: First light indicates 40% of the target torque
reached with intermittent beeps. Second light indi-
cates 60% of the target achieved with constant beep-
ing. Third light indicates 80% of the target achieved
with rapid beeping.
Green: Indicates tool reached targeted torque with
beeping coming to a stop.
Red: Exceeded target torque with beeping and vibra-
tion to indicate that the tool is over-torqued.
Green:
Red:
White:
40%
White:
60%
White:
80%
Forward/Reverse Toggle
For forward (clockwise) rotation,
Reverse
Forward
rotate the forward/reverse toggle
counterclockwise. Check the direc-
tion of rotation before use.
For reverse (counterclockwise)
rotation, rotate the forward/reverse
toggle clockwise. Check the direction
of rotation before use.
Lock Switch
To lock the paddle switch, slide the lock switch to
the locked
position. To unlock the paddle switch,
slide the lock switch to the unlocked
position. The
paddle switch will not work when the lock switch is
in the locked position.
Always lock the paddle switch or remove the battery
pack before performing maintenance, changing ac-
cessories, storing the tool and any time the tool is
not in use.
Starting, Stopping and Controlling Speed
These tools may be operated at any speed from
0 to full RPM.
1. To start the tool, pull the paddle switch. NOTE: A
LED is turned on when the switch is pulled.
The tool will shut o automatically when the set
maximum rundown torque is reached.
2. To vary the driving speed, increase or decrease
pressure on the switch. The further the switch is
pulled, the greater the speed.
3. To stop the tool, release the paddle switch.
APPLICATIONS
Simple Torque Applications
Making a simple measurement
1. Select the units of measure.
2. Set the target torque.
3. Apply torque. Hold the center of the trigger handle
and pull the trigger. While the trigger is pulled "- - -"
is displayed. The tool will automatically stop before
target torque is reached to prevent over torquing.
NOTICE! Do not hold the tool by the boot while
applying torque. It will aect the accuracy of the
tool and could give inaccurate readings.
4. Finish by hand to reach target torque. Current
torque value is displayed.
5. Press
to save an event, to stay consistent with
the tool.
6. Release torque. The torque reading on the LCD
will display for > than 5 seconds or the next trigger
pull.
Advanced Applications
Adjusting torque range
Torque range indicates the acceptable range of val-
ues for a successful install. Adjust the torque range
to meet the recommended torque specications.
Adjusting rundown torque
Rundown torque is the approximate torque value the
motor will stop driving the tool. The tool will tighten
the fastener to the selected preset percentage and
then stop. Finish by hand to reach target torque.
NOTE: Rundown torque changes the tools output
power. Adjust the rundown torque to help prevent
over torquing of the fastener.
Adjusting target torque
Target torque is the required torque value for the
fastener being installed. Adjust the target torque to
meet the desired torque specications.
ALERTS AND TROUBLESHOOTING
Display Alerts
Memory for Saved Events
The tool has a limited amount of memory dedicated
to saved events. When keeping a prolonged list
of events outside of the tools memory, refer to the
ONE-KEY
™ app for better backup. To clear your
saved events, connect to the ONE-KEY
™ app
and clear the memory on the tool using the app.
This ensures that the events are backed up online
within the ONE-KEY
™ cloud. NOTE: The display
will prompt that the memory is close to being full or
reached capacity.