
Use and Care Manual
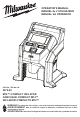


4
OPERATION
WARNING
To reduce the risk of injury, always
wear safety goggles or glasses
with side shields.
Only use accessories specically recommended
for this tool. Others may be hazardous.
Do not leave the tool unattended during operation.
Risk of Bursting. Do not overinate. Follow all
manufacturer's instructions for the item.
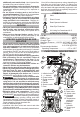
Using the Inator
1. Place the tool on at surface.
2. Insert the proper accessory for the item to be
inated.
3. Attach the accessory to the item to be inated.
• Always attach the inator to desired object before
starting ination.
• No accessory is needed for common car/truck
tire schrader valves.
• For car/truck tires, screw schrader chuck onto
tire valve and ensure it is tight.
4. Insert the battery pack.
5. To turn on, press the
Power
button. The tool
will detect the current air
pressure of the item.
6. Use the
and but-
tons to set the target
pressure, if desired.
Press and hold
or
buttons to jump down or
up faster.
NOTE: Setting target
pressure is not recommended when using the
accessory nozzles.
NOTE: If the current pressure item to be inated
is greater than the target pressure, the tool will not
begin ination.
7. To start, press the Ination
button.
NOTE: Flashing dashes during inating or con-
necting indicate the tool is recalibrating pressure.
8. The tool will shut o automatically once the target
pressure has been reached. Target mode shows
- - if no target pressure is set. Inator will run until
120 psi max pressure.
CAUTION: Allow tool to cool for 10 minutes after
each 10 minutes of continuous use.
9. To stop, press the Ination
button or power
button.
NOTE: The tool will shut down after 5 minutes of
inactivity.
Troubleshooting
If pressure accuracy becomes poor or the inator's
actual value reads greater than zero when not con-
nected to any object, the pressure sensor may have
drifted due to altitude or other factors.
To reset:
With nothing connected to inator, hold power
button and press the
button 3 times to reset pres-
sure to zero.
Sports Needle/Raft Nozzle
Insert needle or nozzle into the item to be inated.
Be careful not to bend the accessory. Remove after
ination.
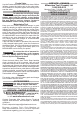
ASSEMBLY
WARNING
Recharge only with the charger
specied for the battery. For spe-
cic charging instructions, read the operator’s
manual supplied with your charger and battery.
Removing/Inserting the Battery
To remove the battery, push in the release buttons
and pull the battery pack away from the tool.
WARNING
Always remove battery pack before
changing or removing accessories.
To insert the battery, slide the pack into the body
of the tool. Make sure it latches securely into place.
WARNING
Only use accessories specically
recommended for this tool. Others
may be hazardous.
Battery Indicator
The Battery Indicator is displayed when the tool is
on. When the battery power is very low
, the
battery indicator will ash.
Setting the Units (PSI, BAR or kPa)
To select the desired unit of pressure, press and hold
the
and buttons until the units of measure
begin to ash (about 1.5 seconds). Use the
and
buttons to scroll through the units (PSI, BAR or
kPa) to select. After about 3 seconds, the screen will
return with the new unit of pressure displayed.
Temperature Protection
During extended use or constricted air ow, the tool
temperature may rise. If the Temperature Protection
Indicator
comes on, allow the tool to cool at least
10 minutes before continuing. In extremely low tem-
peratures, the Temperature Protection Indicator
may come on if the battery is too cold.
CAUTION
Allow tool to cool for 10 minutes
after each 10 minutes of continuous
use.
Overload Warning
If airow is constricted during use, the Overload
Warning Indicator
may come on. Check all con-
nections for blockages before continuing use.
Accessories/Hose Storage
Accessories provided with the inator can be stored
on the back of the tool. The hose can be wrapped
around the storage area and secured in the hose
clamp.