
Use and Care Manual


4
OPERATION
WARNING
To reduce the risk of injury, always
wear proper eye protection marked
to comply with ANSI Z87.1.
When working in dusty situations, wear appro-
priate respiratory protection or use an OSHA
compliant dust extraction solution.
Fuel Gauge
To determine the amount of charge left in the battery,
turn the tool ON. The Fuel Gauge will light up for 2-3
seconds. When less than 10% of charge is left, 1 light
on the fuel gauge will ash 4 times.
To signal the end of charge, 1 light on the fuel gauge
will ash 8 times and the tool will not run. Charge
the battery pack.
If the battery becomes too hot, the fuel gauge lights
will ash and the tool will not run. Allow the battery
to cool down.
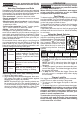
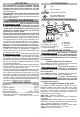
Using the Speed Selector
The speed selector button is used to
adjust the oscillating speed (OPM)
for the application. Press the speed
selector button
to cycle through
the 4 speeds. When the desired
speed indicator number is lit, begin
work.
Allow the tool to come to a
complete stop before changing
speeds.
Speed 1 2 3 4
OPM 0 - 8000 0 - 10,000 0 - 12,000 0 - 14,000
Starting, Stopping and Controlling Speed
1. To start the tool, grasp the handle rmly and pull
the trigger.
NOTE: An LED is turned on when the trigger is
pulled and will go o shortly after the trigger is
released.
2. To vary the speed, increase or decrease the pres-
sure on the trigger. The further the trigger is pulled,
the greater the speed.
3. To stop the tool, release the trigger. Ensure the
tool has come to a complete stop before laying
the tool down.
Trigger Lock-On
Use trigger lock-on when sanding for an extended
period of time or when covering a large area.
1. To lock-on, pull the trigger and push in the lock-
on button.
2. To release the lock-on, pull and release the trigger.
WARNING
Finish sanding can produce clouds
of ne dust that could ignite in the
presence of sparks or open ame. Always wear a
suitable dust mask or respirator and use your
sander in a well-ventilated area.
To reduce the risk of injury, inspect for and remove
all raised nails and fasteners from workpiece
before sanding. Striking a fastener while sanding
could cause loss of control.
WARNING
Only use accessories specically
recommended for this tool. Others
may be hazardous.
Selecting Sandpaper and Grits
Sandpaper can be made from various grit materials
and these should be selected according the material
to be sanded. The guidelines below list materials and
grit materials that should be used with them.
• Fine woodwork – garnet or aluminum oxide
• Rough woodwork – aluminum zirconia or ceramic
aluminum oxide
• Manufactured wood products (particleboard,
medium density ber board, etc.) – silicon carbide
or aluminum oxide
• Solid surface materials (Corian
®
, quartz, granite,
etc.) – silicon carbide or aluminum oxide
• Metals – emery or aluminum oxide
Sandpaper is also graded by coarseness. Start your
work with an abrasive grit just coarse enough to re-
move high spots and excessive roughness. Follow
with a second sanding using a grit one or two grades
ner. Continue with successively ner grits until you
obtain the desired nish.
Do not switch from a coarse grit to a very ne grit in
one step because it may be dicult to remove the
marks made by the coarse grit abrasive. Use the
nest grits practical for the roughing operation, and
nish by using successively ner grits.
Grit Type Typical Application
60
80
Coarse
Ideal for initial sanding on
rougher surfaces. For fast stock
removal. Rough sanding and
stripping of painted and rusted
surfaces.
100
120
Medium
For intermediate sanding and
removal of minor surface imper-
fections.
150
180
220
Fine
Ideal for ne sanding prior to
straining, priming, or sealing.
Attaching Hook-and-Loop Sanding Sheets
1. Remove the battery pack.
2. Align sanding sheet with backing pad, then care-
fully press fuzzy side of sanding sheet against
backing pad as tightly as possible.
NOTE: Hook-and-loop type sanding sheets can
be reused for the life of the sanding abrasive. It
is recommended that you keep the backing pad
clean to provide for best adhesion. Clean occa-
sionally by brushing lightly with a small brush.