
Use and Care Manual


5
General Sanding with Random Orbit Sanders
When using random orbit sanders there are a few
things to keep in mind:
• Unlike most sanders, random orbit sanders should
be placed on the workpiece BEFORE the tool is
started. If the sander is started before it is placed on
the workpiece, the free oating pad may be spinning
at a speed that can cause scratches when it is nally
placed on workpiece.
• Unlike most sanders, random orbit sanders can be
moved across the workpiece in any direction (in the
case of wood, regardless of the direction of the grain).
• Varying pressure applied to the sander will aect its
rotating speed. A light pressure is recommended for
ne work, moderate pressure for rough work. Exces-
sive pressure does not allow the pad to rotate enough.
• Keep sanding pad at on the workpiece. Tipping the
sander or using the edges of the pad may produce
an uneven nish, and reduce pad life.
• Keep sander moving in broad even strokes across the
workpiece. Sanding in one spot too long can cause
gouging and uneven results.
• Check the workpiece frequently, random orbit sanders
work more aggressively than simple orbital sanders.
WARNING
Properly secure workpiece before
sanding. Unsecured work could be
thrown towards the operator causing injury.
Do not wear loose clothing or jewelry when op-
erating sander. They could get caught in moving
parts causing serious injury. Keep head away from
sander and sanding area. Hair could be drawn into
sander causing serious injury.
1. Place sander on the workpiece and turn on the
sander.
2. Keep the sanding sheet at against the workpiece,
keep the sander moving across the workpiece, and
use long, sweeping strokes.
3. Begin sanding with a coarse grit sandpaper and
gradually use ner and ner grits of sandpaper until
the desired nish is reached. For example when
using the sander on wood, begin with an 80 grit
followed by a 120 grit, then a 180 grit and so on.
Removing Paint or Varnish
1. When removing several layers of paint or varnish,
remove as much as possible with a paint solvent or
varnish remover.
2. Scrape away the residue with a putty knife or other
scraping tool and allow the surface to cool and dry
before applying sander to the workpiece.
WARNING
To reduce the risk of re and explo-
sion, paint solvents and varnish
removers must be removed from the workpiece
and the workpiece must be completely dry before
sanding.
3. Select a coarse grit sandpaper sheet to help prevent
the sandpaper from clogging.
4. Keep the sander moving over new areas to avoid heat-
ing and softening the old coating (paint or varnish).
5. Work in wide, overlapping strokes to produce a
uniform nish.
6. As the workpiece begins to show through the old
coating, switch to a medium grit sandpaper sheet
to avoid scratching the surface of the workpiece.
Gradually switch to a ne grit sandpaper until you
achieve the desired nish.
MAINTENANCE
WARNING
To reduce the risk of injury, always
unplug the charger and remove the
battery pack from the charger or tool before per-
forming any maintenance. Never disassemble the
tool, battery pack or charger. Contact a MILWAUKEE
service facility for ALL repairs.
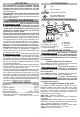
Replacing the Backing Pad
The hook-and-loop backing pad can be rotated in
8 positions for ease of use. Replace backing pad if
broken or defective.
1. Remove the battery pack and any sanding sheets.
2. Remove the screw that holds the backing pad in
place.
3. Remove the backing pad.
4. Clean dust and debris from the sander.
5. Install the new backing pad in the desired posi-
tion with the screw securely. NOTICE: Do not
overtighten.
Maintaining Tool
Keep your tool, battery pack and charger in good
repair by adopting a regular maintenance program.
Inspect your tool for issues such as undue noise,
misalignment or binding of moving parts, breakage of
parts, or any other condition that may aect the tool
operation. Return the tool, battery pack, and charger
to a MILWAUKEE service facility for repair. After six
months to one year, depending on use, return the tool,
battery pack and charger to a MILWAUKEE service
facility for inspection.
If the tool does not start or operate at full power with
a fully charged battery pack, clean the contacts on
the battery pack. If the tool still does not work prop-
erly, return the tool, charger and battery pack, to a
MILWAUKEE service facility for repairs.
WARNING
To reduce the risk of personal in-
jury and damage, never immerse
your tool, battery pack or charger in liquid or allow
a liquid to ow inside them.
Cleaning
Clean dust and debris from vents. Keep handles clean,
dry and free of oil or grease. Use only mild soap and
a damp cloth to clean, since certain cleaning agents
and solvents are harmful to plastics and other insulated
parts. Some of these include gasoline, turpentine,
lacquer thinner, paint thinner, chlorinated cleaning
solvents, ammonia and household detergents contain-
ing ammonia. Never use ammable or combustible
solvents around tools.
Repairs
For repairs, return the tool, battery pack and charger
to the nearest authorized service center.
ACCESSORIES
WARNING
Use only recommended accesso-
ries. Others may be hazardous.
For a complete listing of accessories, go online to
www.milwaukeetool.com or contact a distributor.