
Use and Care Manual


6
Installing Accessories
1. Remove dust and debris from the collet body
before inserting accessory.
2. Insert the collet with the collet nut attached into the
collet body. Thread the collet nut onto the spindle
but do not tighten it yet.
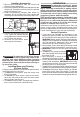
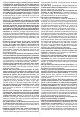
3. Clean the accessory mandrel, then insert it a
minimum of 3/4" into the collet. The mandrel will
overhang the collet and the accessory about 1/2".
Insert mandrel
a minimum of 3/4" inside the collet
Overhang about 1/2"
Accessory
Mandrel
Collet
4. Hold the spindle shaft steady with
a 1/2" open end wrench and se-
curely tighten the collet nut with an
11/16" open end wrench.
5. Reverse the procedure when
removing the accessory.
WARNING
To reduce the risk of injury, always
securely tighten the collet to the
grinders and clean mandrels before inserting
them into the collet. Otherwise the high-speed
rotation of the tool could force the accessory to
y out of the collet.
Installing/Removing/Cleaning
the Dust Screen
Using the dust screen will increase the performance
and extend the life of the tool.
1. To attach the dust screen, snap the screen over
the tool’s handle.
2. To remove the dust screen, insert a at screw-
driver into the notch at the top of the dust screen
and pry away from the tool.
3. To clean the dust screen, tap against a hard sur-
face, or blow clean with compressed air.
OPERATION
WARNING
To reduce the risk of injury,
always
remove battery pack
before attach-
ing or removing accessories or making adjust-
ments. Only use accessories specically recom-
mended for this tool. Others may be hazardous.
To reduce the risk of injury, always wear safety
goggles or glasses with side shields.
If the grinder begins vibrating, immediately stop
the motor and check to see if the accessory is dull.
Dull accessories will cause the tool to vibrate and
could force the collet to y off the tool. Always
replace or sharpen dull accessories.
Accessories are design for specic uses. Only use
points, cones, plugs, grinding wheels and cut-off
wheels for applications for which they were designed.
Follow manufacturer's care and use instructions.
General Operation
1. If you have just installed an accessory or are
beginning a period of work, test it by letting it spin
for one minute before applying it to the workpiece.
WARNING! Never use an accessory that has been
dropped. Out-of-balance or damaged accessories
can mar workpiece, damage the tool, and cause
stress that may cause accessory failure.
2. Use a clamp, vise or other practical means to hold
your work, freeing both hands to control the tool.
3. WARNING! Hold tool securely with both hands.
Start the tool.
4. To start the tool, grasp the handle
and side handle rmly and slide
the switch to ON.
5. Allow accessory to come to full
speed before beginning work.
6. Control pressure and surface contact between ac-
cessory and workpiece. WARNING! Never bang
accessories onto work.Too much pressure causes
accessory failure or slows speed.
7.
To stop the tool, release the switch. Make sure the tool
comes to a complete stop before laying the tool down.
8. To loc
k-on the switch, slide the switch to ON and
press down on the front of the switch. To stop the
tool, press and release the switch. Make sure the tool
comes to a complete stop before laying down the tool.