
Use and Care Manual

5
SYMBOLOGY
Volts
Direct Current
Rated Revolutions per Minute (RPM)
C
US
UL Listing for Canada and U.S.
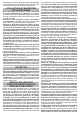
FUNCTIONAL DESCRIPTION
2
5
1
6
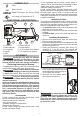
1. Collet nut
2. Mode selector
3. Fuel gauge
4. Handle
5. LED
7
3
4
6. Switch lock-o
7. Paddle switch
8. 11/16" wrench (not shown)
9. 1/2" wrench (not shown)
ASSEMBLY
WARNING
Recharge only with the charger
specied for the battery. For spe-
cic charging instructions, read the operator’s
manual supplied with your charger and battery.
Removing/Inserting the Battery
To remove the battery, push in the release buttons
and pull the battery pack away from the tool.
WARNING
Always remove battery pack before
changing or removing accessories.
To insert the battery, slide the pack into the body
of the tool. Make sure it latches securely into place.
WARNING
Only use accessories specically
recommended for this tool. Others
may be hazardous.
Only use accessories with Maximum Safe Operat-
ing Speed rated at least equal to the maximum
speed marked on the power tool. This speed is
based on the strength of the accessory, allowing
for a reasonable measure of safety. It is not
meant to imply a best or most ecient operat-
ing speed. Do not exceed the Maximum Safe
Operating Speed.
Accessories
Points, cones, plugs, grinding wheels and cut-o
wheels should be protected from:
• wetness and extreme humidity
• any type of solvent
• extreme changes in temperature
• dropping and bumping
Points, cones, plugs, grinding wheels and cut-o
wheels should be stored:
• in an organized way so points, cones, plugs or
wheels can be removed without disturbing or dam-
aging other points, cones, plugs or wheels
• with their safety information
Points, cones, plugs, grinding wheels and cut-o
wheels should NOT be dropped, rolled or bumped.
Discard points, cones, plugs, or wheels that have
been dropped, rolled, bumped, subjected to extreme
changes in temperature, or come into contact with
solvents or wetness.
Installing Collets
The collet must be attached to the collet nut before
installing the collet assembly to the tool. Be sure that
the collet size matches the size of the mandrel you
will use, otherwise the collet may break.
1. To assemble, place collet on an even surface, and
place the nut over the collet.
2. Press down on the nut to snap the nut and collet
together.
3. To disassemble, use a rod to push the collet out
of the nut.
Installing Accessories
1. Remove dust and debris from the collet body
before inserting accessory.
2. Insert the collet with the collet nut attached into the
collet body. Thread the collet nut onto the spindle
but do not tighten it yet.
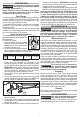
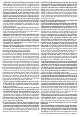
3. Clean the accessory mandrel, then insert it a
minimum of 1" into the collet. The mandrel will
overhang the collet and the accessory about 1/2".
Insert mandrel
a minimum of 1" inside the collet
Overhang about 1/2"
Accessory
Mandrel
Collet
4. Hold the spindle shaft steady with
a 1/2" open end wrench and se-
curely tighten the collet nut with an
11/16" open end wrench.
5. Reverse the procedure when
removing the accessory.
WARNING
To reduce the risk of injury, always
securely tighten the collet to the
grinders and clean mandrels before inserting
them into the collet. Otherwise the high-speed
rotation of the tool could force the accessory to
y out of the collet.