
Use and Care Manual


5
OPERATION
WARNING
Always remove battery pack before
changing or removing accesso-
ries. Only use accessories specically recom-
mended for this tool. Others may be hazardous.
To reduce the risk of injury, always wear safety
goggles or glasses with side shields.
Operation
1. Remove battery pack.
2. Check blades. Replace if necessary.
3. Install guide fence, if desired.
4. Turn the exhaust selector to the desired side.
Install dust bag or vacuum on appropriate side of
tool, if desired.
5. Clamp work securely.
6. Insert battery pack.
7. Securely grasp the tool by the handle and the
depth adjustment knob.
8. Line up the front of the tool with the workpiece.
WITHOUT contacting the drum to the workpiece,
press down on the trigger lock-o and pull the trig-
ger. Wait for the tool to come to full speed before be-
ginning to avoid overloading and damaging the tool.
9. Keeping the front shoe ush with the workpiece,
use gentle pressure to guide the planer. All pres-
sure should be on the front shoe when starting
the cut. Transfer downward pressure to the rear
shoe as it contacts the workpiece.
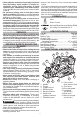
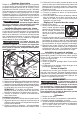
10. For best results, push planer
through the workpiece at an
even rate. Do not push too
fast as it will strain the motor
and could damage the
blades. Do not pull the plan-
er backward over the workpiece.
Slow feed + shallow depth of cut = smooth nish
Faster feed + deep depth of cut = rough nish
11. When nished with the pass, lift the planer away
from the workpiece. Wait for the blade to come to
a complete stop before setting down.
12. Continue using progressive cuts until near the
desired depth. Set the adjustment knob to a
very shallow depth for the nal passes. This will
ensure a smooth nish.
13. Empty and clean the dust bag thoroughly when
it becomes about half-full and upon completion
of a job.
14. If chute becomes clogged, remove battery pack
and clear all dust and debris. WARNING! Keep
hands and ngers away from dust chute. Turn
o tool and remove battery pack before clear-
ing jams.
Types of Cuts
Rabbeting, Shiplapping
Rabbeting, or shiplapping, is a type of step cut
achieved by making repetitive passes. Use the guide
fence to ensure a straight cut.
1. Align the blade edge with the cutting line and secure
the guide fence against the side of the workpiece.
2. Keep the edge of the fence against the workpiece
as the planer is moved through the workpiece.
3. Repeat until the desired depth is reached. Maxi-
mum rabbeting depth is 27/64".
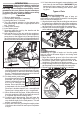
Chamfering
Chamfering is a type of angle cut. Use the guide
fence to ensure the same angle is cut during each
repetitive pass.
1. Align the chamfer groove in the front shoe with
the edge of the workpiece at the desired angle.
2. Secure the guide fence against the side of the
workpiece, using the bevel thumb screws.
3. Keep the edge of the fence against the workpiece
as the planer is moved through the workpiece.
4. Repeat until the desired chamfer is reached.
45
。