
Use and Care Manual


3
• Under abusive conditions, liquid may be ejected
from the battery; avoid contact. If contact ac-
cidentally occurs, flush with water. If liquid
contacts eyes, additionally seek medical help.
Liquid ejected from the battery may cause irritation
or burns.
• Do not use a battery pack or tool that is dam-
aged or modied. Damaged or modied batteries
may exhibit unpredictable behavior resulting in re,
explosion or risk of injury.
• Do not expose a battery pack or tool to re or
excessive temperature. Exposure to re or tem-
perature above 265°F (130°C) may cause explosion.
• Follow all charging instructions and do not charge
the battery pack or tool outside the temperature
range specied in the instructions. Charging im-
properly or at temperatures outside the specied range
may damage the battery and increase the risk of re.
SERVICE
• Have your power tool serviced by a qualied repair
person using only identical replacement parts. This
will ensure that the safety of the power tool is maintained.
• Never service damaged battery packs. Service
of battery packs should only be performed by the
manufacturer or authorized service providers.
SPECIFIC SAFETY RULES FOR
PLANER
Planer safety warnings:
• Wait for the cutter to stop before setting the tool
down. An exposed rotating cutter may engage the
surface leading to possible loss of control and seri-
ous injury.
• Use clamps or another practical way to secure
and support the workpiece to a stable platform.
Holding the work by your hand or against the body
leaves it unstable and may lead to loss of control.
• Inspect and remove nails from the workpiece
before cutting. Nails will damage the tool and could
result in fragments of nail or blade being thrown
toward the operator.
• Use only sharp, properly paired planer blades.
Always change blades in pairs. Dull or improperly
paired blades may cause binding, gouging, or loss
of control, causing injury.
•Keep hands and body away from blades. Hold
tool securely with both hands. Contact with
blade will result in serious injury.
• Blades are sharp. Use care when changing or
adjusting blades.
• Before use, ensure blade bolts are tight and
blades are properly aligned. Run the tool to check
for vibration or “wobble” that could indicate improp-
erly installed blades.
• Keep hands and ngers away from dust chute.
Turn o tool and remove battery pack before clearing
jams.
• Maintain labels and nameplates. These carry
important information. If unreadable or missing,
contact a MILWAUKEE service facility for a free
replacement.
•
WARNING
Some dust created by power sanding,
sawing, grinding, drilling, and other
construction activities contains chemicals known to
cause cancer, birth defects or other reproductive
harm. Some examples of these chemicals are:
• lead from lead-based paint
• crystalline silica from bricks and cement and other
masonry products, and
• arsenic and chromium from chemically-treated
lumber.
Your risk from these exposures varies, depending on
how often you do this type of work. To reduce your
exposure to these chemicals: work in a well ventilated
area, and work with approved safety equipment, such
as those dust masks that are specially designed to
lter out microscopic particles.
SYMBOLOGY
Volts
Direct Current
No Load Revolutions per Minute (RPM)
C
US
UL Listing for Canada and U.S.
SPECIFICATIONS
Cat. No. ..................................................... 2623-20
Volts.............................................................. 18 DC
Battery Type .................................................M18™
Charger Type................................................M18™
Recommended Ambient
Operating Temperature ......................0°F to 125°F
No Load RPM ......................................... 0 - 14,000
Max Planing Depth ......................................... 5/64"
Max Rabbeting Depth ................................... 27/64"
Max Planing Width.........................................3-1/4"
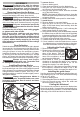
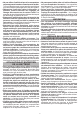
FUNCTIONAL DESCRIPTION
1. Handle
2. Trigger
3. Trigger lock-o
4. Exhaust ports
5. Exhaust selector
6. Depth knob
(grasping surface)
7. Chamfer groove
1
5
4
3
6
7
2
10
9
8
11
12
8. Fence insert
(both sides of tool)
9. Front shoe
10. Drive belt guard
11. Kickstand
(not shown)
12. Rear shoe
13. Wrench storage
(not shown)
13