
User Guide


4
If the tool does not start or operate at full power with
a fully charged battery pack, clean the contacts on
the battery pack. If the tool still does not work prop-
erly, return the tool, charger and battery pack, to a
MILWAUKEE service facility for repairs.
WARNING
To reduce the risk of personal in-
jury and damage, never immerse
your tool, battery pack or charger in liquid or
allow a liquid to ow inside them.
Cleaning
Clean dust and debris from any vents. Keep tool
clean, dry and free of oil or grease. Use only mild
soap and a damp cloth to clean, since certain clean-
ing agents and solvents are harmful to plastics and
other insulated parts. Some of these include gasoline,
turpentine, lacquer thinner, paint thinner, chlorinated
cleaning solvents, ammonia and household deter-
gents containing ammonia. Never use ammable or
combustible solvents around tools.
Repairs
For repairs, return the tool, battery pack and charger
to the nearest authorized service center.
ACCESSORIES
WARNING
Use only recommended accesso-
ries. Others may be hazardous.
For a complete listing of accessories, go online to
www.milwaukeetool.com or contact a distributor.
SERVICE - UNITED STATES
1-800-SAWDUST (1.800.729.3878)
Monday-Friday, 7:00 AM - 6:30 PM CST
or visit www.milwaukeetool.com
Contact Corporate After Sales Service Technical
Support with technical, service/repair, or warranty
questions.
Email: metproductsupport@milwaukeetool.com
Become a Heavy Duty Club Member at
www.milwaukeetool.com to receive important
notications regarding your tool purchases.
SERVICE - CANADA
Milwaukee Tool (Canada) Ltd
1.800.268.4015
Monday-Friday, 7:00 AM - 4:30 PM CST
or visit www.milwaukeetool.ca
LIMITED WARRANTY
USA & CANADA
Every MILWAUKEE power tool* (see exceptions below) is warranted to the
original purchaser only to be free from defects in material and workman-
ship. Subject to certain exceptions, MILWAUKEE will repair or replace any
part on an electric power tool which, after examination, is determined by
MILWAUKEE to be defective in material or workmanship for a period of
ve (5) years** after the date of purchase unless otherwise noted. Return
of the power tool to a MILWAUKEE factory Service Center location or
MILWAUKEE Authorized Service Station, freight prepaid and insured,
is required. A copy of the proof of purchase should be included with the
return product. This warranty does not apply to damage that MILWAUKEE
determines to be from repairs made or attempted by anyone other than
MILWAUKEE authorized personnel, misuse, alterations, abuse, normal
wear and tear, lack of maintenance, or accidents.
Normal Wear: Many power tools need periodic parts replacement and
service to achieve best performance. This warranty does not cover repair
when normal use has exhausted the life of a part including, but not limited
to, chucks, brushes, cords, saw shoes, blade clamps, o-rings, seals, bum-
pers, driver blades, pistons, strikers, lifters, and bumper cover washers.
*This warranty does not cover Air Nailers & Staplers; Airless Paint Sprayer;
Cordless Battery Packs; Gasoline Driven Portable Power Generators; Hand
Tools; Hoist – Electric, Lever & Hand Chain; M12™ Heated Gear; Recon-
ditioned Product; and Test & Measurement Products. There are separate
and distinct warranties available for these products.
OPERATION
WARNING
To reduce the risk of injury, always
wear proper eye protection marked
to comply with ANSI Z87.1.
Always remove battery pack before changing
or removing accessories. Only use accessories
specically recommended for this tool. Others
may be hazardous.
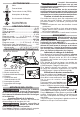
Fuel Gauge
To determine the amount of charge left in the battery,
turn the tool ON. The Fuel Gauge will light up for 2-3
seconds. When less than 10% of charge is left, 1 light
on the fuel gauge will ash 4 times.
To signal the end of charge, 1 light on the fuel gauge
will ash 8 times and the tool will not run. Charge
the battery pack.
If the battery becomes too hot, the fuel gauge lights
will ash and the tool will not run. Allow the battery
to cool down.
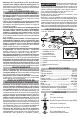
Using the Forward/Reverse Toggle
For forward (clockwise) rotation,
Reverse
Forward
rotate the forward/reverse toggle
counterclockwise. Check the direc-
tion of rotation before use.
For reverse (counterclockwise)
rotation, rotate the forward/reverse
toggle clockwise. Check the direction
of rotation before use.
Lock Switch
To lock the paddle switch, slide the lock switch to
the locked position. To unlock the paddle switch,
slide the lock switch to the unlocked position. The
paddle switch will not work when the lock switch is
in the locked position.
Always lock the paddle switch or remove the battery
pack any time the tool is not in use.
Starting, Stopping and Controlling Speed
1. To start the tool, grasp the handle(s) rmly and
pull the paddle switch.
NOTE: An LED is turned on when the trigger is pulled
and will go o shortly after the trigger is released.
2. To vary the speed, increase or decrease the pres-
sure on the trigger. The further the trigger is pulled,
the greater the speed.
3. To stop the tool, release the trigger. Ensure the
tool has come to a complete stop before laying
the tool down.
MAINTENANCE
WARNING
To reduce the risk of injury, always
unplug the charger and remove the
battery pack from the charger or tool before
performing any maintenance. Never disassemble
the tool, battery pack or charger. Contact a
MILWAUKEE service facility for ALL repairs.
Maintaining Tool
Keep your tool, battery pack and charger in good
repair by adopting a regular maintenance program.
Inspect your tool for issues such as undue noise,
misalignment or binding of moving parts, breakage of
parts, or any other condition that may aect the tool
operation. Return the tool, battery pack, and charger
to a MILWAUKEE service facility for repair. After six
months to one year, depending on use, return the
tool, battery pack and charger to a MILWAUKEE
service facility for inspection.