
Service Parts List


6
1
2
3
4
5
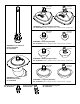
Prior to reinstalling,
clean gear assemblies
with a clean, dry cloth.
Lightly coat all parts highlighted
here with ‘Y’ grease. Apply a greater
amount of grease to all gear teeth.
LUBRICATION NOTES:
Use Type 'Y' Grease, No. 49-08-5270 (6 oz. tube)
Total amount approx. 6.6 grams (.23 ounces)
When servicing, remove 90-95% of the existing grease prior to installing
Type ‘P’. Original grease maybe similar in color but not compatible with ‘P’.
1. Place a light coat of grease inside bore of Compressor Cylinder (53).
2. Apply a light coat of grease around the outside surface of piston head of
Piston Assembly (82).
3. Place a light coat of grease to the inside diameter of crank arm bushing.
4. Coat the inside diameter of Gear Case Bushing (57) with grease.
5. Brush Gear Assembly (59) with grease as shown, being sure to place a heavy
amount to all gear teeth (approximately 5g).
6. Apply a heavy coat of grease to the pinion gear of Motor Assembly (81).
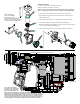
=Wire Trap
Add waterproof grease to the two wire connectors
As an aid to reassembly,
take note of wire routing and
position in wire guides and
traps while dismantling tool.
Be careful and avoid pinching wires between handle halves when reassem-
bling. Be sure all mechanical components are rmly and squarely seated in
housing support (left housing halve). Be sure all wires are tucked completely
down in wire traps and that there is no interference prior to installing hous-
ing cover (right housing halve). Check for proper functionality of trigger and
pressure gauge dial. Install battery and make sure tool operates properly.