
Use and Care Manual


4
5
certain industrial chemicals, and bleach or bleach
containing products, etc., can cause a short circuit.
• Maintain labels and nameplates. These carry im-
portant information. If unreadable or missing, contact
a MILWAUKEE service facility for a free replacement.
•
WARNING
Some dust created by power sanding,
sawing, grinding, drilling, and other
construction activities contains chemicals known to
cause cancer, birth defects or other reproductive harm.
Some examples of these chemicals are:
• lead from lead-based paint
• crystalline silica from bricks and cement and other
masonry products, and
• arsenic and chromium from chemically-treated lumber.
Your risk from these exposures varies, depending on
how often you do this type of work. To reduce your
exposure to these chemicals: work in a well ventilated
area, and work with approved safety equipment, such
as those dust masks that are specially designed to
lter out microscopic particles.
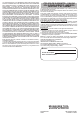
FUNCTIONAL DESCRIPTION
1
2
9
5
4
3
8
PS
10
20
30
50
40
1
2
3
BAR
7
1. Handle
2. Pressure gauge
3. Motor/On button
4. Max water line
5. Coupler
6. Pressure gauge
selector
7. Pressure gauge cap
8. LED
9. Air release trigger
10. Battery bay
10
6
SPECIFICATIONS
Cat. No. ..........................................................2572-20
Volts ...................................................................12 DC
Air Pressure ...................................................0-50 PSI
Battery Type ..................................................... M12™
Charger Type .................................................... M12™
SYMBOLOGY
Volts
Direct Current
C
US
UL Listing Mark for
Canada and U.S.
Do not allow battery to contact corrosive
or conductive uid
Wear face shield
Wear latex or rubber gloves
• Under abusive conditions, liquid may be ejected
from the battery; avoid contact. If contact ac-
cidentally occurs, ush with water. If liquid con-
tacts eyes, additionally seek medical help. Liquid
ejected from the battery may cause irritation or burns.
• Do not use a battery pack or tool that is damaged or
modied. Damaged or modied batteries may exhibit
unpredictable behavior resulting in re, explosion or
risk of injury.
• Do not expose a battery pack or tool to re or ex-
cessive temperature. Exposure to re or temperature
above 265°F (130°C) may cause explosion.
• Follow all charging instructions and do not charge
the battery pack or tool outside the temperature
range specied in the instructions. Charging im-
properly or at temperatures outside the specied range
may damage the battery and increase the risk of re.
SERVICE
• Have your power tool serviced by a qualied repair
person using only identical replacement parts.
This will ensure that the safety of the power tool is
maintained.
• Never service damaged battery packs. Service of
battery packs should only be performed by the manu-
facturer or authorized service providers.
SPECIFIC SAFETY RULES
• Use latex or rubber gloves, a face shield and pro-
tective clothing when chemicals, bacteria or other
toxic or infectious substances are suspected to be
in a drain line. Drains may contain chemicals, bacteria
and other substances that may cause burns, be toxic
or infectious or may result in other serious personal
injury.
• Practice good hygiene. Do not eat or smoke while
handling or operating the tool. After handling or
operating drain cleaning equipment, use hot, soapy
water to wash hands and other body parts exposed
to drain contents. This will help reduce the risk of health
hazards due to exposure to toxic or infectious material.
• Only use the drain cleaner for the recommended
drain sizes.
• Inspect the drain to be cleaned before use. Do not
use on pipes and ttings that are compromised. If
possible, determine the access point(s) to the drain, the
size(s) and length(s) of the drain, distance to mainlines,
the nature of the blockage, presence of drain clean-
ing chemicals or other chemicals, etc. If chemicals
are present in the drain, it is important to understand
the specic safety measures required to work around
those chemicals. Contact the chemical manufacturer
for required information.
• If needed, place protective covers in the work area.
The drain cleaning process can be messy.
• Do not point the tool towards yourself or anyone
nearby. Unexpected triggering will discharge the air
pressure causing an injury.
• Do not actuate the tool unless the tool is placed
rmly against the workpiece. If the tool is not in con-
tact with the workpiece, air pressure may be deected
away from your target.
• Do not engage in horseplay. The discharged air
pressure is capable of causing serious injury.
• Use the tool only for the intended purposes. Do
not abuse the tool.
•
WARNING
To reduce the risk of re, personal in-
jury, and product damage due to a
short circuit, never immerse your tool, battery pack or
charger in uid or allow a uid to ow inside them.
Corrosive or conductive uids, such as seawater,
3. Set the pressure gauge selector to the desired PSI
by twisting the pressure gauge cap. Set at 5 PSI for
initial use.
NOTE: To help avoid damage to pipes and ttings, start
the pressure low and work your way up.
4. Press and hold the Motor/On button for three seconds
and release. The tool will build pressure until it has
reached the desired PSI. WARNING! If the tool does
not shut down at desired pressure, or if pressure
builds into the red warning area, remove battery and
take tool into the nearest service center.
5. Place tool into drain opening, sealing the drain
with the accessory. Use force to maintain seal.
WARNING! Do not place tool in water past the water
line. Damage to the tool may occur.
6. Press the trigger rapidly, holding for one second.
7. If the clog persists, increase the PSI by 5 and repeat
steps 4-6 until the clog is cleared.
8. When done with tool, release any excess air by point-
ing the tool in a safe direction and pressing trigger
before storing.
9. After use, use hot, soapy water to wash hands and
other body parts exposed to drain contents.
MAINTENANCE
WARNING
To reduce the risk of injury, always
unplug the charger and remove the
battery pack from the charger or tool before per-
forming any maintenance. Never disassemble the
tool, battery pack or charger. Contact a MILWAUKEE
service facility for ALL repairs.
Maintaining Tool
Keep your tool, battery pack and charger in good repair
by adopting a regular maintenance program. Inspect
your tool for issues such as undue noise, misalignment
or binding of moving parts, breakage of parts, or any
other condition that may affect the tool operation. Return
the tool, battery pack, and charger to a MILWAUKEE
service facility for repair. After six months to one year,
depending on use, return the tool, battery pack and
charger to a MILWAUKEE service facility for inspection.
If the tool does not start or operate at full power with a
fully charged battery pack, clean the contacts on the bat-
tery pack. If the tool still does not work properly, return
the tool, charger and battery pack, to a MILWAUKEE
service facility for repairs.
WARNING
To reduce the risk of re, personal
injury, and product damage, never
immerse your tool, battery pack or charger in uid
or allow a uid to ow inside them.
Cleaning
Clean dust and debris from vents. Keep handles clean,
dry and free of oil or grease. Use only mild soap and a
damp cloth to clean, since certain cleaning agents and
solvents are harmful to plastics and other insulated
parts. Some of these include gasoline, turpentine,
lacquer thinner, paint thinner, chlorinated cleaning
solvents, ammonia and household detergents contain-
ing ammonia. Never use ammable or combustible
solvents around tools. Do not pour water directly down
the discharge area.
Repairs
For repairs, return the tool, battery pack and charger to
the nearest service center.
ASSEMBLY
WARNING
Recharge only with the charger
specied for the battery. For spe-
cic charging instructions, read the operator’s
manual supplied with your charger and battery.
Removing/Inserting the Battery
To remove the battery, push in the release buttons and
pull the battery pack away from the tool.
WARNING
Always remove battery pack before
changing or removing accessories.
To insert the battery, slide the pack into the body of the
tool. Make sure it latches securely into place.
WARNING
Only use accessories specically
recommended for this tool. Others
may be hazardous.
Selecting the Proper Accessory
Name Drain Style
Drain
Diameter
1"-2" Drain Plug Attachment
Sink drains, bathtub/
shower drains
1" to 2"
2"-3" Drain Plug Attachment
Sink drains, bathtub/
shower drains
2" to 3"
3"-4" Drain Plug Attachment
Sink drains, bathtub/
shower drains
3" to 4"
Drain Shroud
Attachment
Floor drains, uneven
surfaces, permanent drain
covers
1" to 4"
Toilet Seal Attachment Toilet P-Traps 2" to 3"
10" Extension N/A N/A
15º Offset Connector Angled N/A
Straight Connector Quick connect N/A
For a complete listing of accessories, go online to
www.milwaukeetool.com or contact a distributor.
Accessory Installation
WARNING
Always remove battery pack before
changing or removing accessories.
Only use accessories specically recommended
for this tool. Others may be hazardous.
To reduce the risk of injury, wear a face shield.
Always wear latex or rubber gloves.
Select the proper accessory for your application.
1. To install the accessory, pull out the coupler. Press
the accessory bit into the coupler socket until the
coupler snaps back and the bit is locked into place.
2. To remove the accessory, pull out the coupler, then
pull out the accessory bit.
OPERATION
WARNING
Always remove battery pack before
changing or removing accessories.
Only use accessories specically recommended
for this tool. Others may be hazardous.
To reduce the risk of short circuit, when setting tool
or battery down, do not allow battery to contact
corrosive or conductive uid.
To reduce the risk of injury, wear a face shield.
Always wear latex or rubber gloves.
Inspect the drain to be cleaned before use. Do not
use on pipes and ttings that are compromised.
1. Select and install the proper accessory.
2. Insert battery pack.