
Use and Care Manual


4
ASSEMBLY
WARNING
Recharge only with the charger
specied for the battery. For spe-
cic charging instructions, read the operator’s
manual supplied with your charger and battery.
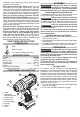
Removing/Inserting the Battery
To remove the battery, push in the release buttons
and pull the battery pack away from the tool.
WARNING
Always remove battery pack before
changing or removing accessories.
To insert the battery, slide the pack into the body
of the tool. Make sure it latches securely into place.
WARNING
Only use accessories specically
recommended for this tool. Others
may be hazardous.
To reduce the risk of injury, do not remove or
attach accessory tips until tool has cooled to
room temperature.
Installing/Removing Nozzles
1. To install, slide the nozzle onto the heat gun nose
and twist it into place.
2. Adjust distance from work and length of application
as necessary.
3. To remove, allow tool to cool to room temperature,
then twist and pull the nozzle away from tool.
OPERATION
WARNING
To reduce the risk of injury, always
unplug tool before attaching or
removing accessories or making adjustments.
Use only specically recommended accessories.
Others may be hazardous.
To reduce the risk of injury, always wear safety
goggles or glasses with side shields.
To reduce the risk of injury, do not remove or
attach accessory tips until tool has cooled to
room temperature.
Turning On/Off
The proper amount of heat for each application
depends on the distance between the nozzle and
workpiece, and the length of time heat is applied.
Experiment with scrap materials. Be cautious when
working until the proper combination of distance and
time of application has been obtained. Use a back
and forth motion when applying heat unless concen-
trated heat is desirable. When done, place the tool
upright on a at surface, so the heat gun won’t tip to
allow the nozzle to cool.
1. To turn the tool ON, press the lock-off trigger down
and pull the trigger.
2. To turn the tool OFF, release the trigger.
materials to burn and cause fumes, which may be
inhaled by the operator.
• Keep work environment clean. Keep food and
drink away from work area. Wash hands, arms and
face and rinse mouth before eating and drinking. Do
not smoke, or chew gum or tobacco in the work area.
Paint scrapings and dust created from removing
paint may contain chemicals that are hazardous.
• Clean up all paint scraping and dust. DO NOT
SWEEP, DRY DUST OR VACUUM. Wet mop oors.
Use a wet cloth to clean all walls, sills and other sur-
faces where paint and dust have accumulated. Use
a high phosphate detergent, trisodium phosphate
(TSP), or a trisodium phosphate substitute to clean
and mop the work area.
• Dispose of paint scrapings properly. Following
each work session, place paint scrapings in a double
plastic bag, close it with tape or twist ties and dispose.
• Remove protective clothing and work shoes
in the work area to avoid transferring dust to
other parts of the building. Wash work clothes
separately. Wipe shoes off with a wet rag that is
then washed with the work clothes. Wash hair and
body thoroughly with soap and water.
SAVE THESE INSTRUCTIONS
SYMBOLOGY
Volts
Direct Current
C
US
UL Listing for Canada and U.S.
SPECIFICATIONS
Cat. No. ..................................................... 2688-20
Volts.............................................................. 18 DC
Battery Type .................................................M18™
Charger Type................................................M18™
Temperature ................................ 1000° F (537° C)
Airow ...........................................................6 CFM
Recommended Ambient
Operating Temperature ......................0°F to 125°F
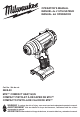
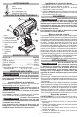
FUNCTIONAL DESCRIPTION
1. Nose
2. Accessory
attachment area
3. Ladder hook
4. Intake vents
5. Lock-off trigger
6. Handle
7. Trigger
8. LED
1
3
6
5
4
7
8
2