
Use and Care Manual


5
OPERATION
WARNING
To reduce the risk of injury, keep
hands away from the blade and all
moving parts.
Always wear proper eye protection marked to
comply with ANSI Z87.1.
When working in dusty situations, wear appro-
priate respiratory protection or use an OSHA
compliant dust extraction solution.
Always remove battery pack before changing
or removing accessories. Only use accessories
specically recommended for this tool. Others
may be hazardous.
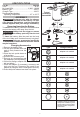
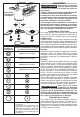
Typical Applications
A large variety of accessories are available for ap-
plications such as sawing/cutting, scraping, and
sanding.
Sawing/Cutting
Install a sawing/cutting blade at an angle easy to use.
Properly clamp the workpiece. Set the speed dial to
a high speed. Start the tool and allow it to reach full
speed. Use moderate pressure to avoid burning or
scorching the workpiece.
Scraping
Install a scraping blade at an angle easy to use.
Start the tool and allow it to reach full speed. Use
light pressure and a low angle to avoid gouging and
damaging the workpiece.
Sanding
Install a sanding backing pad at an angle easy to
use. Attach a sanding disc, or cut sandpaper to t the
backing pad. Generally, use 24 or 36 grit for heavy
stock removal; 50, 60, or 80 grit for medium stock
removal and 120 or 240 grit for nishing. Always
begin with a coarse grit, using successively ner grits
to obtain the desired nish.
Properly clamp the workpiece. Start the tool and allow
it to reach full speed. Use light pressure and long,
sweeping, side to side strokes, advancing forward
to produce the desired nish.
WARNING
To reduce the risk of explosion,
electric shock and property dam-
age, always check the work area for hidden gas
pipes, electrical wires or water pipes when mak-
ing blind or plunge cuts.
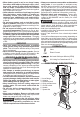
Selecting Speed
To set the maximum speed, rotate the speed dial.
Set the speed dial to "1" for the lowest speed
(11,000 OPM). Set the speed dial to "12" for the
highest speed (18,000 OPM).
Starting/Stopping
1. To start the tool, grasp the handle and slide the
switch forward to the ON (I) position.
2. Allow the tool to come to full speed before begin-
ning work.
3. Control pressure and surface contact between
accessory and workpiece.
4. To stop the tool, slide the switch back to the OFF
(0) position. Make sure the tool comes to a com-
plete stop before laying the tool down.
MAINTENANCE
WARNING
To reduce the risk of injury, always
unplug the charger and remove the
battery pack from the charger or tool before
performing any maintenance. Never disassemble
the tool, battery pack or charger. Contact a
MILWAUKEE service facility for ALL repairs.
Maintaining Tool
Keep your tool, battery pack and charger in good
repair by adopting a regular maintenance program.
Inspect your tool for issues such as undue noise,
misalignment or binding of moving parts, breakage of
parts, or any other condition that may aect the tool
operation. Return the tool, battery pack, and charger
to a MILWAUKEE service facility for repair. After six
months to one year, depending on use, return the
tool, battery pack and charger to a MILWAUKEE
service facility for inspection.
If the tool does not start or operate at full power with
a fully charged battery pack, clean the contacts on
the battery pack. If the tool still does not work prop-
erly, return the tool, charger and battery pack, to a
MILWAUKEE service facility for repairs.
WARNING
To reduce the risk of personal in-
jury and damage, never immerse
your tool, battery pack or charger in liquid or
allow a liquid to ow inside them.
Cleaning
Clean dust and debris from any vents. Keep tool
clean, dry and free of oil or grease. Use only mild
soap and a damp cloth to clean, since certain clean-
ing agents and solvents are harmful to plastics and
other insulated parts. Some of these include gasoline,
turpentine, lacquer thinner, paint thinner, chlorinated
cleaning solvents, ammonia and household deter-
gents containing ammonia. Never use ammable or
combustible solvents around tools.
Repairs
For repairs, return the tool, battery pack and charger
to the nearest authorized service center.
ACCESSORIES
WARNING
Use only recommended accesso-
ries. Others may be hazardous.
For a complete listing of accessories, go online to
www.milwaukeetool.com or contact a distributor.
SERVICE - UNITED STATES
1-800-SAWDUST (1.800.729.3878)
Monday-Friday, 7:00 AM - 6:30 PM CST
or visit www.milwaukeetool.com
Contact Corporate After Sales Service Technical
Support with technical, service/repair, or warranty
questions.
Email: metproductsupport@milwaukeetool.com
Become a Heavy Duty Club Member at
www.milwaukeetool.com to receive important
notications regarding your tool purchases.
SERVICE - CANADA
Milwaukee Tool (Canada) Ltd
1.800.268.4015
Monday-Friday, 7:00 AM - 4:30 PM CST
or visit www.milwaukeetool.ca