
Operator's Manual S/N J49A


5
Remove PSA Sanding Disc Before Storage
Do not store the sander with the sanding disc in-
stalled. Heat generated from sanding causes the
pressure sensitive adhesive to ow and form a tight
bond between the backing pad and sanding disc.
Removing the sanding disc soon after you have n-
ished a sanding operation avoids letting the adhesive
set up. If the sanding disc is left on the backing pad
for an extended period of time after use, the adhesive
will set up and cause the sanding disc to become
dicult to remove.
It may also tear when removing. When this situation
occurs, it becomes dicult to clean the backing pad
for the next sanding disc.
NOTE: If you forget to remove the sanding disc after
a sanding operation, sand for a few minutes to soften
the adhesive backing before attempting to remove
sanding disc.
WARNING
Collected sanding dust from sand-
ing surface coatings such as
polyurethanes, linseed oil, etc. can self-ignite in
the sander dust box or elsewhere and cause re.
To reduce the risk of re always empty the dust
box frequently (10-15 minutes) while sanding and
never store or leave a sander without totally
emptying its dust box. Also follow the recom-
mendations of the coatings manufacturers.
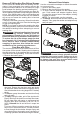
Dust Box with Filter
The dust box provides a dust collection and air ltra-
tion system for the sander. Sanding dust is drawn up
through the holes of the sanding pad and collected
in the dust box during sanding. To use the dust box:
1. Remove the battery pack.
2. To insert, slide the dust box chute into the sander's
dust port. Ensure the dust box vents are facing
up and push sander and dust box together rmly.
Use the extender when using larger M18™ battery
packs
3. To remove, grasp the sander and dust box rmly
and pull apart.
4. To empty, using the tabs, pull o the dust box lid.
Empty dust from the dust box and tap lter clean.
Do not clean lter with water or compressed air.
Replace lter when necessary (Cat. No. 43-31-
0105). Reinstall the lid and ensure it snaps into
place.
For more ecient operation, empty the dust box
when it is no more than half full. This will permit air
to ow through the box better. Always empty and
clean the dust box thoroughly upon completion of
a sanding operation and before storing the sander.
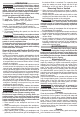
Universal Hose Adapter
Use the universal hose adapter to attach the sander
to a vacuum hose.
1. Remove the battery pack.
2. Remove the dust box from the sander.
3. To insert, slide the adapter into the sander's dust
port. Push sander and adapter together rmly.
Connect the vacuum hose to the adapter, twisting
together to secure.
NOTE: For extra length, use the extender.
4. To remove, disconnect the vacuum hose from the
adapter. Then, grasp the sander and adapter rmly
and pull apart.
WARNING
When sander is not connected to
vacuum, always reinstall dust box
assembly back onto sander. Failure to do so
could cause sanding dust or foreign objects to
be thrown into your face or eyes which could
result in possible serious injury.