
Operator’s Manual


5
If the speed begins to drop o when drilling large or
deep holes, pull the bit partially out of the hole while
the tool is running to help clear dust. Do not use water
to settle the dust since it will clog the bit utes and
tend to make the bit bind in the hole. If the bit should
bind, a built-in, non-adjustable slip clutch prevents
the bit from turning. If this occurs, stop the tool, free
the bit and begin again.
Cold Starting
If this tool is stored for a long period of time or
at cold temperatures, it may not hammer ini-
tially because the lubrication has become stiff.
To warm up the tool:
1. Insert and lock a bit or chisel into the tool.
2. Pull the trigger and apply force to the bit or chisel
against a concrete or wood surface for a few
seconds. Release the trigger
3. Repeat until the tool starts hammering. The colder
the tool is, the longer it will take to warm up.
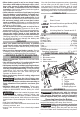
Using Rotary Percussion Core Bits
Core Bits are useful for drilling large or long holes
in concrete. MILWAUKEE Heavy-Duty Core Bits
have heat-treated steel bodies with durable carbide
tips. These core bits are specially designed for fast,
accurate drilling with combined hammering and
rotary action.
1. Clean and lubricate the
threads on the adapter
and core bit to make
later removal easier.
Thread the adapter
shank to the rear of the
core bit.
2. Push the guide plate
onto the pointed end of
the center pin. Insert the
center pin and guide
plate assembly into the
core bit. Be sure the
small end of the center
pin is securely placed
into the hole in the cen-
ter of the core bit.
For LHS systems, screw
the threaded end of the
centering bit into the core bit.
NOTE: If using an extension, first thread the
adapter shank to the extension. Then thread the
core bit to the extension.
3. Insert the adapter into the nose of the tool as
described in “Installing Bits and Chisels”. Set the
knob to the "hammering with rotation" setting.
4. Press the centering bit rmly against your center
mark, hold the tool rmly and pull the trigger.
NOTE: If the 48-20-5099 threaded stud is used,
or a center pin and guide plate are not available,
use a template or notched board to start the hole.
5. Start the tool. After drilling to about the depth
of the core bit teeth, remove the center pin and
guide plate from the core bit (not necesary for LHS
system). Resume drilling.
6. To change the core bit, hold the tool upwards,
pointing it away from your body, and run it briey
in forward to loosen the core bit from the adapter.
NOTE: To make deeper holes, remove the core bit,
break and remove the core, then resume drilling.
When drilling long or deep holes, after each inch
of penetration pull the bit partially out of the hole
while the tool is running, to help clear dust from
the bit utes. Dust can clog the bit utes and can
make the bit bind in the hole. If this occurs, stop
the tool, free the bit and begin again.
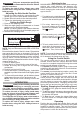
Setting Self-Drilling Anchors
MILWAUKEE Tooth Anchor Chucks require a “B”
taper adapter.
1. Place the proper size tooth anchor chuck into the
“B” taper adapter. Then insert the “B” taper adapter
into the tool and lock it into place as described.
See “Installing Bits and Chisels”.
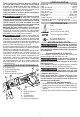
2. Insert the anchor into
1/8"
the tooth anchor chuck.
Set the knob for ham-
mering only. Set the
anchor on your mark
and hammer until the
teeth have penetrated
the concrete.
3. Set the knob for ham-
mering with rotation
and drill until the chuck
is 1/8" above the con-
crete.
NOTE: It may be nec-
essary to clean dust
and cuttings from the
anchor several times
while drilling the hole.
4. Remove the anchor
from the hole while the
tool is running. Clean
the dust and cuttings
from the anchor by
pointing it downward
and turning the tool on
and o several times. Clean the dust out of the
hole with a vacuum cleaner or blowout bulb.
5. Place the expansion plug into the anchor and insert
the anchor into the hole. Switch the knob back to
hammering only, and hammer the anchor rmly
into the hole.