
Use and Care Manual


5
4. Press the centering bit
rmly against your cen-
ter mark, hold the tool
rmly and pull the trig-
ger.
NOTE: If the
48-20-5099 threaded
stud is used, or a cen-
ter pin and guide plate
are not available, use
a template or notched
board to start the hole.
5. Start the tool. After drill-
ing to about the depth
of the core bit teeth,
remove the center pin
and guide plate from
the core bit (not nece-
sary for LHS system).
Resume drilling.
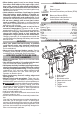
6. To change the core bit, hold the tool upwards,
pointing it away from your body, and run it briey
in forward to loosen the core bit from the adapter.
NOTE: To make deeper holes, remove the core bit,
break and remove the core, then resume drilling.
When drilling long or deep holes, after each inch
of penetration pull the bit partially out of the hole
while the tool is running, to help clear dust from
the bit utes. Dust can clog the bit utes and can
make the bit bind in the hole. If this occurs, stop
the tool, free the bit and begin again.
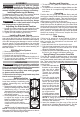
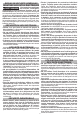
Drilling Large Diameter Holes
with Core Bits
When drilling holes with large diameter core bits,
dust may build up in the cut and can cause the tool
to stall, bind, or cut slowly. By creating an opening
for the dust to escape, drilling time, bit stress, and
tool stress can be reduced.
1. Start the cut as normal.
2. Once the bit is rmly established in
Cut
approximately
1/4" deep with
a core bit.
Drill a hole
through the
work.
Dust and debris
will fall through
the hole.
Top view
Cut
approximately
1/4" deep with
a core bit.
Drill a hole
through the
work.
Dust and debris
will fall through
the hole.
Top view
Cut
approximately
1/4" deep with
a core bit.
Drill a hole
through the
work.
Dust and debris
will fall through
the hole.
Top view
the hole.
Dust and debris
will fall through
the cut (about 1/4" deep), remove
the bit from the cut.
3. Remove the bit from the tool.
4. Install a standard uted bit, ap-
proximately 7/8" in diameter, onto
the tool.
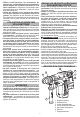
5. Drill a perpendicular hole through
the kerf of the large hole.
• Depending on the location of the
work, the hole should either break
through the other side of the hole/
oor or extend 4"-5" past the end
of the workpiece (such as into the
dirt below a concrete slab).
• If dust builds up in the hole,vacuum
it out and continue drilling.
• If drilling through a wall, the hole
for dust should be drilled on the
Side vie
w
of slab
lowest part of the large hole
kerf as the dust will fall there
when drilling and can be evac-
uated more easily.
6. Reinstall the core bit and con-
tinue drilling. Dust and debris
will fall through the hole and
optimize the cutting ability of
the bit.
NOTE: If unable to drill a hole
Pull bit out as far
as possible onc
e
or twice per inc
h
drilled.
in the kerf, pull back on the bit
with the hammer running. This
will remove some of the dust
and debris from the cut. Repeat
this for every inch of drilling. If
necessary, vacuum dust and
debris from the cut and sur-
rounding area.
7. For core bits, once the maximum
core bit depth is drilled, the core
must be broken and removed.
• Install a chisel bit.
• Place the chisel into the hole
kerf.
• Chisel down into the kerf at
several points until the core is loose or broken.
• Remove the core and vacuum/remove any remain-
ing dust and debris.
• Install the core bit and continue the cut.
WARNING
To reduce the risk of personal in-
jury and damage to the tool or work:
• Always use the “hammering-only” setting to
set the anchor. Never use the “hammering-
with-rotation” setting to set the anchor.
• Never switch the tool to “hammering-with-
rotation” until after the anchor has been set
and the tooth anchor chuck has been removed
from the anchor.
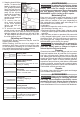
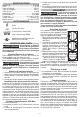
Setting Self-Drilling Anchors
MILWAUKEE Tooth Anchor Chucks require a “B”
taper adapter.
1. Place the proper size tooth anchor chuck into the
“B” taper adapter. Then insert the “B” taper adapter
into the tool and lock it into place as described.
See “Installing Bits and Chisels”.
2. Insert the anchor into
1/8"
the tooth anchor chuck.
Set the knob for ham-
mering only. Set the
anchor on your mark
and hammer until the
teeth have penetrated
the concrete.
3. Set the knob for ham-
mering with rotation
and drill until the chuck
is 1/8" above the con-
crete.
NOTE: It may be nec-
essary to clean dust
and cuttings from the
anchor several times
while drilling the hole.
4. Remove the anchor
from the hole while the
tool is running. Clean
the dust and cuttings
from the anchor by
pointing it downward
and turning the tool on
and off several times. Clean the dust out of the
hole with a vacuum cleaner or blowout bulb.
5. Place the expansion plug into the anchor and insert
the anchor into the hole. Switch the knob back to
hammering only, and hammer the anchor rmly
into the hole.