
User Guide


4
SPECIFICATIONS
Cat. No. ..................................................... 2718-20
Volts .............................................................. 18 DC
Battery Type .................................................M18™
Charger Type ................................................M18™
Module/FCC ID .....................BLE113/QOQBLE113
RPM ...................................................................380
BPM .................................................................2900
Type ......................................................... SDS-Max
Twist bit.......................................................... 1-3/4"
Core bit ................................................................ 6"
Tunnel bit .......................................................2-1/2"
Recommended Ambient
Operating Temperature ......................0°F to 125°F
ASSEMBLY
WARNING
Recharge only with the charger
specied for the battery. For spe-
cic charging instructions, read the operator’s
manual supplied with your charger and battery.
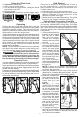
Removing/Inserting the Battery
To remove the battery, push in the release buttons
and pull the battery pack away from the tool.
WARNING
Always lock the trigger or remove
the battery pack any time the tool
is not in use.
To insert the battery, slide the pack into the body
of the tool. Make sure it latches securely into place.
WARNING
Only use accessories specically
recommended for this tool. Others
may be hazardous.
To reduce the risk of injury, always use a side
handle when using this tool. Always brace or
hold securely.
Adjusting the Side Handle Position
1. Loosen the side handle by unscrewing the side
handle grip until the side handle rotates freely.
2. Rotate the side handle to the desired position.
3. Tighten the side handle grip securely.
Installing Bits and Chisels
Be sure that the shank of the bit is clean. Dirt particles
may cause the bit to line up improperly. Do not use
bits larger than the maximum recommended capacity
of the drill because gear damage or motor overload-
ing may result. For best performance, be sure that
the bit is properly sharpened and the shank is lightly
greased before use. Use caution when handling hot
bits and chisels.
SDS-Max Drive System
1. Remove battery pack.
2. Insert the bit or chisel into the nose of the tool.
3. Push bit into tool until it locks.
4. Check to see that the bit is locked by tugging on it.
5. To remove bits and chisels, pull back on the bit
release collar and remove bit.
ONE-KEY™
To learn more about the ONE-KEY™ functionality
for this tool, go to milwaukeetool.com/One-Key. To
download the ONE-KEY™ app, visit the App Store or
Google Play from your smart device.
ONE-KEY™ Indicator
Solid Blue Wireless mode is active and ready
to be congured via the ONE-KEY™
app.
Blinking Blue Tool is actively communicating with
the ONE-KEY™ app.
Blinking Red Tool is in security lockout and can
be unlocked by the owner via the
ONE-KEY™ app.
OPERATION
WARNING
To reduce the risk of injury,
always
remove battery pack before chang-
ing or removing accessories. Only use acces-
sories specically recommended for this tool.
Others may be hazardous.
Keep hands away from the bit and all moving
parts.
Always wear proper eye protection marked to
comply with ANSI Z87.1.
When working in dusty situations, wear appro-
priate respiratory protection or use an OSHA
compliant dust extraction solution.
Always use a side handle when using this tool.
Always brace or hold securely.
Cut embedded rebar only if this operation does
not aect the integrity of the building. If in doubt,
consult a structural engineer. Tool operator fully
responsible for adverse structural eects.
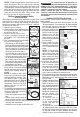
Selecting Action
These MILWAUKEE Rotary Hammers
have three settings: hammering with
rotation, hammering-only, and chisel
adjustment.
1. Hammering with rotation. Use this
setting for drilling holes with drill bits.
2. Hammering only. For use with
“hammering-only” accessories. Use
this setting for chiseling or setting
self-drilling anchors.
3. Chisel adjustment. Use this setting
to adjust the angle of the chisel
blade in relation to the tool. With a
chisel mounted in the tool:
• turn the knob to this setting
• rotate the chisel to the desired
angle
• turn the knob to "hammering-only".
NOTE: To engage the hammering mechanism, main-
tain pressure on the bit. When the pressure on the bit
is released, the hammering will stop.
Starting and Stopping
1. To start the tool, grasp the handle(s) rmly and
pull the trigger.
NOTE: An LED is turned on when the trigger is
pulled and will go o shortly after the trigger is
released.
2. To stop the tool, release the trigger. Make sure
the tool comes to a complete stop before laying
the tool down.