
Use and Care Manual


3
•Before using the battery pack or charger read the
operator’s manuals, and any labels on the battery
pack, charger and tool.
•Recharge only with the charger specied by the
manufacturer. A charger that is suitable for one type
of battery pack may create a risk of re when used with
another battery pack.
• Use tool only with specically designated battery
packs. Use of any other battery packs may create a
risk of injury and re.
• When battery pack is not in use, keep it away from
other metal objects like paper clips, coins, keys,
nails, screws, or other small metal objects that can
make a connection from one terminal to another.
Shorting the battery terminals together may cause
burns or a re.
• Under abusive conditions, liquid may be ejected from
the battery; avoid contact. If contact accidentally
occurs, ush with water. If liquid contacts eyes,
additionally seek medical help. Liquid ejected from
the battery may cause irritation or burns. It may be toxic
if swallowed.
• Do not use damaged battery pack or tool. If battery
pack or appliance are not working as they should, have
been dropped, damaged, left outdoors, or dropped into
water, return them to a service center.
• Do not expose a battery pack or tool to re or
excessive temperature. Exposure to re or temperature
above 265°F (130°C) may cause explosion.
• Follow all charging instructions and do not charge
the battery pack or tool outside the temperature range
specied in the instructions. Charging improperly or at
temperatures outside the specied range may damage
the battery and increase the risk of re.
SERVICE
• Have your power tool serviced by a qualied repair
person using only identical replacement parts. This
will ensure that the safety of the power tool is maintained.
• Never service damaged battery packs. Service
of battery packs should only be performed by the
manufacturer or authorized service providers.
•Maintain labels and nameplates. These carry im-
portant information. If unreadable or missing, contact
a MILWAUKEE service facility for a free replacement.
READ AND SAVE ALL
INSTRUCTIONS FOR
FUTURE USE
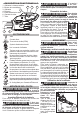
FUNCTIONAL DESCRIPTION
3
4
1
5
1. Speed control button
2. Lock on button
3. Trigger
4. Handle
5. Air intake vent
6. Tube latch
7. Tube
7
2
6
SPECIFICATIONS
Cat. No. ..................................................... 2724-20
Volts.............................................................. 18 DC
Battery Type .................................................M18™
Charger Type................................................M18™
No Load RPM ...............................................14 400
Air speed (CFM) .......................................... 0 - 450
SYMBOLOGY
Volts
Direct Current
No Load Revolutions per Minute (RPM)
Safety Alert Symbol
Read Operator's Manual
Always wear eye protection, hearing protection,
and protective clothing and footwear.
Do not use in rain or wet locations. Electric
shock could occur.
mini mum
50' / 15m
Keep bystanders 50' away during use
Do not point tool at self or bystanders. Objects
may be thrown or ricochet in all directions.
Do not put hands or objects into openings.
Laceration can occur.
Keep hair contained. It can be pulled into
moving parts.
Do not wear loose clothing or jewelry. It can
be pulled into moving parts.
C
US
UL Listing for Canada and U.S.
ASSEMBLY
WARNING
Recharge only with the
charger specied for the
battery. For specic charging instructions, read the
operator’s manual supplied with your charger and
battery.
Removing/Inserting the Battery
To remove the battery, push in the release buttons and
pull the battery pack away from the tool.
WARNING
Always remove battery pack
before changing or remov-
ing accessories.
To insert the battery, slide the pack into the body of the
tool. Make sure it latches securely into place.
WARNING
Only use accessories spe-
cically recommended for
this tool. Others may be hazardous.
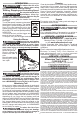
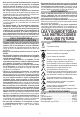
Tube Assembly
WARNING
To reduce the risk of injury,
do not operate blower with-
out tube securely in place. Never reach
into blower through tube hole.
To install, line up the tab on the tube with
the notch in the housing. Slide the tube
into the housing until it snaps in place.
Pull on the tube to ensure it is secure.
To remove the tube for storage, press
the tube latch and pull the tube out of
the housing. Always re-install the tube
before use.