
User Guide


5
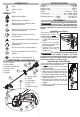
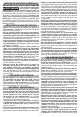
Adjusting the Cutting Diameter
14”
16”
14”
16”
To change the cutting diameter from 14" to 16":
1. Remove the battery pack.
2. Remove the two screws holding the line cut-off
blade.
3. Rotate the blade 180° and reinstall the screws.
Tighten securely.
WARNING
Recharge only with the charger
specied for the battery. For spe-
cic charging instructions, read the operator’s
manual supplied with your charger and battery.
Removing/Inserting the Battery
To remove the battery, push in the release buttons
and pull the battery pack away from the tool.
WARNING
Always remove battery pack before
changing or removing accessories.
To insert the battery, slide the pack into the body
of the tool. Make sure it latches securely into place.
WARNING
Do not use blades, brush cutting
wheels, accessories, or attach-
ment other than those recommended by
MILWAUKEE. Serious injury or product damage
may occur.
Replacing the Cutting Line
Use only MILWAUKEE trimmer line (see Specica-
tions). Replace the cutting line with either 20' of
.095 line or 25' of .080 line. Note, when used near
abrasive surfaces or in dense growth, the cutting
line will wear faster.
1. Remove the battery pack.
2. Clean any grass or debris from the trimmer head.
3. Measure out 20' of .095 line or 25' of .080 line.
CAUTION: When replacing the line, use only
MILWAUKEE .080" or .095" (2 mm or 2.4 mm)
diameter line. Any other line can degrade perfor-
mance or cause damage to the trimmer.
4. Rotate the cap to align the red indi-
cators on the cap with the red indi-
cators above the eyelets.
5. Insert the line through either eyelet
and push through the head so an
equal amount of line extends from
each eyelet.
6. Begin winding the line by rotating
the cap in the direction of the
arrows. Continue twisting until 4"
to 6" of line extends from the
eyelets.
7. Check that the exposed line
extends no further than the line
blade. If the exposed line is too
long, continue winding the cap or trim before use.
8. Under normal operation, the remaining string
should be thrown from the spinning head during
use. If any string remains in the head, or to remove
a length of string to replace with a different type,
turn the trimmer head over and
press the release tabs. Pull the
cover away from the head (2).
Discard any short line rem-
nants. Snap the cover back
onto the trimmer head.
Selecting the Speed
Use the speed control button to select Low
High
Low
or High speeds. Use low speed for larger
jobs where extended battery life is needed.
Use high speed for dense growth applica-
tions.