
Use and Care Manual


6
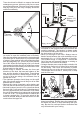
7. Wrap the new or sharpened chain around the
guide bar in the direction indicated on the saw
.
8. Ensure the chain is properly set in the slot around
the entire guide bar.
9. Loop the chain around the hub and t the bar
around the bolts.
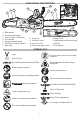
Bolts
Hub
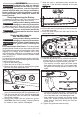
10. Replace the drive cover.
11. Use the adjustment tool to rotate the chain ten-
sioning screw to increase tension (clockwise)
until the chain is snug around the guide bar.
• The tension is correct when the chain snaps
back after being pulled 1/8" (3 mm) away from
the guide bar. No sag should be visible in the
chain.
• Do not over-tension the chain - excess tension
will cause excessive wear and will reduce the
life of the chain and could damage the bar.
• New chains could stretch and loosen during
intitial use. Remove battery pack and check
chain tension frequently during the rst two
hours of use.
12. Tighten the guide bar nuts securely.
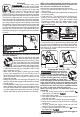
ASSEMBLY
WARNING
Recharge only with the charger
specied for the battery. For spe-
cic charging instructions, read the operator’s
manual supplied with your charger and battery.
Before removing or inserting a battery, push the
hand guard/chain brake forward to ensure the
brake is locked.
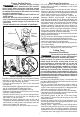
Removing/Inserting the Battery
To remove the battery, push in the release buttons
and pull the battery pack away from the tool.
WARNING
Always remove battery pack before
changing or removing accessories.
To insert the battery, slide the pack into the body
of the tool. Make sure it latches securely into place.
WARNING
Only use accessories specically
recommended for this tool. Others
may be hazardous.
Replacing/Adjusting the
Saw Chain and Bar
WARNING
Always remove battery pack before
changing or removing accessories.
CAUTION
Chain is sharp. Always wear protec-
tive gloves when handling the
chain.
Use
Low Kickback Saw Chains - The rakers (depth
gauges) ahead of each cutter can minimize the force
of a kickback reaction by preventing the cutters from
digging in too deeply at the kickback zone. Only
use replacement chain that is equivalent to original
chain or has been certied as low kickback chain
per ANSI B175.1.
As saw chains are sharpened during their useful life,
they lose some of the low kickback qualities and extra
caution should be used.
1. Remove the battery pack.
2. Place the saw on a at, rm surface.
3. Remove the drive cover by removing the guide
bar nuts using the adjustment tool.
4. Loosen the chain by turning the chain tensioning
screw counterclockwise with the adjustment tool.
5. Pull the guide bar o of the guide bar bolts and
unloop the chain from the drive hub. CAUTION!
Saw Chain is sharp.
6. Remove the chain from the guide bar groove.
CAUTION! Saw Chain is sharp. Inspect guide bar
for cracks or wear; replace if damaged.