OPERATOR'S MANUAL MANUEL de L'UTILISATEUR MANUAL del OPERADOR Cat. No. / No de cat. 2746-20 M18 FUEL™ 18GA BRAD NAILER CLOUEUSE M18 FUEL™ 18GA BRAD M18 FUEL™ 18GA BRAD CLAVADORA WARNING To reduce the risk of injury, user must read and understand operator's manual. AVERTISSEMENT Afin de réduire le risque de blessures, l'utilisateur doit lire et bien comprendre le manuel. ADVERTENCIA Para reducir el riesgo de lesiones, el usuario debe leer y entender el manual.
moving parts. Loose clothes, jewelry or long hair can be caught in moving parts. •If devices are provided for the connection of dust extraction and collection facilities, ensure these are connected and properly used. Use of dust collection can reduce dust-related hazards. •Do not let familiarity gained from frequent use of tools allow you to become complacent and ignore tool safety principles. A careless action can cause severe injury within a fraction of a second.
•Follow all charging instructions and do not charge •Maintain labels and nameplates. These carry the battery pack or tool outside the temperature important information. If unreadable or missing, contact range specified in the instructions. Charging im- a MILWAUKEE service facility for a free replacement. properly or at temperatures outside the specified range • dust created by power sanding, WARNING Some may damage the battery and increase the risk of fire.
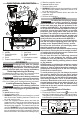
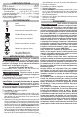
FUNCTIONAL DESCRIPTION 1 2 3 7 4. Slide the magazine closed. To remove fastener strips: 1. Remove battery pack. 2. WARNING! Always point the tool away from yourself and others when installing fasteners. Failure to do so could result in injury. 3. Press the magazine release button and slide the magazine open. 4. Remove the fasteners. 4 OPERATION reduce the risk of injury, always WARNING To wear safety goggles or glasses with side shields.
3. Press and hold the MODE button to toggle between single sequential actuation mode and contact (bump) actuation mode. WARNING! Understand actuation process before use. Single Sequential Actuation The workpiece contact and then the trigger must be activated in a specific sequence to drive a fastener. Contact (Bump) Actuation The workpiece contact and the trigger can be activated in any sequence to drive a fastener. 4. Press and hold the Power button to turn off the tool.
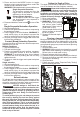
press the workpiece contact against a workRetracting a Dropped Striker piece. Pull the trigger. The tool must operate. If the striker becomes "dropped" and does not retract Release the trigger. The driver must move up. after an operation: 8. Select the Contact Actuation Operation. 1. Remove battery pack. Holding the workpiece contact away from the 2. Remove all fasteners. workpiece, open the magazine (to override the 3. Reinsert battery pack. Reload Indicator) and pull the trigger. The tool 4. Turn tool ON.
SERVICE - UNITED STATES LIMITED WARRANTY - MEXICO, CENTRAL AMERICA & CARIBBEAN 1-800-SAWDUST (1.800.729.3878) TECHTRONIC INDUSTRIES' warranty is for 5 years since the original purchase date. This warranty card covers any defect in material and workmanship on this Product. To make this warranty valid, present this warranty card, sealed/stamped by the distributor or store where you purchased the product, to the Authorized Service Center (ASC).
cuisinières et des réfrigérateurs. Le risque de choc électrique est accru lorsque le corps est mis à la terre. •Ne pas exposer les outils électriques à l'eau ou l'humidité. La pénétration d’eau dans ces outils accroît le risque de choc électrique. •Ne pas maltraiter le cordon d'alimentation. Ne jamais utiliser le cordon d’alimentation pour transporter l’outil électrique et ne jamais débrancher ce dernier en tirant sur le cordon.
sur un socle ou le modifier pour une utilisation fixe. ENTRETIEN •Les réparations de l’outil électrique doivent être con- •Toujours faire preuve de bons sens et procéder fiées à un technicien qualifié, utilisant exclusivement avec prudence lors de l’utilisation d’outils. C’est des pièces identiques à celles d’origine. Le maintien impossible de prévoir toutes les situations dont le de la sûreté de l’outil électrique sera ainsi assuré. résultat est dangereux.
SPECIFICATIONS une défaillance de l’outil et causer des blessures. 4. Fermer le chargeur. Pour retirer une bande d’agrafes : 1. Retirer le bloc-piles 2. AVERTISSEMENT! Ne jamais pointer l’outil ni vers soi, ni vers d’autres personnes lors de l’installation des agrafes. Ne pas procéder de la sorte peut entraîner des blessures. 3. Appuyer sur le bouton de relâchement du poussoir et ouvrir le chargeur. 4. Retirer les agrafes. Volts..............................................................
Sélection de l’alimentation/du déclenchement Déclenchement unique : 1. Tenir la poignée fermement. 2. Appuyer l’outil contre la pièce à clouer en action1. Installer le bloc-piles. nant le dispositif de déclenchement par contact. 2. Appuyer sur le bouton d’alimentation/de déclenchement et le maintenir enfoncé pour démarrer l’outil. 3. Presser la gâchette pour planter une agrafe.
Déblocage d’une agrafe 8. Le percuteur se rétractera. 9. Recharger les éléments de fixation selon les consignes de « Installation/enlèvement de bandes de fixation ». La plupart des blocages sont causés par une agrafe ou une partie d’une agrafe coincée entre la lame d’entraînement et le guide de clous. Les bandes d’agrafes avec un angle d’assemblage incorrect ou une épaisseur d’agrafe erronée peuvent causer un blocage continu. Pour débloquer l’outil : 1. Retirer le bloc-piles 2.
10. Définir la profondeur d’enfoncement conformément à la section « Définition de la profondeur d’enfoncement ». 11.Si tous les tests fonctionnent correctement, l’outil est prêt à être utilisé. Répéter ces tests tous les jours avant l’utilisation ou si l’outil est tombé, a reçu un choc violent ou a été écrasé, bloqué, etc. matériau ou de fabrication et ce pendant une période de cinq (5) ans** à compter de la date d’achat, sauf indication contraire.
utilice una extensión adecuada para uso en exteriores. El uso de una extensión adecuada para el uso en exteriores disminuye el riesgo de descarga eléctrica. • Si es inevitable utilizar una herramienta eléctrica en un lugar húmedo, utilice un alimentador de corriente protegido con un interruptor de circuito por falla de conexión a tierra (GFCI). El uso de un GFCI reduce el riesgo de descarga eléctrica.
REGLAS ESPECIFICAS DE SEGURIDAD PARA CLAVADORAS DE ACABADOS ciones la utilicen. Las herramientas eléctricas son peligrosas en manos de usuarios sin capacitación. • Dé mantenimiento a las herramientas eléctricas y accesorios. Verifique que no haya desalineación, amarre de partes móviles, partes rotas o alguna otra condición que pueda afectar el funcionamiento de la herramienta eléctrica. Si se daña, asegúrese de que la herramienta eléctrica sea reparada antes de que se utilice.
están presentes, comuníquese con un centro de servicio MILWAUKEE para obtener un reemplazo gratuito. • polvos generados por ADVERTENCIA Algunos el lijado eléctrico, aserrado, pulido, taladrado y otras actividades de construcción contienen químicos identificados como causantes de cáncer, defectos congénitos u otros daños reproducti vos.
Para extraer la tira de sujetadores: Encendido/selección de accionamiento 1. Extraiga la batería. 1. Instale la batería. 2. ADVERTENCIA! Siempre apunte la herramienta le- 2. Presione sin soltar el botón de Encendido/Acciojos de usted y otros durante la instalación de sujetanamiento para encender la herramienta. El LED dores. De no hacerlo, podrían producirse lesiones. de la batería indica cuando el nivel de la batería 3.
4. Quite el dedo del gatillo y retire la herramienta de 4. Jale hacia abajo el pestillo de atasco y jale en la pieza de trabajo. dirección contraria a la herramienta. 5. Retire el sujetador y otros desechos (use pinzas Indicador de recarga de punta de aguja si es necesario). Para indicar que el cartucho está casi vacío de sujetadores (quedan aproximadamente 4 o 5), el 6. Cierre el pestillo de atasco. contacto de la pieza de trabajo no comprimirá, evi- 7.
Mantenimiento de las herramientas Siempre apunte la herramienta lejos de usted y otros. 1. Extraiga la batería. 2. ADVERTENCIA! Siempre apunte la herramienta lejos de usted y otros durante la instalación de sujetadores. De no hacerlo, podrían producirse lesiones. 3. Revise todos los tornillos, pernos, tuercas y clavijas de la herramienta. Todos los sujetadores sueltos deben apretarse. 4.
portátil de gasolina, herramientas de mano, palanca y cadena de mano de polipasto - eléctricas, indumentaria calefactada M12™, producto reacondicionado y productos de prueba y medición. Existen garantías por separado y distintas disponibles para estos productos. **El periodo de garantía para los radios para obra, puerto de energía M12™, fuente de poder M18™, ventiladores para obra y carretillas de trabajo industrial Trade Titan™ es de un (1) año a partir de la fecha de compra.