
Use and Care Manual


8
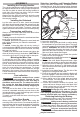
Adjusting the Fences
Every time the bevel or mitre angle settings are changed,
make sure the fences are set correctly.
Fences MUST:
•
Support the workpiece
•
Not interfere with the blade or lower guard
•
Be adjusted to keep hands out of the No Hand Zone
To adjust the Fences
1. Remove battery pack.
2. Loosen the fence lock knobs.
3. Slide the fences side-to-side to the desired posi-
tion to allow for a bevel or compound miter cut.
Position the fences properly for maximum work
support while maintaining hand safety. WARNING!
Ensure fence hand holds are positioned to keep
hands out of the No Hand Zone.
4. Tighten the fence lock knobs securely before mak-
ing a cut.
NOTE: If either fence has any movement forward
to backward, tighten the fence set screw, located
on the back of each fence slot.
5. With the saw OFF and the workpiece removed
from the table, slowly lower the saw head com-
pletely to ensure the guard and blade do not con-
tact the fences when making miter and bevel cuts.
Guards
The lower guard should cover the blade when the
saw head is up and it should move freely and open
automatically as the saw head is lowered into the
workpiece. WARNING! Never disable or remove
guards. Only push the lower guard into the OPEN
position when changing blades.
If the lower guard appears loose, sticks, or does not
cover the blade when the saw head is up, take the saw
to an authorized service center for repairs.
Ensure the Fences are adjusted properly to allow for
free-movement of the guards during the complete
movement of the cut.
Setting for Chop Cuts
The slides can be locked and the saw head set in
the proper position to use the saw for chop cuts (cuts
not requiring the use of the slides).
1. To lock, push Chop Lock to .
2. Slide saw head until it locks into place.
3. To unlock, push Chop Lock to .
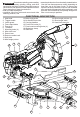
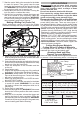
Adjusting the Depth of Cut
The depth of the cut can be adjusted for groove or
rabbet cuts.
1. Remove battery pack.
Depth-stop lever
Lock nut
Knob
2. To set the depth of cut,
rotate the depth stop
lever up.
3. Lower the saw head to
the desired depth of cut.
4. Rotate the depth stop
adjustment knob un-
til it contacts the le-
ver. Lock in the depth
using the lock nut.
5. Make a test cut to verify
the depth of cut is cor-
rect.
6. To remove the depth
of cut limit, loosen the
lock nut by turning counterclockwise and rotate
the lever back.
OPERATION
WARNING
To reduce the risk of injury, always
wear proper eye protection marked
to comply with ANSI Z87.1.
When working in dusty situations, wear appro-
priate respiratory protection or use an OSHA
compliant dust extraction solution.
Keep hands and body out of the path of the saw
blade. Contact with blade will result in serious
injury. Check guarding system to make sure it is
functioning correctly. Do not operate saw without
guards in place. Do not perform any operation
freehand. Never reach around saw blade. Turn
o tool and wait for saw blade to stop before
moving workpiece or changing settings. Tighten
all adjustments prior to use.
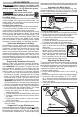
Cut Line Indicator
The cut-line indicator shines down the blade, casting
a shadow where the blade will meet the workpiece.
No calibration/adjustments will be needed as the
shadow will always be true to the blade location.
Use the cut-line indicator switch to turn on the light
before making a cut. The light will go o automatically
about 10 seconds after use.
WARNING
To reduce the risk of injury, do not
rely on the brake as a safety fea-
ture. Always wait until the blade stops com-
pletely before allowing anything near the blade.
To reduce the risk of injury, make sure all adjust-
ments are securely locked before making a cut.
Starting and Stopping the Tool
Always hold the trigger handle rmly because the
starting and stopping action of the motor may cause
the handle to move up or down slightly. WARNING!
Always press down miter lock lever and tighten all
adjustments prior to use. WARNING! Ensure hands
are out of the No Hands Zone.
1. To start the motor, push down the trigger lock and
pull the trigger.
2. To stop the motor, release the trigger. The elec-
tric brake will stop the blade in about 4 seconds.
WARNING! The brake is not a substitute for the
guards and could fail; always wait for the blade to
stop completely before removing the blade from
the workpiece. If the brake fails to stop the blade or
misses frequently, return the tool to a MILWAUKEE
service facility for repair.
Making a Chop Cut
Cut workpieces with chop cuts whenever possible.
Only use sliding cuts (cross cuts) when necessary.
1. Use the chop lock to set the saw in the chop cut
position.
2. Select the desired angles and adjust the fences to
ensure fence hand holds are positioned to keep
hands out of the No Hand Zone.
3. Place the workpiece on the turntable and line up
the cut.
4. Insert battery pack.
5. Support the workpiece using any of the methods
described in "Support the Workpiece Properly".
6. WARNING! Keep hands out of the No Hands
Zone at all times during use. Contact with blade
will result in serious injury.