
Operator’s Manual


10
Two Methods for Cutting Crown Molding
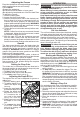
The angles created on a piece of crown molding that
ts at against the ceiling and wall will, when added
together, equal 90° (A + B = 90°).The most common
crown molding angles are :
52
°
/38
°
: A 52° angle against the ceiling (A) and a 38°
angle against the wall (B). The miter saw has spe-
cial miter settings at 31.6° left and right and a bevel
setting at 33.9° to use when cutting 52°/ 38° crown
molding at on the miter saw table. These settings
are identied with a diamond mark.
45
°
/45
°
: A 45° angle against the ceiling (A) and a 45°
angle against the wall (B). The miter saw has special
miter settings at 35.3° left and right and a bevel set-
ting at 30° to use when cutting 45°/ 45° crown at
on the miter saw table. These settings are identied
with a black circle.
NOTE: Even though all of these angles are standard,
rooms are very rarely constructed so the corners
are exactly 90°. You will need to “ne tune” these
settings and make necessary adjustments to the
cutting angles.
Ceiling
Wall
Angle B
Angle A
Inside
corner
Outside
corner
Cutting Crown Molding Flat on the
Miter Saw Table
The advantage of cutting crown molding at on the
table is that it is easier to secure the molding at the
correct cutting position. Also larger pieces of crown
molding may be cut lying at on the miter saw table.
1. Set the bevel and miter angles using the Crown
Molding Miter Angles chart. Tighten the miter lock
lever and the bevel adjustment lever.
2. Using the Positioning section below, correctly
positions the molding.
NOTE: Always make a test cut on scrap material
to conrm all angles are correct.
3. Make the cut according to "Making a Chop Cut".
Cutting Crown Molding Angled Against
the Fence (Nested – in position)
Always use a crown stop (Cat.No. 43-98-0295) when
cutting crown molding angled against the fence.
When cutting crown molding angled against the fence
does not require bevel settings. Small changes in
the miter angle can be made without aecting the
bevel angle. When using this method the saw can
be quickly and easily adjusted for corners that are
not 90° (square).
Positioning
Standard (U.S.) crown molding with 52
°
and 38
°
angles (set bevel angle to 33.85°)
Left side, inside corner
1. Top edge of molding against fence
2. Miter table set right 31.62
°
3. Save left end of cut
Right side, inside corner
1. Bottom edge of molding against fence
2. Miter table set left 31.62
°
3. Save left end of cut
Left side, outside corner
1. Bottom edge of molding against fence
2. Miter table set left 31.62
°
3. Save right end of cut
Right side, outside corner
1. Top edge of molding against fence
2. Miter table set right 31.62
°
3. Save right end of cut
Standard (U.S.) crown molding with 45
°
angles (set
bevel angle to 0°)
Left side, inside corner
1. Top edge of molding against fence
2. Miter table set right 45
°
3. Save left end of cut
Right side, inside corner
1. Bottom edge of molding against fence
2. Miter table set left 45
°
3. Save left end of cut
Left side, outside corner
1. Bottom edge of molding against fence
2. Miter table set left 45
°
3. Save right end of cut
Right side, outside corner
1. Top edge of molding against fence
2. Miter table set right 45
°
3. Save right end of cut
MAINTENANCE
WARNING
To reduce the risk of injury, always
unplug the charger and remove the
battery pack from the charger or tool before
performing any maintenance. Never disassemble
the tool, battery pack or charger. Contact a
MILWAUKEE service facility for ALL repairs.
Maintaining Tool
Keep your tool, battery pack and charger in good
repair by adopting a regular maintenance program.
Inspect your tool for issues such as undue noise,
misalignment or binding of moving parts, breakage of
parts, or any other condition that may aect the tool
operation. Return the tool, battery pack, and charger
to a MILWAUKEE service facility for repair. After six
months to one year, depending on use, return the
tool, battery pack and charger to a MILWAUKEE
service facility for inspection.
If the tool does not start or operate at full power with
a fully charged battery pack, clean the contacts on
the battery pack. If the tool still does not work prop-
erly, return the tool, charger and battery pack, to a
MILWAUKEE service facility for repairs.
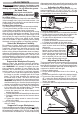
Adjusting the Miter Saw
This Miter Saw is fully adjusted at the factory. If it is not
accurate due to shipping and handling, please follow
these steps to accurately set up your saw. Once the
saw is properly adjusted, it should remain accurate
under normal jobsite and transportation conditions.