
Operator's Manual S/N J35A

15
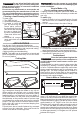
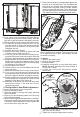
Making a Bevel Rip Cut
WARNING
Make sure the blade guard assem-
bly is installed and working prop-
erly to avoid serious possible injury.
The rip fence must be on the right side of the
blade to avoid trapping the wood and causing
kickback. Placement of the rip fence to the left
of the blade will result in kickback and the risk
of serious personal injury.
1. Remove the battery pack.
2. Remove the miter gauge.
3. Install feather board in the appropriate position for
the cut being made.
4. Adjust the bevel angle to the desired setting.
5. Set the blade to the correct depth for the workpiece.
6. Position the rip fence the desired distance from
the blade for the cut and lock in place.
7. When ripping a long workpiece, place a support
the same height as the table surface behind the
saw for the cut work.
8. Position the workpiece at on the table with the
edge ush against the rip fence.
9. Insert the battery pack.
10. Make sure the wood is clear of the blade before
turning on the saw.
11. Turn ON the saw. Allow the saw to come to full
speed.
12. Hold the workpiece rmly against the rip fence
and table. WARNING! Keep hands at least 3"
away from the blade at all times! If ripping a
narrow piece, use a push stick and/or push blocks
to move the piece through the cut and past the
blade. Once the blade has made contact with the
workpiece, use the hand closest to the rip fence to
guide it. Make sure the edge of the workpiece re-
mains in solid contact with both the rip fence and
the surface of the table. If ripping a narrow piece,
use a push stick and/or push blocks to move the
piece through the cut and past the blade.
13. Turn OFF the saw. Wait for the blade to come to
a complete stop before removing the workpiece.
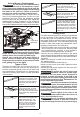
Making a Compound (Bevel) Miter Cut
WARNING
Make sure the blade guard assem-
bly is installed and working prop-
erly to avoid serious possible injury.
The miter gauge must be on the right side of the
blade to avoid trapping the wood and causing
kickback. Placement of the miter gauge to the
left of the blade will result in kickback and the
risk of serious personal injury.
1. Remove the battery pack.
2. Remove the rip fence.
3. Adjust the bevel angle to the desired setting.
4. Set the blade to the correct depth for the workpiece.
5. Set the miter gauge to the desired angle and
tighten the lock knob.
6. Insert the battery pack.
7. Make sure the wood is clear of the blade before
turning on the saw.
8. Turn ON the saw. Allow the saw to come to full speed.
9. Hold the workpiece rmly with both hands on the
miter gauge and feed the workpiece into the blade.
NOTE: The hand closest to the blade should be
placed on the miter gauge lock knob and the hand
farthest from the blade should be placed on the
workpiece.
10. Turn OFF the saw. Wait for the blade to come to
a complete stop before removing the workpiece.
Making a Large Panel Cut
Make sure the saw is properly secured to a work sur-
face to avoid tipping from the weight of a large panel.
WARNING
Make sure the blade guard assem-
bly is installed and working prop-
erly to avoid serious possible injury.
Never make freehand cuts (cuts without the miter
gauge or rip fence). Unguided workpieces can
result in serious injury.
1. Remove the battery pack.
2. Set the blade to the correct depth for the work-
piece.
3. Depending on the shape of the panel, use the rip
fence or miter gauge. If the panel is too large to
use either the rip fence or the miter gauge, it is
too large for this saw.
4. Place a support the same height as the table sur-
face behind the saw for the cut work. Add supports
to the sides as needed.
5. Install a feather board in the appropriate position
for the cut being made.
6. Make sure the wood is clear of the blade before
turning on the saw.
7. Turn ON the saw. Allow the saw to come to full
speed.
8. Use proper hand positions for cross cut or rip cut,
as necessary.
9. Turn OFF the saw. Wait for the blade to come to
a complete stop before removing the workpiece.
Making a Non-Through Cut
Non-through cuts can be made with the grain (rip-
ping) or across the grain (cross cut). The use of
a non-through cut is essential to cutting grooves,
rabbets, and dadoes. This is the only type cut that
is made without the riving knife with blade guard
installed. Use the riving knife without blade guard.
Make sure the blade guard assembly is reinstalled
upon completion of this type of cut. Read the ap-
propriate section which describes the type of cut
in addition to this section on non-through or dado
cuts. For example, if your non-through cut is a rip
cut, read and understand the section on rip cuts
before proceeding.
WARNING
When making a non-through cut,
the blade is covered by the work-
piece during most of the cut. Be alert to the ex-
posed blade at the start and nish of every cut
to reduce the risk of personal injury.
Never feed wood with your hands when making
any non-through cut such as rabbets or dadoes.
To avoid personal injury, always use push blocks,
push sticks, and featherboards.
Do not make complex non-through cuts, such as
plunge cuts, resawing, moulding head cutting,
or plowing.
1. Remove the battery pack.
2. Remove the riving knife with blade guard and
anti-kickback pawls.
3. Install the riving knife.
4. Adjust the bevel angle to 0°.
5. Set the blade to the correct depth for the workpiece.
6. Depending on the shape and size of the work-
piece, use the rip fence or miter gauge.
7. Install a feather board in the appropriate position
for the cut being made.
8. Insert the battery pack.
9. Make sure the wood is clear of the blade before
turning on the saw.