
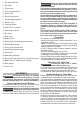
Product Manual


10
To use the extending rip
fence as a table extension:
Use the extending rip fence
to hold the edge of the work-
piece when the fence is
moved out past the end of
the table.
1. Pull the fence lock forward.
2. Use the fence adjusting
knob to move the extend-
ing rip fence out past the
edge of the table.
3. Flip the fence extension over. The tab on the
extending rip fence will t into the lower slot on
the fence.
4. Adjust the fence as needed and push the fence
lock back.
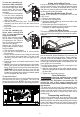
To use the extending rip
fence when cutting thin
(3/4" or less) workpieces
close to the blade:
NOTE: Only use the extend-
ing rip fence in this position
for workpieces 3/4" thick or
less. For thicker workpieces,
use the miter gauge.
Always use a push stick to
keep hands at least 3" away
from the blade.
1. Pull the fence lock forward.
2. Use the fence adjusting knob to move position
the rip fence.
3. Flip the fence extension over. Slide the extending
rip fence back, then push down. The tab on the
extending rip fence will t into the upper slot on
the fence.
4. Adjust the fence as needed and push the fence
lock back.
5. NOTE: If the fence is adjusted close to the blade,
ensure the guard and anti-kickback pawls move
freely. They may rest on top of the fence extension.
WARNING! Never stand directly in line with the
blade. Thin cut-o pieces can be thrown out and
toward the operator when the anti-kickback pawls
are not engaged with the wood.
To store the fence:
When making a cross cut or storing the tool, remove
and store the rip fence, as shown. The fence ts
around the fence lock. NOTE, the fence rail cannot
be adjusted when the fence is in the storage position.
Using an Auxiliary Fence
Use an auxiliary fence for cutting thin pieces of wood,
such as veneer panels, that could get pinched under
the rip fence. To create an auxiliary fence, clamp a
1x4 piece of lumber (without beveled edges) to the
rip fence and ush to the table.
Changing Blade Angle (Bevel)
NOTE: A 90° cut has a 0° bevel and a 45° cut has
a 45° bevel.
1. Remove the battery pack.
2. Lift the bevel locking lever.
3. Grasp the height adjusting wheel and slide to the
desired bevel angle.
4. Push down the bevel locking lever.
5. Check fence clearance before making a cut. Make
a sample cut before beginning work.
Using the Miter Gauge
The miter gauge provides greater accuracy in angled
cuts. For very close tolerances, test cuts are recom-
mended.
Lock Knob
Miter Gauge
Miter Gauge Body
There are two miter gauge grooves, one on either
side of the blade. When making a 90° cross cut, you
can use either miter gauge groove. When making a
beveled cross cut (the blade tilted in relation to the
table) the miter gauge should be located in the groove
on the right so that the blade is tilted away from the
miter gauge and your hands.
The miter gauge can be turned 60° to the right or left.
1. Loosen the lock knob.
2. With the miter gauge in the miter gauge groove,
rotate the gauge until the desired angle is reached
on the scale.
3. Tighten the lock knob securely.
Dust Collection
WARNING
Collected sawdust from coated
(polyurethanes, linseed oil, etc.)
workpieces can self-ignite and cause re. To
reduce the risk of re, empty frequently and
never store or leave a saw without totally empty-
ing sawdust.
The dust chute at the back of the saw can be con-
nected to a vacuum hose (diameter 2.5"/62.6 mm). To
install, push and twist the hose onto the dust chute.
Leave dust chute open to direct dust down into a
garbage can.
Transporting and Storing
Always store all saw parts, such as the fence, miter
gauge, riving knife, riving knife with guard, and blade
wrench, with the saw when transporting and storing.
Lower the blade, remove the battery pack and/or
lock-out the ON/OFF switch before transporting or
storing the saw.