
Product Manual


17
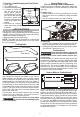
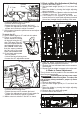
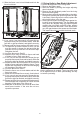
Making a Dado Cut
WARNING
Blades are sharp. Wear work gloves
when handling blades.
Always remove riving knife before
making a dado cut.
An optional dado throat plate is re-
quired for this procedure (For a com-
plete listing of accessories, go online to
www.milwaukeetool.com or contact a
distributor). All blades and dado sets must
not be rated less than the speed of this
tool. This saw is designed for use with a 6" stack
dado (up to width of 3/4"). Do not use an adjustable
dado or molding cutters on this saw.
WARNING
When making a non-through cut,
the blade is covered by the work-
piece during most of the cut. Be alert to the ex-
posed blade at the start and nish of every cut
to reduce the risk of personal injury.
To avoid personal injury, always use push blocks,
push sticks, and featherboards.
1. Remove the battery pack.
2. Remove the riving knife with blade guard and
anti-kickback pawls.
3. Remove the standard blade and install the dado
blade, according to manufacturer instructions,
using the blade and chippers appropriate for the
desired width of cut. NOTE: Always store the throat
plate, blade, ange, and bolt in a secure location.
4. Install the dado throat plate and rotate the blade
by hand to make sure it turns freely then lower
the blade.
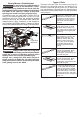
5. Depending on the shape and size of the work-
piece, use the rip fence or miter gauge.
6. Install a feather board in the appropriate position
for the cut being made.
7. Insert the battery pack.
8. Make sure the wood is clear of the blade before
turning on the saw.
9. Turn ON the saw. Allow the saw to come to full
speed.
10. Use a push stick and/or push blocks to move the
piece into the cut.
11. Turn OFF the saw. Wait for the blade to come to
a complete stop before removing the workpiece.
12. Once all non-through cuts are complete, remove
the battery pack and reinstall the standard blade,
throat plate, riving knife with guard and anti-
kickback pawls.
Troubleshooting
Problem Cause Solution
Excess
vibration.
B
lade is out of
balance.
Blade is damaged.
Saw is not mounted
securely.
Work surface is
uneven.
Blade is warped.
Replace blade.
Replace blade.
Tighten all
hardware.
Reposition on at
surface. Adjust
legs of optional
stand.
Check saw blade
installation.
Replace blade if
necessary.
Rip fence
does not
move
smoothly.
Rip fence not
mounted correctly.
Rails are dirty or
sticky.
Remount the rip
fence.
Clean rails.
Cutting
binds or
burns work.
Blade is dull.
Blade is heeling.
Work is fed too fast.
Rip fence is
misaligned.
Wood is warped.
Riving knife is out of
alignment.
Replace or sharpen
blade.
See
Blade to Miter
Slot Adjustment
(Heeling)
.
Slow the feed rate.
Align the rip fence.
Replace the wood.
Always cut with
convex side to
table surface.
See Riving Knife
to Saw Blade
Adjustment.
Wood
edges away
from rip
fence when
ripping.
Blade not properly
sharpened or set.
Resharpen or set
blade.
Saw does
not make
accurate
90˚ or 45˚
cuts.
Bevel adjustment is
out of alignment.
See Bevel
Adjustments at 0°
and 45°
Height
adjusting
hand-wheel
is hard to
turn.
Gears or screw post
inside cabinet are
clogged with saw
dust.
Clean the gears or
screw post.
S
aw does
not start.
Battery pack is at end
of charge.
Battery pack contacts
are dirty.
Charge battery
pack.
Clean battery pack
contacts.
Blade
makes poor
cuts.
Blade is dull or dirty.
Blade is wrong type
for cut being made.
Blade is mounted
backwards.
Clean, sharpen, or
replace blade.
Replace with
correct type.
Remount blade.
Motor
labors in rip
cut.
Blade not proper for
rip cut.
Work is fed to fast
into blade.
Change blade; rip
blade typically has
fewer teeth.
Slow feed rate.
Saw
shuts o
unexpectedly
Battery over-
temperature
Allow battery to
cool for 10 minutes
before use.