
Use and Care Manual


9
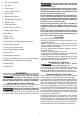
Changing the Riving Knife
WARNING
Use the appropriate saw blade for
the riving knife. Match kerf width
of blade (>1.8 mm) and blade body thickness
(<1.55 mm) with the marking on the riving knife
to reduce the risk of kickback. Failure to heed
this warning could result in personal injury.
Two riving knives are provided with the saw; the
riving knife with guard, and the riving knife without
guard. The riving knife with guard should be used for
through cutting operations for maximum protection
against kickback. When performing an operation
that requires "non-through cutting", use the riving
knife without guard. Do not use any riving knife when
making a dado cut.
Store the riving knife on the table saw frame when
not in use (see "Functional Description" for storage
location).
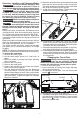
To change the riving knife:
1. Remove the battery pack.
2. Raise the blade by turning the height adjusting
wheel clockwise.
3. Release the riving knife release lever.
4. To remove, pull the riving knife straight up.
5. To install, insert the riving knife into the slot
directly behind the blade until it is rmly seated.
NOTE: if the release lever is not fully open, the
riving knife may not fully seat.
6. Close the riving knife release lever fully.
7. Gently tug on the riving knife to ensure it is locked
into place.
8. When using the riving knife with guard, lift the
guard legs and ensure the move independently
and contact the table top. The guard legs can be
raised to line up the cut, but must be lowered to
contact the table top before starting the saw.
Release
lever
Installing Anti-kickback Pawls
WARNING
Always install the anti-kickback
pawls onto the riving knife with
guard when performing "through cutting" opera-
tions.
Replace dull or damaged anti-kickback pawls.
Dull or damaged pawls may not stop a kickback
increasing the risk of serious personal injury.
Anti-kickback pawls should only be installed for
through cuts.
1. Remove the battery pack.
2. Raise the blade by turning the height adjusting
wheel clockwise.
3. Install the riving knife with guard.
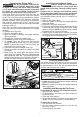
4. Press in the pawl release button and insert the slot
in the pawl joint into the riving knife notch. Press
down on the joint. NOTE: It may be easier to install
the pawls from the front of the saw.
5. Gently tug on the pawl joint to ensure it is locked
into place. Ensure the pawls move freely and are
not engaged in the throat plate slot.
3. Press down
2. Insert
1. Press button
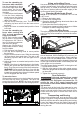
Changing Blade Depth
The blade depth should be set so that the outer
points of the blade are higher than the workpiece
by approximately 1/8" to 1/4" but the lowest points
(gullets) are below the top surface.
1/8" - 1/4"
1. Remove the battery pack.
2. Lower the blade by turning the height adjusting
wheel counterclockwise.
3. Raise the blade by turning the height adjusting
wheel clockwise.
Installing and Moving the Rip Fence
To install the rip fence on one of the fence posts:
1. Open the fence latches.
2. Fit the notches in the fence over the correspond-
ing fence posts.
3. Close the fence latches.
4. Check that the fence is square to the blade (see
"Blade to Fence Adjustment" in Maintenance).
To move the rip fence:
1. Pull the fence lock forward.
2. Use the fence adjusting knob to move the rip
fence left or right.
3. Push the fence lock back.