
Use and Care Manual


6
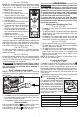
WARNING
To reduce the risk of injury, do not
start the tool with the blade con-
tacting the workpiece.
To reduce the risk of injury, be sure the blade
always extends beyond the shoe and workpiece
throughout the stroke. Blades may shatter if they
impact the workpiece.
Making the Cut
1. Set the orbital action according the material to be cut.
2. Position the tool with the front part of the shoe on
the workpiece and start the tool.
3. Hold the shoe rmly against the workpiece and
guide the tool along the desired cutting line. Do not
feed into the work too hard, light pressure on the
saw blade will achieve the optimum cutting speed.
Special Cutting Techniques
1. Straight cuts — To obtain a perfectly straight cut,
clamp a strip of wood as a guide along the work-
piece or use the rip guide (accessory).
2. Bevel cuts — adjust the shoe to the correct angle
(see Adjusting the Shoe).
3. Cutting Sheet Metal — sheet metal may vibrate
when being cut. To minimize vibration clamp, the
workpiece to a wood base.
WARNING
To reduce the risk of explosion,
electric shock and property dam-
age, always check the work area for hidden gas
pipes, electrical wires or water pipes when mak-
ing blind or plunge cuts.
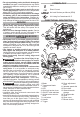
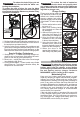
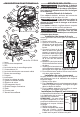
Plunge Cutting
Plunge cuts can be made into
soft materials without a pre-
drilled hole. Harder materials
require a starter hole with a
diameter slightly over the width
of the blade. To make a plunge
cut:
1. Set the orbital action selec-
tor lever to 0.
2. Make sure nothing below
the intended cut area will
be damaged.
3. Without turning the tool on,
place the front edge of the
shoe solidly on workpiece.
4. Align the blade with the
intended cut line, but keep
it above the workpiece.
5. Using the front edge of the
shoe as a pivot, turn on the
tool and gradually lower the
blade into the workpiece.
6. When the shoe is flat
against the workpiece, nor-
mal cutting may take place.
MAINTENANCE
WARNING
To reduce the risk of injury, always
unplug the charger and remove the
battery pack from the charger or tool before
performing any maintenance. Never disassemble
the tool, battery pack or charger. Contact a
MILWAUKEE service facility for ALL repairs.
Maintaining Tool
Keep your tool, battery pack and charger in good
repair by adopting a regular maintenance program.
Inspect your tool for issues such as undue noise,
misalignment or binding of moving parts, breakage of
parts, or any other condition that may aect the tool
operation. Return the tool, battery pack, and charger
to a MILWAUKEE service facility for repair. After six
months to one year, depending on use, return the
tool, battery pack and charger to a MILWAUKEE
service facility for inspection.
If the tool does not start or operate at full power with
a fully charged battery pack, clean the contacts on
the battery pack. If the tool still does not work prop-
erly, return the tool, charger and battery pack, to a
MILWAUKEE service facility for repairs.