
Use and Care Manual


4
OPERATION
WARNING
Always remove battery pack before
changing or removing accesso-
ries. Only use accessories specically recom-
mended for this tool. Others may be hazardous.
To reduce the risk of injury, always wear safety
goggles or glasses with side shields.
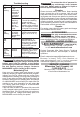
Pressing
• Before beginning a press, inspect the jaw assembly
for cracks or other damage. Do not use a damaged
jaw assembly. Return damaged jaw assembly to a
MILWAUKEE service facility.
• The tool will turn off automatically after 30 minutes
of no use.
• Inspect and discard workpieces with cracks or wear
before use. Materials may crack or shatter.
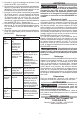
1. Turn the tool ON by quickly pressing and releasing
the start button.
2. Open the jaws and
place around the
tting.
3. Hold tool securely.
Press and hold the
start button. The
green LED will go
out.
4. The automatic
press cycle be-
gins. Release the
start button and
continue to hold
the tool securely.
5. When the press
cycle is complete
the tool will switch
off and the green
LED will light.
6. To cancel the auto-
matic press cycle,
press and hold the release button. Hold tool
securely until jaws open and the tool turns off.
7. If the tool is in use for 30 minutes continuously
(e.g., on a manufacturing xture), allow the tool to
cool down for at least 15 minutes before continu-
ing. Under normal use (e.g., plumbing/mechanical)
press freely and pay attention to the LED indicators
(see "Troubleshooting").
8. If the red LED lights, press the start button. If the
tool does not run, return the tool to a MILWAUKEE
service facility for repairs.
9. If the red and green LEDs ash alternately, the
tool must be serviced by a MILWAUKEE service
facility.
ASSEMBLY
WARNING
Recharge only with the charger
specied for the battery. For spe-
cic charging instructions, read the operator’s
manual supplied with your charger and battery.
Removing/Inserting the Battery
To remove the battery, push in the release buttons
and pull the battery pack away from the tool.
WARNING
Always remove battery pack before
changing or removing accessories.
To insert the battery, slide the pack into the body
of the tool. Make sure it latches securely into place.
WARNING
Only use accessories specically
recommended for this tool. Others
may be hazardous.
Use tool only with MILWAUKEE or MILWAUKEE
approved press jaws, press ttings, and pipe for
which they are designed. Other uses may cause
injury or damage to the tool, accessories, and
pipes. Leaking may result.
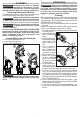
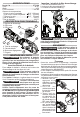
Inserting/Removing the Press jaw
1. Pull out the retaining pin (1).
2. Insert the press jaw (2).
3. Push in the retaining pin (3).
2
1
3
CAUTION
To avoid damage to the tool, do not
operate the tool without the retain-
ing pin fully inserted. Damage to the cylinder may
occur.