
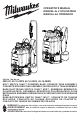
Operator's Manual S/N K62A


5
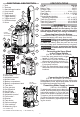
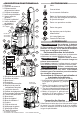
Filling the Tank
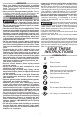
WARNING
Before lling the tank, remove the
tank from the base.
Ensure battery door is closed and latched when-
ever chemicals are present.
Mix chemicals per manufacturer's instructions.
Failure to follow instructions may cause harsh
chemicals to injure user or damage tool.
A removable strainer prevents debris that can clog
or damage the pump from entering thetank. Label
tank contents accordingly during each use. Only
put recommended liquids in tank. Only use water in
water supply tank.
1. Ensure the battery door is closed securely.
2. Remove the tank from the base and
set on a level surface away from the
base to prevent exposing the base
to harsh chemicals.
3. Unscrew and remove the tank cap;
ensure strainer is in place.
4. Fill the tank (up to 4 gallons; do not
overll). Use the gallon markings on
the side of the tank as a guide.
5. Reinstall the tank cap.
6. Reinstall the tank.
Installing the Tank
1. Ensure the battery door is closed securely.
2. Slide tank hooks into base and seat tank into tank
reservoir in the base.
3. Secure tank to base with front and rear tank
latches; ensuring the tank is level, rmly seated,
and all seals are aligned.
WARNING
When filled, the sprayer will be
heavy, take care when putting on
the backpack to avoid strain.
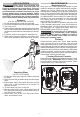
Putting on the Backpack
1. Ensure tank is securely attached to base with front
and rear tank latches, tank cap is installed, and
battery door is latched.
2. Pick up the backpack by one of the shoulder
straps, slide your arms through each shoulder
strap.
3. With the sprayer on your back, tighten the shoulder
and waist straps until they t snugly and securely,
high on your back. Connect chest strap.
4. Be sure the shoulder, chest, and waist straps are
tight but comfortable; if they are too loose, the
sprayer may slide around on your back, making it
uncomfortable to wear.
5. Be aware tank contents may shift during use and
movement, such as twisting or bending over.
OPERATION
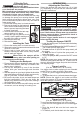
Adjusting the Flow Rate
Select the desired ow rate from Low (1) to High
(5), depending on the job and the chemical manu-
facturer's instructions.
Flow
Rate
2820-20PS
(Stream Nozzle)
2820-20CS
(Stream Nozzle)
2820-20WS
(Open Flow)
1 0.10 GPM 0.14 GPM 0.16 GPM
2 0.17 GPM 0.21 GPM 0.22 GPM
3 0.24 GPM 0.33 GPM 0.35 GPM
4 0.35 GPM 0.44 GPM 0.53 GPM
5 0.51 GPM 0.82 GPM 1.13 GPM
WARNING
To reduce the risk of injury, always
wear personal protective equip-
ment (PPE) according to the chemical manufac-
turer's instructions. Always wear eye protection.
Always ensure battery compartment latch is
securely closed before use.
Ensure trigger handle lock-on is not engaged
before turning ON tool.
Turning the Sprayer ON/OFF
1. Install the battery pack. Close and latch the battery
compartment.
2. To turn the sprayer ON, press the ON/OFF switch to "I".
The Power LED will light green.
3. To start the ow of liquid at the spray wand, pull
the trigger.
4. To stop the ow of liquid at the spray wand, re-
lease the trigger.
5. To turn the sprayer OFF, press the ON/OFF switch
to "O".
NOTE: Be aware some spray material may remain
inside the spray wand and drip out. To drain, turn o
the tool, then pull the trigger and point the tool down
until dripping stops.
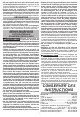
Trigger Lock-On
(Cat. No. 49-16-28PS, 49-16-28CS)
Use trigger lock-on when spraying for an extended
period of time or when covering a large area.
1. To lock-on, pull the trigger and push in the lock-on
button.
2. To release the lock-on, pull and release the trigger.
NOTE: Ensure the trigger is not locked on before
turning the sprayer o to avoid accidental spraying
when the sprayer is restarted.
1
2
Trigger Lock-On
Trigger Lock-O
Trigger Lock-O
(Cat. No. 49-16-28PS, 49-16-28CS)
To avoid accidental spraying, lock-o the trigger.
1. Press the lock-o toggle at the end of the trigger
(1).
2. Hook the lock-o tab onto the hook under the
trigger (2).
3. To release, push the tab back into the trigger.