
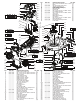
Replacement Part List
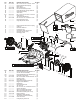
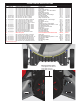

PROCEDURAL OVERVIEW
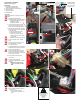
Surface prep and glue
Equipment
1. Sure Bonder (PRO9700A)
Adjustable Temp Glue Gun
2. Element HMS707 (Hot Melt Glue)
3. Cleaning Pads
4. Isopropyl Alcohol
5. ESD Bracelet
Procedure
ESD Protection must be worn in this
station.
1. Sure Bonder (PRO9700A)
Adjustable Temp Glue Gun Settings:
• Temperature Setting is 320°F.
• Trigger Pull is set to
Full Stroke (Approx. 1”).
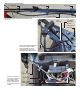
2. Locate and Clean the connector
location with an Isopropyl wipe.
Remove excess Dielectric Grease.
3. Wipe Excessive Dielectric Grease
off the connector on all 4 sides with
an alcohol wipe.
a. Take one wipe per mower
b. Soak wipe with alcohol
c. Use wipe to remove excess
Dielectric Grease from 4 sides
of connector
d. Discard wipe after each mower
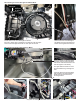
4. Push Connector in with ~5lbf of
force
5. Visually inspect that connector is
properly seated - check for
connector damage
6. Use PRO9700A Glue Gun to Apply
Hot Melt to harness and connector
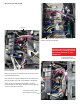
7. Apply 1st Trigger Stroke
(~5 Seconds) starting at the wire
harness and working in an arcing
motion (back and forth) towards the
base of the connector
8. Pause to allow for slight cure
(~ Seconds)
9. Apply 2nd Trigger Stroke
(~ Seconds) repeating the process
for Step 4
a. Work to encapsulate the
entire connector with Hot
Melt
10. Inspect Glue application after 30
Second Cure
a. Ensure Connector and
Harness are encased in Hot
Melt
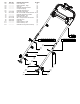
Metal must be in
contact with skin.
Technician must
stand on mat.
Grounding Clip
ESD
Bracelet
1”
1 1
2
2
3
3
4
5
6
7 8
9 10
ATTENTION
OBSERVE PRECAUTIONS
FOR HANDLING
ELECTROSTATIC
SENSITIVE
DEVICES