
Use and Care Manual


6
If the tool does not start or operate at full power with
a fully charged battery pack, clean the contacts on
the battery pack. If the tool still does not work prop-
erly, return the tool, charger and battery pack, to a
MILWAUKEE service facility for repairs.
ONE-KEY™
WARNING
Chemical Burn Hazard.
This device contains a
-
close securely, stop using the device, remove the
-
Internal Battery
An internal battery is used to facilitate full ONE-KEY™
functionality.
To replace the battery:
1. Remove the battery pack.
2. Remove the screw(s) and open the battery door.
3. Remove the old battery, keep it away from children,
and dispose of it properly.
4. Insert the new battery (3V CR2032), with the posi-
tive side facing up.
5. Close the battery door and tighten the screw
securely.
WARNING
To reduce the risk of personal in-
jury and damage, never immerse
Cleaning
Clean dust and debris from vents. Keep handles
clean, dry and free of oil or grease. Use only mild
soap and a damp cloth to clean, since certain clean-
ing agents and solvents are harmful to plastics and
other insulated parts. Some of these include gasoline,
turpentine, lacquer thinner, paint thinner, chlorinated
cleaning solvents, ammonia and household deter-
gents containing ammonia. Never use ammable or
combustible solvents around tools.
Repairs
For repairs, return the tool, battery pack and charger
to the nearest service center.
ACCESSORIES
WARNING
Use only recommended accesso-
For a complete listing of accessories, go online to
www.milwaukeetool.com or contact a distributor.
SERVICE - UNITED STATES
1-800-SAWDUST (1.800.729.3878)
Monday-Friday, 7:00 AM - 6:30 PM CST
or visit www.milwaukeetool.com
Contact Corporate After Sales Service Technical
Support with technical, service/repair, or warranty
questions.
Email: metproductsupport@milwaukeetool.com
Become a Heavy Duty Club Member at
www.milwaukeetool.com to receive important
notications regarding your tool purchases.
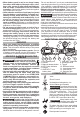
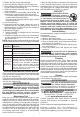
3. Rotate the jaws to the desired angle.
4. Open the jaws by sliding the jaw release lever.
5. Place jaws around workpiece and close the swing-
ing jaw. Press in the locking pin.
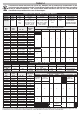
6.
Crimps should be uniformly placed on the barrel
of the connector.
7.
Crimps should be reasonably placed within the
color bands or knurled area of the connector.
- For splices, begin crimping in the center, working
outward while alternating sides.
- For lugs, begin crimping near the pad, working
towards the barrel.
8. Hold tool securely.
9. Press and hold the trigger. When the cycle is
complete the tool will automatically return to its
starting position. An LED will light the workpiece
when the trigger is pulled.
10. Release the trigger.
11.
The die identier is stamped into the connector
during the crimp.
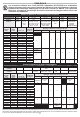
12. Continue crimping according to the instructions
in Table A or the connector manufacturer's instal-
lation instructions.
NOTE: After the cycle reaches a certain point, the crimp
may automatically nish, even if the trigger is released.
LED
Indicator
Solid Green Tool completed the operation and
reached full crimping pressure.
Solid Red Tool completed the operation but did NOT
reach full crimping pressure.
Flashing Red Tool did NOT complete the operation.
Flashing
Red/Green
(after Solid
Green or
Solid Red)
Tool has reached its service interval
(20,000 crimps). Red/Green flashing
will begin after the solid Red or Green
indicator for the operation is displayed.
Tool will stop operating after 25,000
cycles. Return tool to a MILWAUKEE
service facility for inspection and
preventative maintenance.
Reverse Button/Manual Release Button
If the jaws need to be opened without completing the
cycle, press the reverse button. Hold tool securely
until the ram retracts fully.
If the jaws must be opened without the battery pack
installed, press and hold the Manual Release Button
until the ram retracts fully.
MAINTENANCE
WARNING
To reduce the risk of injury, always
unplug the charger and remove the
MILWAUKEE service facility for ALL repairs.
Maintaining Tool
Keep your tool, battery pack and charger in good
repair by adopting a regular maintenance program.
Inspect your tool for issues such as undue noise,
misalignment or binding of moving parts, breakage of
parts, or any other condition that may aect the tool
operation. Return the tool, battery pack, and charger
to a MILWAUKEE service facility for repair. After six
months to one year, depending on use, return the
tool, battery pack and charger to a MILWAUKEE
service facility for inspection.