
Product Manual


5
Starting, Stopping and Controlling Speed
These tools may be operated at any speed from 0
to full speed.
1. To start the tool, pull the trigger.
NOTE: An LED is turned on when the trigger is pulled.
2. To vary the driving speed, increase or decrease
pressure on the trigger. The further the trigger is
pulled, the greater the speed, up to the max RPM
set by the MODE.
3. To stop the tool, release the trigger.
Impacting Techniques
The longer a bolt, screw, or nut is impacted, the
tighter it will become. To help prevent damaging the
fasteners or workpieces, avoid excessive impact-
ing. Be particularly careful when impacting smaller
fasteners because they require less impacting to
reach optimum torque.
Practice with various fasteners, noting the length of
time required to reach the desired torque. Check the
tightness with a hand-torque wrench. If the fasteners
are too tight, reduce the impacting time. If they are
not tight enough, increase the impacting time.
Oil, dirt, rust or other matter on the threads or under the
head of the fastener aects the degree of tightness.
The torque required to loosen a fastener averages
75% to 80% of the tightening torque, depending on
the condition of the contacting surfaces.
On light gasket jobs, run each fastener down to a
relatively light torque and use a hand torque wrench
for nal tightening.
MAINTENANCE
WARNING
To reduce the risk of injury, always
unplug the charger and remove the
battery pack from the charger or tool before
performing any maintenance. Never disassemble
the tool, battery pack or charger. Contact a
MILWAUKEE service facility for ALL repairs.
Maintaining Tool
Keep your tool, battery pack and charger in good
repair by adopting a regular maintenance program.
Inspect your tool for issues such as undue noise,
misalignment or binding of moving parts, breakage of
parts, or any other condition that may aect the tool
operation. Return the tool, battery pack, and charger
to a MILWAUKEE service facility for repair. After six
months to one year, depending on use, return the
tool, battery pack and charger to a MILWAUKEE
service facility for inspection.
If the tool does not start or operate at full power with
a fully charged battery pack, clean the contacts on
the battery pack. If the tool still does not work prop-
erly, return the tool, charger and battery pack, to a
MILWAUKEE service facility for repairs.
OPERATION
WARNING
To reduce the risk of injury, always
wear proper eye protection marked
to comply with ANSI Z87.1.
When working in dusty situations, wear appro-
priate respiratory protection or use an OSHA
compliant dust extraction solution.
Always remove battery pack before changing
or removing accessories. Only use accessories
specically recommended for this tool. Others
may be hazardous.
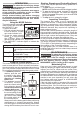
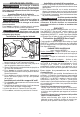
Using the MODE Selector
The mode selector button is
Mode Selector Button
Mode
Indicators
ONE-KEY™
Indicator
used to select the mode set in
the ONE-KEY™ app.
To select the mode:
1. Pull and release the trigger
to turn on the tool. The cur-
rent mode indicator is lit.
2. Press the mode selector
button to cycle through
the 4 modes. When the
desired mode indicator is lit, begin work.
3. The ONE-KEY™ Indicator lights, to indicate the
following:
ONE-KEY™ Indicator
Solid Blue Wireless mode is active and ready
to be congured via the ONE-KEY™
app.
Blinking Blue Tool is actively communicating with
the ONE-KEY™ app.
Blinking Red Tool is in security lockout and can
be unlocked by the owner via the
ONE-KEY™ app.
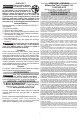
Using the Control Switch
The control switch may be set to three positions: for-
ward, reverse and lock. Due to a lockout mechanism,
the control switch can only be adjusted when the trig-
ger is not pressed. Always allow the motor to come
to a complete stop before using the control switch.
1. For forward (clockwise)
Push for
forward
Push for
reverse
Push
to
center
to lock
rotation, push the con-
trol switch in the direc-
tion shown. Check the
direction of rotation
before use.
2. For reverse (counter-
clockwise) rotation,
push the control switch
in the direction shown.
Check the direction of
rotation before use.
3. To lock the trigger, push
the control switch to the
center position. The trig-
ger will not work when
the control switch is in
the locked position.
Always remove the battery pack before performing
maintenance or changing accessories. Always
lock the trigger or remove the battery pack before
storing the tool and any time the tool is not in use.