
Use and Care Manual


5
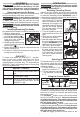
center position. The trigger will not work while the
control switch is in the center locked position. Always
lock the trigger or remove the battery pack before
performing maintenance, changing accessories,
storing the tool and any time the tool is not in use.
Threading
Properly prepare the pipe. Make sure the pipe is
squarely cut and deburred. Pipe cut at an angle can
damage the dies while threading and can cause
diculty engaging the die head. The pipe must be
stable and secured to prevent tipping during use. Use
appropriate pipe stands to support pipe length.
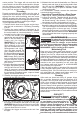
To cut Right-Handed Threads:
1. Position the die head over the pipe end and sup-
port the tool as directed in “Resisting Threading
Forces”.
2. Position the control switch to "clockwise"
for
dies inserted from the left side of the tool. Position
the control switch to “counterclockwise”
for dies
inserted from the right side of the tool.
3. To start the thread, push
against the side grip with the
palm of the free hand, and
slowly pull the trigger.
WARNING! Do not wear
gloves, jewelry or use a rag
while pushing on the side
grip; this increases the risk of
entanglement and injury.
Once the dies engage the
pipe, threads will be cut as
the dies pull themselves onto
the end of the pipe. WARN-
ING! Always rmly hold the
tool to resist the tool forces.
Support devices could, in
rare cases, slip and allow the
tool to move.
4. Once the dies have engaged
the pipe, stop pushing on the
side grip and use an oiler to
apply a generous quantity
of thread-cutting oil to the area. This will lower
the necessary threading torque, improve thread
quality, and increase die life.
5. Release the trigger when the end of the pipe is
even with the end of the dies.
6. Use the control switch to reverse the tool. Pull
the trigger to thread the die head o of the pipe.
WARNING! Always rmly hold the tool to resist the
tool forces. Support devices could, in rare cases,
slip and allow the tool to move.
7. Release the trigger and remove the tool from
the pipe.
8. Maintain the tool and die head after use. Remove
battery pack and clean oil and cutting debris from
the tool and die. WARNING! Cuttings may be
sharp. Clean up any oil spills to maintain a safe
work environment.
For Left-Handed Threads, reverse the clockwise/
counterclockwise selections.
Inspecting Threads/Using a Ring Gauge
1. Wipe any oil, chips or debris from the thread.
2. Inspect the thread. Threads should be smooth,
complete, and in good form. If irregularities such
as thread tearing, thin threads, or pipe out-of-
roundness are seen, the thread may not seal.
3. To check the size of the thread with a ring gauge,
thread the gauge onto the pipe and hand-tighten.
The end of the pipe should be ush with the side
of the gauge (plus or minus one turn). If thread
does not gauge properly, cut o the thread, adjust
the die head, and cut another thread. WARNING!
Using a thread that does not gauge properly can
cause leaks.
MAINTENANCE
WARNING
To reduce the risk of injury, always
unplug the charger and remove the
battery pack from the charger or tool before
performing any maintenance. Never disassemble
the tool, battery pack or charger. Contact a
MILWAUKEE service facility for ALL repairs.
Maintaining Tool
Keep your tool, battery pack and charger in good
repair by adopting a regular maintenance program.
Inspect your tool for issues such as undue noise,
misalignment or binding of moving parts, breakage of
parts, or any other condition that may aect the tool
operation. Return the tool, battery pack, and charger
to a MILWAUKEE service facility for repair. After six
months to one year, depending on use, return the
tool, battery pack and charger to a MILWAUKEE
service facility for inspection.
If the tool does not start or operate at full power with
a fully charged battery pack, clean the contacts on
the battery pack. If the tool still does not work prop-
erly, return the tool, charger and battery pack, to a
MILWAUKEE service facility for repairs.
Cleaning
After each use, clean tool of any oil, grease, chips,
dirt, or residue. Keep tool clean, dry and free of oil
or grease. Use only mild soap and a damp cloth to
clean, since certain cleaning agents and solvents
are harmful to plastics and other insulated parts.
Some of these include gasoline, turpentine, lacquer
thinner, paint thinner, chlorinated cleaning solvents,
ammonia and household detergents containing am-
monia. Never use ammable or combustible solvents
around tools.
ONE-KEY™
WARNING
Chemical Burn Hazard.
This device contains a
lithium button/coin cell battery. A new
or used battery can cause severe in-
ternal burns and lead to death in as
little as 2 hours if swallowed or enters the body.
Always secure the battery cover. If it does not
close securely, stop using the device, remove the
batteries, and keep it away from children. If you
think batteries may have been swallowed or en-
tered the body, seek immediate medical attention.