
User Guide


6
Operator's Zones
Installing/Removing the Type 1
Clip-on Guard
When using a Type 1 wheel, always use the Type 1
clip-on guard.
1. Remove the battery pack.
2. Properly install the Type 27 guard according to the
instructions, and adjust it properly to provide the
operator with maximum protection while operating.
3. To install the Type 1 clip-on guard, slide the Type 1
clip-on guard over the Type 27 guard until it clips
into place.
4. To remove, remove the battery pack and then
separate the Type 1 clip-on guard from the Type
27 guard.
WARNING
To reduce the risk of injury, always
use a side handle when using this
tool. Hold securely.
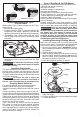
Installing Side Handle
The side handle may be installed on either side of
the gear case. Position the side handle in the loca-
tion which oers best control and guard protection.
To install, thread side handle into side handle socket
and tighten securely.
WARNING
To reduce the risk of injury, the
operator should be instructed in
the use, care and protection of grinding wheels.
Grinding Wheel Selection
Use grinding wheels, and accessories that are:
• correct size as written on tool’s nameplate.
• rated at or above the RPM listed on the tool’s name-
plate.
• correct accessory, wheel type and grit for the job.
Grinding is the cutting action of thousands of abrasive
grains on the face of a grinding wheel. When grinding
metals such as steel and iron, choose an aluminum
oxide grinding wheel. Select a silicon carbide grinding
wheel for stone and concrete. Use cotton reinforced
wheels for non-ferrous metals.
Type 1 reinforced 1/8" thick or less Cut-O Wheels
are suited for small cut-o and shallow notching
operations only. Always handle wheels carefully to
avoid damage. Before installing any wheel, always
inspect it for cracks. If wheel is cracked, discard it to
prevent others from using it.
Care of Grinding & Cut-O Wheels
Grinding/cut-o wheels should be protected from:
• wetness and extreme humidity
• any type of solvent
• extreme changes in temperature
• dropping and bumping
Grinding and cut-o wheels should be stored:
• in an organized way so wheels can be removed
without disturbing or damaging other wheels
• with their safety information
Grinding and cut-o wheels should NOT be dropped,
rolled or bumped.
Discard wheels that have been dropped, rolled,
bumped, subjected to extreme changes in tempera-
ture, or come into contact with solvents or wetness.
WARNING
Only use accessories with Maxi-
mum Safe Operating Speed rated
at least equal to the maximum speed marked on
the power tool. This speed is based on the
strength of the wheel, allowing for a reasonable
measure of safety. It is not meant to imply a best
or most ecient operating speed. Do not exceed
the Maximum Safe Operating Speed.
Installing/Removing Grinding Wheels
Make sure the wheel does not extend beyond the
bottom of the guard. Threaded hub grinding wheels
may require a deeper guard (see "Accessories").
1. Remove the battery pack. WARNING! Always
remove battery pack before changing or removing
accessories.
2. Properly position the guard.
3. Wipe the ange, ange nut and spindle to remove
dust and debris. Inspect the parts for damage. Re-
place if needed. Use only MILWAUKEE mounting
hardware designed for your tool.
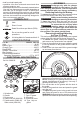
4. Place the ange on spindle, as shown.
Spindle
Flange
Wheel
Flange nut
5. Place the selected wheel on the spindle and align
it with the ange.
6. Position the ange nut over the spindle according
to wheel thickness.