
Operator’s Manual


4
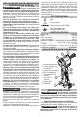
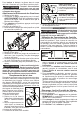
1. Remove the battery pack.
2. Remove blade screw using a
Blade
screw
Blade
Bushing
3/32" hex wrench. Save the
blade screw.
3. Carefully remove old blade,
keeping ngers away from
the cutting edge, and discard
of properly.
4. Insert new blade.
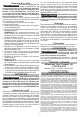
5. Position the blade according
to bushing size
Small Bushings
1-5/16″ OD
Blades are positioned
fully outward
Blades are positioned
fully inward
Large Bushings
1-3/4″ OD
Small Bushings
1-5/16″ OD
Blades are positioned
fully outward
Blades are positioned
fully inward
Large Bushings
1-3/4″ OD
Small Bushings
1-5/16" OD
Blades are positioned
fully outward
Large Bushings
1-3/4" OD
Blades are positioned
fully inward
6. Hand tighten screw securely with a 3/32" hex wrench.
OPERATION
WARNING
To reduce the risk of injury, always
wear proper eye protection marked
to comply with ANSI Z87.1.
Using the Control Switch
The control switch may be set to three positions: for-
ward, reverse and lock. Due to a lockout mechanism,
the control switch can only be adjusted when the trig-
ger is not pressed. Always allow the motor to come
to a complete stop before using the control switch.
1. For forward (clockwise) rotation, push the control
switch in the direction shown. Check the direction
of rotation before use.
2. For reverse (counterclockwise) rotation, push the
control switch in the direction shown. Check the
direction of rotation before use.
3. To lock the trigger, push the control switch to the
center position. The trigger will not work when the
control switch is in the locked (middle) position.
Always remove the battery pack before performing
maintenance or changing accessories. Always
lock the trigger or remove the battery pack before
storing the tool and any time the tool is not in use.
Starting, Stopping and Controlling Speed
These tools may be operated at any speed from 0
to full speed.
1. To start the tool, press the trigger. NOTE: An LED
is turned on when the switch is pressed.
2. To vary the speed, increase or decrease pressure
on the trigger. The further the trigger is pressed,
the greater the speed.
3. To stop the tool, release the trigger.
SPECIFICATIONS
Cat. No. ..................................................... 2935-20
Volts.............................................................. 18 DC
Battery Type .................................................M18™
Charger Type................................................M18™
Recommended Ambient
Operating Temperature ......................0°F to 125°F
RPM ................................................................0 -160
Stripping Length ..........................................1/2"- 3"
Replacement Blades .......................... 48-44-2935
ASSEMBLY
WARNING
Recharge only with the charger
specied for the battery. For spe-
cic charging instructions, read the operator’s
manual supplied with your charger and battery.
Removing/Inserting the Battery
To remove the battery, push in the release buttons
and pull the battery pack away from the tool.
WARNING
Always remove battery pack before
changing or removing accessories.
To insert the battery, slide the pack into the body
of the tool. Make sure it latches securely into place.
WARNING
Only use accessories specically
recommended for this tool. Others
may be hazardous.
Attaching and Removing Bushings
1. Remove the battery pack.
2. Choose the appropriate bushing for the job.
WARNING! For specic bushing information, read
the manual supplied by the bushing manufacturer.
3. To attach a bushing, press in bushing latch (1).
4. Insert bushing (2).
5. Rotate the bushing by hand until it locks in place (3).
1
2
3
Setting the Depth Gauge
1. Remove the battery pack.
2. Loosen depth gauge lock a half turn (counterclock-
wise). Do not remove the gauge lock.
3. Slide the depth gauge in or out to the desired
stripping length.
4. Tighten the depth gauge lock (clockwise).
WARNING
Blade is sharp. Keep hands away
from cutting edges and moving
parts. Avoid cutting short pieces of material that
put hands near blades. Lacerations can occur.
Blade Replacement
Replace the blades when they become dull, rounded,
chipped, damaged or when they no longer strip the
wire jacket. When using MILWAUKEE bushings,
follow the below instructions to replace the blades.
When using bushings from other manuafacturers,
follow the blade manufacturers' blade replacement
instructions. See Specications for replacement
blades numbers.