
Use and Care Manual


6
WARNING
To reduce the risk of injury always
secure the stand to the work sur-
face to help prevent personal injury and to protect
the stand. An unsecured stand could rotate dur-
ing coring and possibly cause injury. Never rely
on the shoring pin alone for securing.
Using the Shoring Pin
For added rigidity when using an expansion-type
anchor or vacuum system, use the shoring pin and
a brace.
1. Secure the stand using either an expansion-type
anchor or a vacuum system. WARNING! Never
rely on the shoring pin alone for securing.
2. Use the four (4) eye bolts to level the stand.
3. Use pipe or wood (e.g., 4x4 piece of lumber) to
brace stand between a sturdy structure and the
top of the stand.
4. Tighten shoring pin against the brace to increase
the stability of the stand.
Coring
WARNING
To reduce the risk of injury, always
wear proper eye protection marked
to comply with ANSI Z87.1.
When working in dusty situations, wear appro-
priate respiratory protection or use an OSHA
compliant dust extraction solution.
Follow all instructions and warnings provided
with the core drill and accessories. Only use a
core drill and accessories specically recom-
mended for this stand. Others may be hazardous.
When drilling through walls or ceilings, protect
persons and the work area on the other side. The
bit may extend through the hole or the core may
fall out on the other side.
1. Secure the stand using an expansion-type anchor
or a vacuum system.
2. Install the drill into the stand.
3. Use the four (4) eye bolts to level the stand.
4. Adjust the stand carrier up and install a bit.
5. Adjust the stand to the desired angle.
6. Ensure all adjustments are secure and the center
pointer is retracted.
7. Turn on the machine according to the drill manu-
facturer's instructions.
8. Lower the drill into the workpiece using the feed
handle and continue to drill according to drill and
accessory manufacturers' instructions.
9. When done, use the feed handle to raise the bit
clear of the hole and turn o the drill.
MAINTENANCE
WARNING
To reduce the risk of injury, always
remove the machine and all acces-
sories before performing any maintenance.
Contact a MILWAUKEE service facility for ALL
repairs.
Maintaining Stand
Start a regular maintenance program to keep your
machines in good repair. Inspect your stand for is-
sues such as undue noise, misalignment or binding
of moving parts, breakage of parts, or any other
condition that may aect the operation. Return to a
MILWAUKEE service facility for repair.
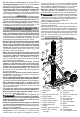
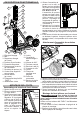
Adjusting Carrier Assembly
Over time carrier assembly may become loose and
need to be tightened.
1. Remove drill and all accessories. WARNING!
Always remove the machine and all accessories
before performing any maintenance.
2. When the carrier is loose from side to side, tighten
the two eccentric shaft/nut assemblies (A).
a. Loosen the outer nut slightly.
b. Hand-tighten the eccentric shaft with a at
screwdriver to 1 to 5 in-lb.
c. Manually tighten the outer nut to 120 to
130 in-lb.
3. When the carrier is loose from front to back, tighten
the four set pins (B). Use a 4 mm hex wrench to
tighten the pins to 2.5 to 7 in-lb.
NOTE: Over-tightening the assembly will make the
carrier dicult to move up and down.
Eccentric
Shaft
Nut
Set
Pins
A B
Lubricating Rack
Maintain a light coat of MILWAUKEE Type "P" or "J"
Grease on the rack to reduce friction and wear when
the carrier is moved up and down.
Replacing Vacuum Gaskets
Through normal use, the rubber gaskets under the
base can become worn, requiring replacement.
1. Remove drill and all accessories. WARNING!
Always remove the machine and all accessories
before performing any maintenance.
2. Tip the stand on its side.
3. Loosen the (4) eye bolts until the ends are above
the bottom of the surface of the base.
4. Pull the old gaskets from the grooves and discard.
5. Place a new gasket (Cat. No. 43-44-0019) into both
grooves and press rmly in place.
6. Place the stand upright and apply pressure to all
edges to fully seat the gasket into the stand.
Cleaning
Keep handles clean, dry and free of oil or grease.
Use only mild soap and a damp cloth to clean, since
certain cleaning agents and solvents are harmful to
plastics and other insulated parts. Some of these
include gasoline, turpentine, lacquer thinner, paint
thinner, chlorinated cleaning solvents, ammonia
and household detergents containing ammonia.
Never use ammable or combustible solvents around
machines.
Repairs
For repairs, return the stand to the nearest service
center.